
Note: When purchasing a new wishbone for a second generation vehicle, make sure the rear bearing shell is missing. The bushings in the triangular lever can be replaced, while note that for each bushing it is necessary to choose an equivalent one. There are differences depending on the year of manufacture of the model, which must be taken into account when replacing.
1. Press out the first sleeve using a tube with a diameter of 31.0 or 39.5 mm, depending on the diameter of the sleeve.
2. Press in a new bushing until the value «A» (see illustration) will not be exactly 181.3 mm for production models prior to December 1987, or 112.6 mm for production models from January 1988. This value is measured first on the old pressed bushing, and then on the new one.
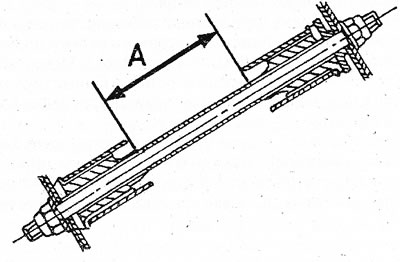
13.2 Installing the rubber bushings in the lower control arm. Value «A» must match the value specified in the text
3. Press out the second sleeve and press in a new one according to the given dimensions.
4. The second generation control arm bushing replacement is completely different because two bushings are pressed in from the front and one bushing is pressed into the back of the control arm.
5. The installation process of the rear hub is quite laborious, as it requires a certain angle in order to prestress the rubber support. If you are not sure that you can handle this work yourself, contact a car repair shop. Otherwise, do the following:
6. Cut the flange (1) (see illustration), be careful not to cut the control arm.
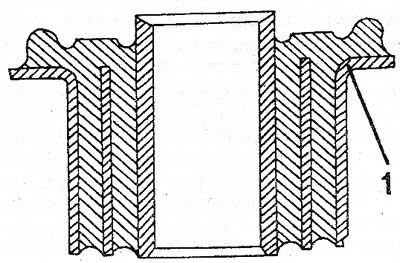
13.6 Before knocking out the front bushings, cut off the flange (1)
7. Press out both bushings with a 34 mm tube. You can use a vice.
8. Press in new bushings. To do this, use the 38 mm tube again until the flange (1) will not touch the suspension arm.
9. Press out the rear bushing with a punch. To remove the old bushing, it is necessary to press the pin out of it, i.e. fasten the bushing from below and press the pin out of the bushing.
10. Install the front hub before replacing the rear.
11. Installation of a new sleeve is made in accordance with the illustration. As you can see, the sleeve is tilted slightly back and is pressed in such a way that the desired angle of inclination can be set after pressing. In addition, the value «X» should be 393 mm. A deviation of 0.5 mm is allowed. Proceed as follows:
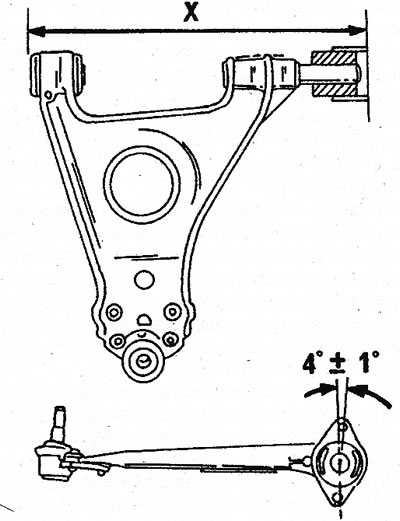
13.11 Pressing in the rear hub on second generation vehicles
12. Install the bushing in the indicated position using the transverse arm pin, look at the arm from the side and, if necessary, set the bushing at the desired angle. It is problematic to accurately measure the angle, i.e. it must be determined by sight.
13. Without turning the sleeve, place your finger under the press and press the sleeve onto it, at the same time measure the value «X» using a ruler. Use a 24 mm tube to press on the bushing. If this value is observed, the bushing will be accurately installed, however, the angle of both screw holes must also be set.