
First generation models - J11...
1. Separate removal of the telescopic pole is a laborious process as it requires special skills and special tools. For this reason, it is recommended to remove the telescopic pole together with the spring, since in this case only pullers are needed, which are more accessible (see illustration).

19.1 Tie-down devices of this design are required to replace the suspension strut spring. The cups of these pullers are placed under the spring, and the hooks cling to its coils.
2. When removing, proceed as follows:
3. Jack up the front of the vehicle and place it on axle stands. Remove the wheel from the corresponding side.
4. Place a vehicle jack under the lower control arm and jack up the control arm until the body is clear of the support.
5. Install the turnbuckle on the front spring. Use only durable fixtures. Usually we are talking about two hooks that are adjustable in the middle. Hook the hooks onto the coils of the spring and tighten the set nut in the middle until the spring is clear of the top cup and the cup can be removed by hand. Before proceeding to other work, make sure that the pullers are installed securely.
6. Turn off both nuts of the top fastening of the shock-absorber. To install a wrench for the purpose of blocking, a surface is worked out in the piston rod. Remove the top cup and cushion, having previously made alignment marks on them.
7. At the bottom of the damper, lock the hex and loosen the locknut (2) (see illustration).
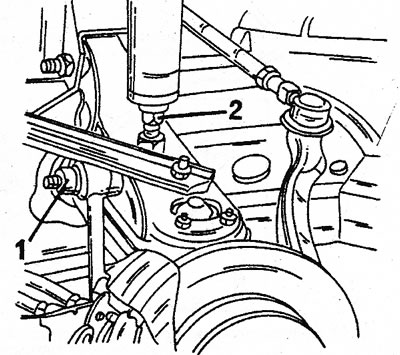
19.7 Fastening the shock absorber with pivot bolts (1) and locknut (2)
8. Slowly lower the car jack but leave it under the control arm until the pivot bolt can be loosened (1). Without knocking out bolts, disconnect draft of the stabilizer of cross-section stability.
9. Turn away the shock-absorber and remove the block in gathering. The shock absorber can now be released.
10. Telescopic stands cannot be repaired and must be replaced if damaged.
11. Before installation, clamp the new rack in a vise and pump to bring it into working condition.
12. Install the shock absorber in reverse order.
13. At installation of the top fasteners on the shock-absorber watch adjusting labels.
14. If new rubber pads are installed, mark them with the chassis number, as they varied depending on the year of manufacture of a particular model.
15. Make sure that the ends of the springs go exactly into the cups. Screw the shock absorber up to the stop and from this position turn one turn. Tighten the locknut to the specified torque.
16. Install the top fasteners on the telescoping pole (again pay attention to the correct installation method). Rubber pads and covers are not the same for all models.
17. Lower the vehicle onto its wheels and tighten the pivot bolt at the lower end of the telescopic strut (together with the anti-roll bar), then tighten both piston rod nuts at the top of the strut.
18. Rock the front of the car a few times until all suspension components are in place. Don't forget the wheel bolts.
Second generation models - J63...
19. To remove the telescopic pole on these models, unscrew the three nuts at the top and lower the pole down.
20. Jack up the front of the vehicle and place it on axle stands. Remove the wheel from the corresponding side.
21. Loosen the locknut at the bottom and remove the damper pivot bolt. Now the shock absorber is free (see illustration).
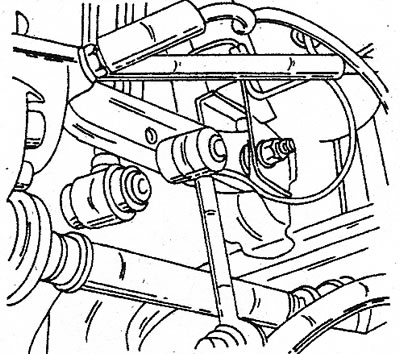
19.21 Before detaching the upper end of the telescopic strut, disconnect it from the rod and transverse arm
22. From the engine compartment, unscrew the three nuts securing the telescopic rack. At the same time, support the stand from below so that it does not fall. The telescoping stand can now be removed.
23. The spring is locked separately and cannot be released unexpectedly. If removal is difficult, either the upper or lower ball joint can be separated.
24. Install the telescopic rack in reverse order.
25. Pre-clamp the new shock absorber vertically in a vise and pump to bring it into working condition.
26. Insert the stand from below and secure the bottom end as shown in illustrations 25.21, so that the hinge bolt, linkage and wishbone can be inserted into the shock absorber eye. Tighten the nut only with your fingers. The final tightening is carried out with the vehicle on the ground. The locknut can be tightened immediately. All tightening torques are specified in specifications.