
2. Loosen the lower ball joint nut in the steering knuckle until it contacts the drive shaft housing (see illustration). Now carefully continue to tighten the nut until the ball head bolt comes out of the mount.
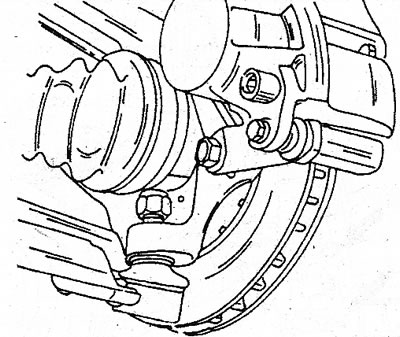
12.2 Removing the lower ball joint from the steering knuckle. Turn away a nut from the case of a semiaxis while the hinge will not be released. This will damage the nut
3. On first generation vehicles, remove the nut before loosening the control arm pivot bolts (1) (see illustration). Carefully remove the bolts (do not damage the thread). Remove the wheel control arm in the manner shown by pressing it down.
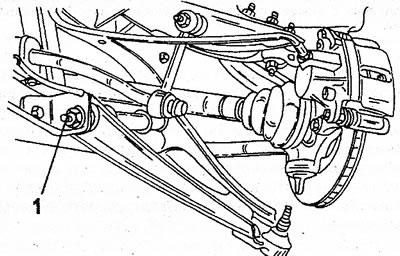
12.3 Attaching the lower control arm when a nut is used to secure the pivot bolt (1)
4. For cars of the second generation, unscrew the hinge bolt at the front and then unscrew the nuts and bolts from the back of the body. Remove the transverse suspension arm as shown in illustration 12.3.
Note: The camber adjusting washer is fitted on the rear end of the pivot bolt. It needs to be saved and installed again.
5. Install in reverse order. Lubricate the pivot bolt with graphite grease. With the method of fastening shown in illustration 12.3, the bolt is driven in from the front. On second generation vehicles, the front hinge bolt with nut and both bolts (see illustration) installed on the reverse side. Tighten all nuts and bolts with your fingers for now so they can be tightened as directed.
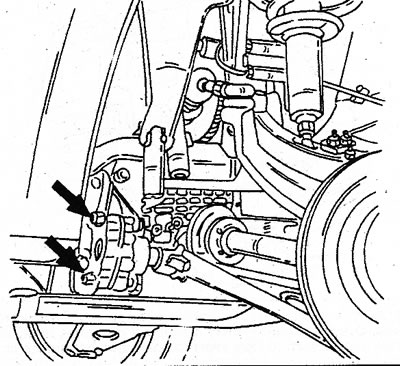
12.5 The arrows indicate the mounting of the transverse suspension arm on the underside of the car of the second generation
Attention: Differences for first generation cars. The tightening torque for the hinge bolt nut was 90 Nm until January 1988. Since January 1988, the tightening torque has increased to 130 Nm.