
Removing
SCENIC cars
1. Remove levers of brushes of a cleaner of a windscreen, the corresponding chapter see.
2. Unscrew the mounting bolts and remove the drain grate, see the relevant chapter.
3. Remove cover 1, which covers the upper suspension strut mounting support on the mudguard. To do this, pry off the cover in the places indicated by the arrows (see illustration). Under the cover are the bolts for fastening the upper support of the suspension strut.
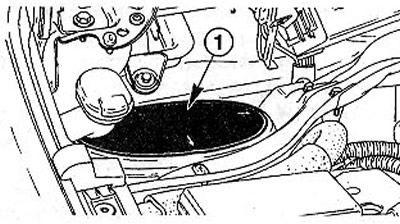
2.3 Pry cover 1 in the places indicated by arrows
4. Mark the position of the front wheels on the hubs with paint. This will allow the assembly to set the balanced wheel in its original position.
5. Loosen the wheel bolts. In this case, the car must be on the ground.
6. Stand in front of the car on the goats and remove the wheels.
7. Install an appropriate support under the transverse levers so that the axle shaft does not sag after removing the shock absorber. A trestle or a hydraulic lift can be used as a support.
8. Unscrew both nuts 1 fastening the lower part of the suspension strut to the steering knuckle and remove the bolts (see illustration).
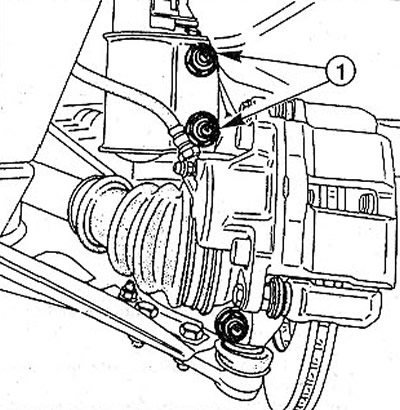
2.8 Unscrew both nuts 1 fastening the lower part of the suspension strut to the steering knuckle and remove the bolts
9. Support the shock absorber by placing a support on the transverse arm so as not to damage the axle shaft.
10. Mark the mounting position of the suspension strut upper support bolts on the mudguard by circling the mounting bolt heads at the landing sites with a felt-tip pen or marker to set the strut to its original position during assembly.
11. Unscrew two bolts 2 fastening the top support of a rack to a mudguard (see illustration).
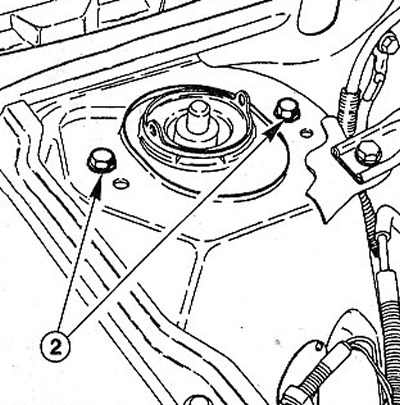
2.11 Unscrew the two bolts 2 securing the upper support of the rack to the mudguard. The suspension strut of SCENIC cars has a different appearance
Attention! Do not unscrew the nut located in the center of the suspension strut support. This nut secures the spring to the strut.
12. Remove an amortization rack.
Installation
Attention! The suspension strut must be installed as it was before removal. Position A of the pillar refers to vehicles without power steering. Position B - vehicles with power steering (see illustration 2.0).

2.0 Position A of the suspension strut applies to vehicles without power steering. Position B - vehicles with power steering
13. Fix the top support of an amortization rack on a mudguard. Tighten the mounting bolts with a force of 30 Nm.
14. Fix two bolts the lower part of an amortization rack to a rotary fist.
15. Replace the old self-locking bolt nuts with new ones and tighten them to 170 Nm.
Attention! The bolts are inserted into the holes in the direction from front to back so that the heads of the bolts face the direction of travel of the vehicle.
16. Establish forward wheels according to the marks put at removal.
17. Bolt the wheel and lower the car.
18. Tighten the bolts in a cross pattern to 90 Nm.
SCENIC cars
19. Replace the strut top mount cover on the mudguard and make sure it is tight. If necessary, fix it with a sealant, such as Sodicam.
20. Replace the gutter grate, see relevant chapter.
21. Replace the levers of the windshield wiper brushes, see the relevant chapter.