
English Русский
Български
Беларускі
Український
Српски
Hrvatski
Română
Polski
Slovenský
Magyar
Bookmark Contacts Articles Sitemap
Company vehicles Peugeot Company vehicles Opel Company vehicles Skoda Company vehicles Land Rover Company vehicles Mitsubishi Company vehicles Volkswagen Company vehicles Honda
RenaultBook.ru


Duster   Fluence   Kangoo   Laguna   Logan   Megane   Sandero   Scenic   Symbol   Clio   Other
Symbol 1 (1999-2008, petrol) Symbol 2 (2008-2013, petrol)

Removal and installation the rear suspension spring (Renault Symbol 1)

  • Main
  • Symbol
  • Symbol 1 (1999-2008, petrol)
  • Chassis, running gear
  • Car suspension
  • Removal and installation the rear suspension spring
0
If damage to one spring is detected (cracks, breakage of turns, decrease in elasticity) both springs should be replaced.

Caution: Due to the design features of the suspension, remove the springs only one at a time.


Removal procedure:
  • engage reverse gear (or set the selector lever to position "P");
  • raise the rear of the car and place safety jacks under the body;
  • remove the wheel from the desired side;
  • raise the rear trailing arm slightly with a jack to relieve the shock absorber;
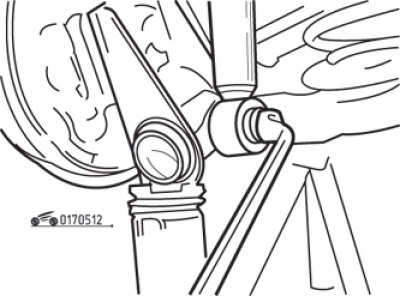
Fig. 5.12. Unscrewing the lower bolt securing the rear shock absorber

Fig. 5.12. Unscrewing the lower bolt securing the rear shock absorber

  • unscrew the lower shock absorber mounting bolt (see fig. 5.12);

Original publication on the portal www.RenaultBook.ru
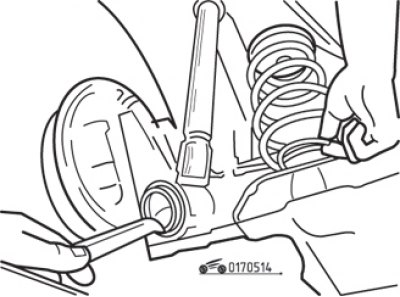
Fig. 5.14. Moving the suspension arm down and removing the spring

Fig. 5.14. Moving the suspension arm down and removing the spring


  • using a suitable lever, move the transverse lever as low as possible without damaging the brake hose (Fig. 5.14);
  • remove the spring together with the rubber pads (at both ends of the spring);
  • inspect the spring and if damaged, replace the springs on both sides of the suspension.

Installation is carried out in the reverse order of removal, and do the following:
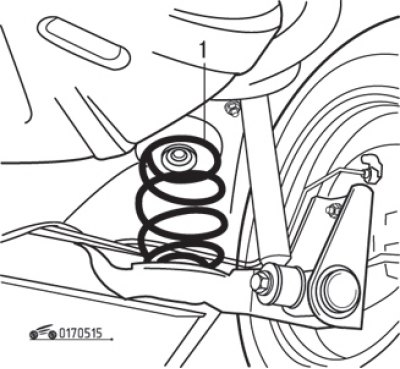
Fig. 5.15. Installing the spring: 1 - green mark

Fig. 5.15. Installing the spring: 1 - green mark

  • the green mark on the spring should be at the top and facing the rear of the car (Fig. 5.15);
  • the spring must be correctly installed in the recesses of the rubber pads;
  • tighten the shock absorber mounting bolt after lowering the vehicle onto its wheels.
This article is available on: russian, bulgarian, belarusian, ukrainian, serbian, croatian, romanian, polish, slovak, hungarian
Article has been reviewed by editor: Podkrepilov Maxim
Share with friends:
Previous
Symbol 1: Car suspension
Next

Removal and installation the rear shock absorber
Replacing the front wheel hub bearing
Removal and installation the lower arm ball joint
Replacing silent blocks of the lower arm
Removal the lower arm
Replacing the rear wheel hub bearings
Replacing the rear suspension silent blocks
Rear wheel alignment angles
Front wheel alignment angles
Checking the front wheel alignment angles
Other articles on other Renault models

➽ Rear suspension spring (4x2 drive) Renault Duster 1 (2009-2017)
➽ Removal and installation the rear suspension spring Renault Laguna 2 (2001-2007)
➽ Replacing the rear suspension spring Renault Logan 1 (2004-2012, petrol)
➽ Removal and installation the rear suspension spring Renault Megan 2 (2002-2009, petrol)
➽ Replacing the rear suspension spring Renault Sandero 1 (2007-2012, petrol)
Link to this article in different formats
Reviews and comments of visitors
No comments yet


Add two numbers 39 + 38


Symbol 2 (2008-2013, petrol) 
  • General information
  • User manual
  • Maintenance
  • Power unit
  • Engine repair
  • Cooling system
  • Fuel system
  • Exhaust system
  • Ignition system
  • Transmission
  • Clutch
  • Mechanical gearbox
  • Automatic gearbox
  • Drive shafts
  • Chassis, running gear
  • Front suspension
  • Rear suspension
  • Steering
  • Brake system
  • Body and interior
  • Exterior (external elements)
  • Interior (internal elements)
  • Doors, locks and windows
  • Heating and ventilation
  • Electrical equipment
  • Equipment and devices
  • Headlights and lighting
  • Power devices
  • Electrical circuits
Symbol 1 (1999-2008, petrol) 
  • General information
  • User manual
  • Car care
  • Maintenance
  • Power unit
  • Engine repair
  • Cooling and lubrication system
  • Supply system
  • Exhaust system
  • Ignition system
  • Transmission
  • Clutch
  • Mechanical gearbox
  • Automatic gearbox
  • Drive shafts
  • Chassis, running gear
  • Car suspension
  • Steering
  • Brake system
  • Body and interior
  • Exterior (external elements)
  • Interior (internal elements)
  • Doors, locks and windows
  • Restoration and repair
  • Electrical equipment
  • Equipment and devices
  • Headlights and lighting
  • Power devices
  • Heating and ventilation
  • Electrical circuits
RenaultBook.ru © 2018–2026 | Mobile version | News and articles | Sitemap: EN BG BY UA RS HR RO PL SK HU | Administration | Site search | Bookmark
Duster 1 (2009-2017) | Fluence 1 (2009-2020, petrol) | Kangoo 1 (1997-2007) | Laguna 2 (2001-2007) | Logan 1 (2004-2012, petrol) | Logan 2 (2012-2020) | Megane 1 (1995-2002) | Megan 2 (2002-2009, petrol) | Sandero 1 (2007-2012, petrol) | Scenic 1 (1996-2003) | Symbol 1 (1999-2008, petrol) | Symbol 2 (2008-2013, petrol) | Renault 19 (1988-1996) | Espace I and II (1984-1996) | Espace III (1996-2002) | Clio 1 (1990-1998) |
We want your visit to be comfortable 😌 and use cookies 🍪 to do so.