



Contents: Removal 🠛 Installation 🠛
Caution: Regardless of the lifting equipment used, do not use the suspension arm as a support.
Removal
Place the vehicle on a two-post lift.
Unlock the steering wheel.
Remove the front wheel and side mudguard.
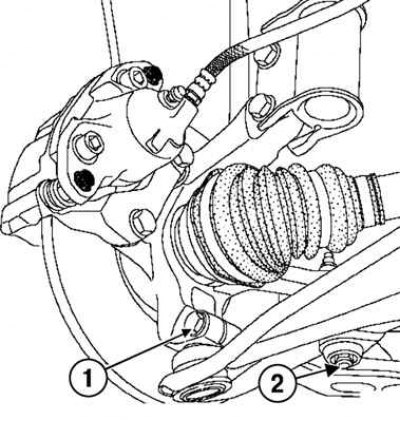
Fig. 4.34. Unscrewing the lower fasteners of the front suspension arm: 1 – suspension arm ball joint mounting bolt; 2 – ball joint pin mounting nut
Unscrew the suspension arm ball joint mounting bolt and the anti-roll bar end ball joint pin mounting nut (Fig. 4.34).
Press out the ball joint of the tie rod end using the tool (Tav. 476).
Unscrew the upper bolt securing the connecting rod between the subframe and the side member.
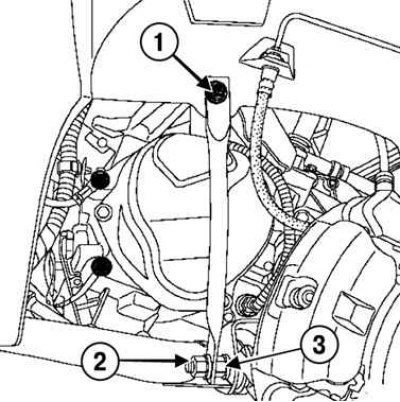
Fig. 4.35. Unscrewing the upper fasteners of the front suspension arm: 1 – upper bolt for fastening the connecting rod; 2 – subframe connecting rod fastening nut; 3 – bolts for the rear and front suspension arm mounts
Unscrew the lower nut securing the subframe connecting rod and the bolts of the rear and front suspension arm mounts (Fig. 4.35).
Remove the suspension arm.
Installation
Installation is carried out in the reverse order of removal.
Attention! Be sure to replace the suspension arm mounting bolts.
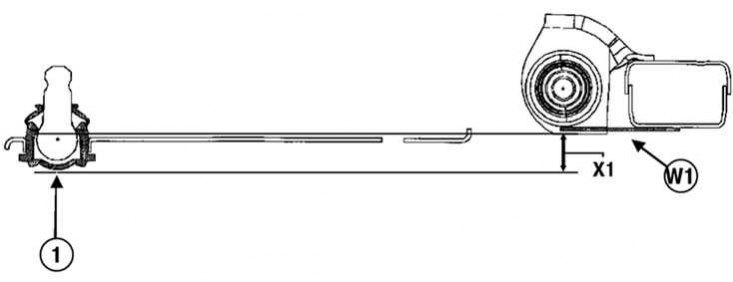
Fig. 4.36. Eliminating tension when tightening silent blocks when installing the suspension arm: 1 – Ball joint plug
Attention! When installing, to eliminate tension when tightening the silent blocks, install the suspension arm so as to obtain an interaxial distance of X1 = 24 mm between the lower part of the arm ball joint and the lower part of the subframe at the level of the hole in the center of the arm W1 (Fig. 4.36).
Place a hydraulic jack under the subframe in the area of the middle hole of the W1 suspension arm and lift it until it touches the subframe.
Lower the hydraulic jack to dimension X1 = 24 mm.
Place the control arm ball joint plug on a hydraulic jack without changing the position of the control arm.
In this position, tighten the front and rear suspension arm to subframe mounting bolts to the required torque of 105 Nm.
Remove the hydraulic jack.
Insert the control arm ball joint into the steering knuckle.
Install and tighten to specified torque:
- nut of the lower fastening of the subframe connecting rod (62 Nm);
- subframe tie rod upper mounting bolt (210 Nm);
- nuts for fastening the pins of the ball joints of the ends of the anti-roll bar (35 Nm);
- nut for fastening the ball joint pin of the suspension arm (62 Nm);
- front wheels and front wheel mounting bolts (105 Nm).
Note: Install the anti-roll bar link using the tool (Sus. 1413) and adapter (Sus. 1734).
Attention! Adjust the wheel alignment angles.