
English Русский
Български
Беларускі
Український
Српски
Hrvatski
Română
Polski
Slovenský
Magyar
Bookmark Contacts Articles Sitemap
Company vehicles Peugeot Company vehicles Opel Company vehicles Skoda Company vehicles Land Rover Company vehicles Mitsubishi Company vehicles Volkswagen Company vehicles Honda
RenaultBook.ru


Duster   Fluence   Kangoo   Laguna   Logan   Megane   Sandero   Scenic   Symbol   Clio   Other
Megane 1 (1995-2002) Megan 2 (2002-2009, petrol)

Removal and installation the rear axle assembly (Renault Megane 2)

  • Main
  • Megane
  • Megan 2 (2002-2009, petrol)
  • Chassis, running gear
  • Suspension and wheels
  • Removal and installation the rear axle assembly
0
Contents: Removal 🠛 Installation 🠛

Removal


Release the parking brake.

Place the vehicle on a two-post lift.

Caution: When performing this operation, it is necessary to secure the vehicle to the lift using a safety belt to prevent the vehicle from becoming unbalanced.


Remove the rear wheels.

Remove the brake drums.

Install a pressure device on the brake pedal to reduce the amount of brake fluid leaking out.

Remove the parking brake cables by sliding the lever using pliers and a screwdriver.
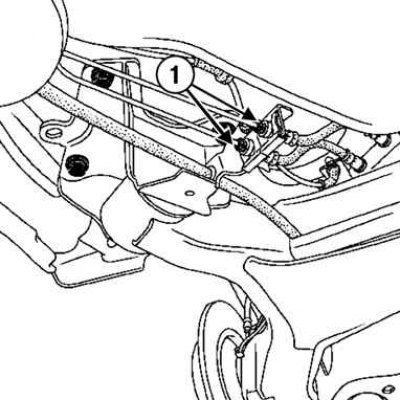
Fig. 4.43. Disconnecting the parking brake drive cables: 1 – drive cables

Fig. 4.43. Disconnecting the parking brake drive cables: 1 – drive cables


Disconnect the parking brake cables (Fig. 4.43).

Remove the wheel speed sensors.

Disconnect the wheel speed sensor wiring from the rear suspension beam.
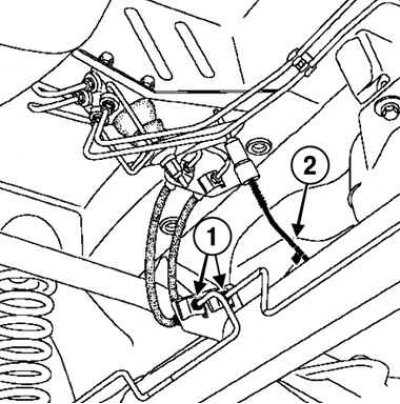
Fig. 4.44. Removing the brake force regulator rod: 1 – rigid pipeline connection nipples; 2 – brake…

Fig. 4.44. Removing the brake force regulator rod: 1 – rigid pipeline connection nipples; 2 – brake force regulator rod


Unscrew the fittings connecting the rigid pipes to the brake hoses and disconnect the brake force regulator rod from the rear suspension beam (Fig. 4.44).

Install a hydraulic jack, place chocks on it and rest the jack against the right spring cup without compressing the spring.

Mark the position of the spring.

Unscrew the lower shock absorber mounting bolt using an extended head.

Remove the hydraulic jack.
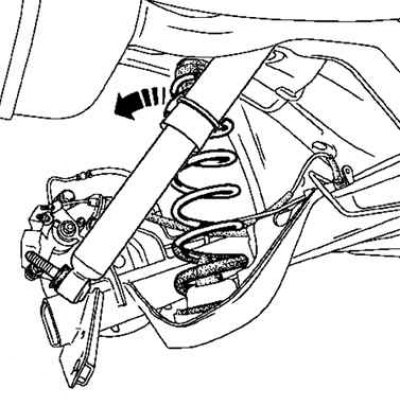
Fig. 4.45. Removing the left spring

Fig. 4.45. Removing the left spring


Remove the left spring together with the lower cup (Fig. 4.45).

Loosen the hard line fittings on the wheel cylinders.

Remove the brake shields.

Repeat the operations on the opposite side.

Caution: If the upper spring cup has become detached from the socket, replace it.


Place a hydraulic jack in the center of the rear suspension beam.
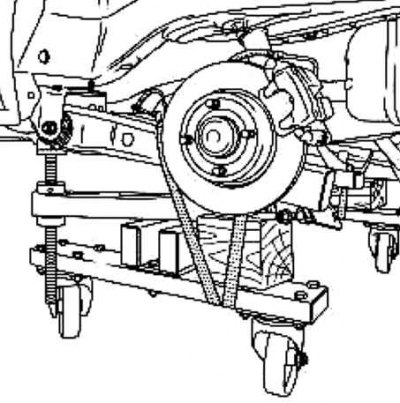
Fig. 4.46. Securing the rear suspension and hydraulic jack

Fig. 4.46. Securing the rear suspension and hydraulic jack


Attach the rear suspension to the hydraulic jack using the safety belt (Fig. 4.46).
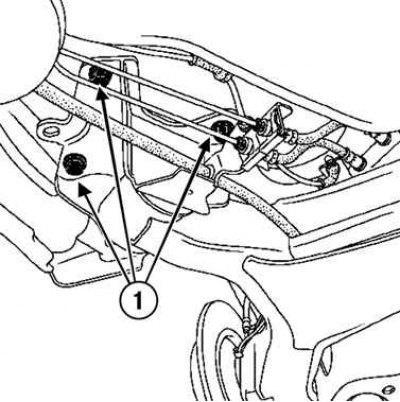
Fig. 4.47. Loosening the rear suspension bracket mounting bolts: 1 – mounting bolts

Fig. 4.47. Loosening the rear suspension bracket mounting bolts: 1 – mounting bolts


Loosen the rear suspension bracket mounting bolts (Fig. 4.47).

Lower the rear suspension beam using a hydraulic jack.

Installation
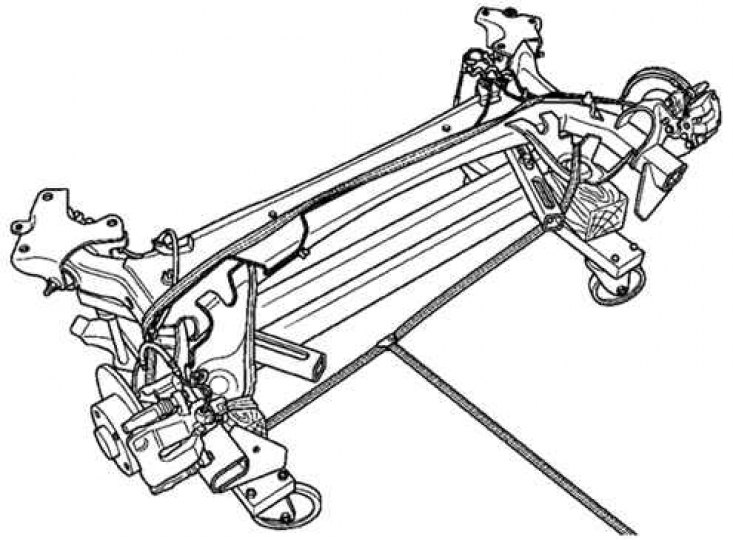


Fig. 4.48. Securing the rear suspension beam with straps

Fig. 4.48. Securing the rear suspension beam with straps


Secure the rear suspension beam to the fixture using straps (fig. 4.48 on p. 156).

Position the rear suspension beam under the vehicle.

Position the bracket mounting tabs opposite the centering holes.

Tighten the mounting bolts starting from the left bracket.
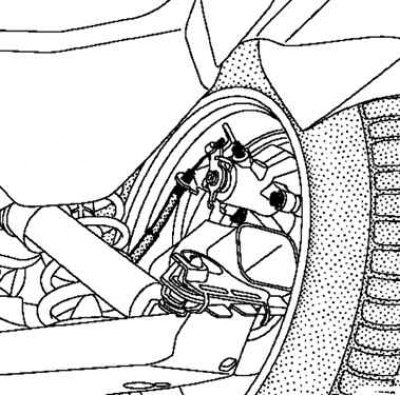
Fig. 4.49. Installing brake pipes

Fig. 4.49. Installing brake pipes


Install the brake pipes into the sockets (Fig. 4.49).

Remove the safety belt and hydraulic jack.

Install brake shields.

Tighten to the specified torque:
  • bracket mounting bolts (62 Nm);
  • brake shield mounting bolts (80 Nm);
  • rigid pipe fittings on wheel cylinders (14 Nm);
  • rigid brake line fittings on hoses (14 Nm).

(Text published on the website www.RENAULTBOOK.ru)

Install the parking brake cables.

Make sure the parking brake cable stops are properly inserted into the sockets.

Install:
  • brake drums;
  • cups on springs;
  • springs in nests;
  • install wires and wheel speed sensors.

Connect the parking brake control and drive unit wiring to the equalizer.

Place a hydraulic jack with a pad against the spring cup.

Compress the rear suspension.

Tighten the lower shock absorber mounting bolts.

Attention! The final tightening of the shock absorber mounting bolts is performed when the car is standing on its wheels.


Install the rear wheels.

Lower the lift.

Tighten to the specified torque:
  • brake drum mounting stud nuts (175 Nm);
  • lower shock absorber mounting bolts (105 Nm);
  • wheel bolts (105 Nm).

Bleed the brake system.
This article is available on: russian, bulgarian, belarusian, ukrainian, serbian, croatian, romanian, polish, slovak, hungarian
Article has been reviewed by editor: Kupriyanov Sergey
Share with friends:
Previous
Megan 2: Suspension and wheels
 

Removal and installation the rear shock absorber
Removal and installation the rear suspension spring
Removal and installation the hub bearing
Removal and installation the front suspension arm
Shock absorber noise (diagnostics)
 
Other articles on other Renault models

➽ Rear axle assembly (4x2 drive) Renault Duster 1 (2009-2017)
➽ Rear axle assembly Renault Fluence 1 (2009-2020, petrol)
➽ Tubular beam rear axle Renault Kangoo 1 (1997-2007)
➽ Removal and installation the rear wheel hub axle Renault Laguna 2 (2001-2007)
➽ Removal and installation brake pipes from the rear axle beam Renault Logan 2 (2012-2020)
Link to this article in different formats
Reviews and comments of visitors
No comments yet


Add two numbers 35 + 43


Megan 2 (2002-2009, petrol) 
  • User manual
  • Introduction to manual
  • Controls and instruments
  • Salon equipment
  • Operation and driving
  • Maintenance and care
  • Power unit
  • Engine repair
  • Fuel system
  • Injection system
  • Intake and exhaust system
  • Starting and charging system
  • Cooling system
  • Decreased toxicity
  • Transmission
  • Clutch
  • Mechanical gearbox
  • Automatic gearbox
  • Wheel drive mechanism
  • Chassis, running gear
  • Suspension and wheels
  • Steering
  • Brake system
  • Body and interior
  • Exterior (external elements)
  • Interior (internal elements)
  • Doors, locks and windows
  • Heating and air conditioning
  • Electrical equipment
  • Equipment and devices
  • Headlights and lighting
  • Electrical circuits
Megane 1 (1995-2002) 
  • General information
  • User manual
  • Maintenance
  • Power unit
  • Petrol engines 1.4/1.6 l
  • Petrol engines 2.0 l
  • Diesel engines 1.9 l
  • Overhaul of engines
  • Cooling system
  • Fuel system (petrol)
  • Fuel system (diesel)
  • Decreased toxicity
  • Charge and launch systems
  • Ignition system (petrol)
  • Preheat system (diesel)
  • Transmission
  • Clutch
  • Mechanical gearbox
  • Automatic gearbox
  • Drive shafts
  • Chassis, running gear
  • Brake system
  • Car suspension
  • Steering
  • Body and interior
  • Exterior (external elements)
  • Interior (internal elements)
  • Doors, locks and windows
  • Electrical equipment
  • Equipment and devices
  • Electrical circuits
RenaultBook.ru © 2018–2026 | Mobile version | News and articles | Sitemap: EN BG BY UA RS HR RO PL SK HU | Administration | Site search | Bookmark
Duster 1 (2009-2017) | Fluence 1 (2009-2020, petrol) | Kangoo 1 (1997-2007) | Laguna 2 (2001-2007) | Logan 1 (2004-2012, petrol) | Logan 2 (2012-2020) | Megane 1 (1995-2002) | Megan 2 (2002-2009, petrol) | Sandero 1 (2007-2012, petrol) | Scenic 1 (1996-2003) | Symbol 1 (1999-2008, petrol) | Symbol 2 (2008-2013, petrol) | Renault 19 (1988-1996) | Espace I and II (1984-1996) | Espace III (1996-2002) | Clio 1 (1990-1998) |
We want your visit to be comfortable 😌 and use cookies 🍪 to do so.