
Fuel tank
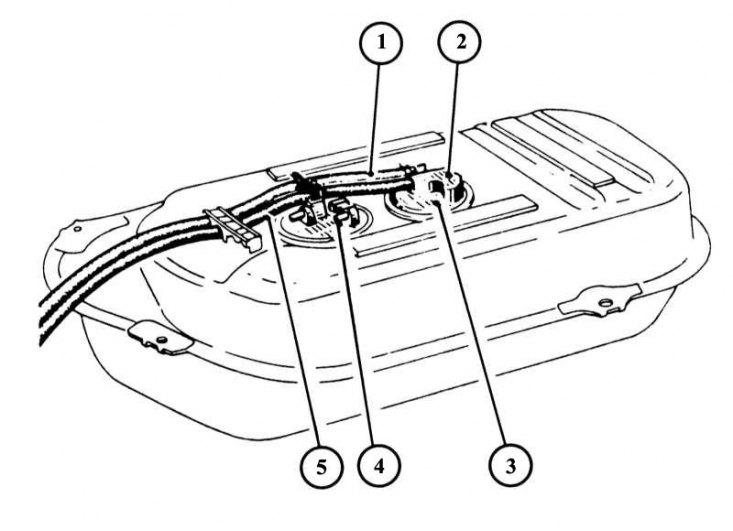
1 - fuel supply hose; 2 - plug block of the fuel pump; 3 - fuel pump; 4 - fuel level sensor; 5 - fuel return hose.
The Renault engine is supplied with fuel through a pipeline network. For this, a fuel tank is installed in the rear part under the bottom of the car. From this tank, the fuel pump delivers fuel to the engine.
Tank
The fuel tank is installed in a well-protected place - between the rear wheels behind the rear axle beam. It is made of sheet steel and has a volume of 55 liters. In the upper part of the fuel tank, in combination with pipelines, a fuel gauge is installed, which shows the amount of fuel in the tank. Tank ventilation hoses are led out into the rubber part of the filler neck.
Fuel Handling Precautions
When performing work on the repair of elements of the power system, and especially when draining fuel from the tank, you must be extremely careful. Therefore, do not take up work without examining the following precautions:
- Always disconnect the wires from the battery terminals.
- Drain fuel from the tank always only in the open air, and only with the help of a suitable pumping device. Never drain fuel through the fuel sensor opening by turning the tank upside down or sucking it out with your mouth through a hose, otherwise you can get poisoned.
- Always keep CO2 powder or a foam extinguisher near the work site.
- Never drain fuel from a tank over an inspection ditch. Poisonous gases formed during the removal of fuel are heavier than air and can remain in the inspection ditch for several hours. If you inhale these gases for a long time, you can get poisoned, in addition, they are explosive.
- Before starting work, make sure that there are no working electrical appliances, sources of open flame nearby.
- An empty fuel tank is especially dangerous due to residual gases. Therefore, carry out all work with extreme caution.
- The recommendations given here are only a small part of the safety regulations and should therefore only be considered as a starting point for fuel handling.
Fuel drain
Tank filler neck with cap
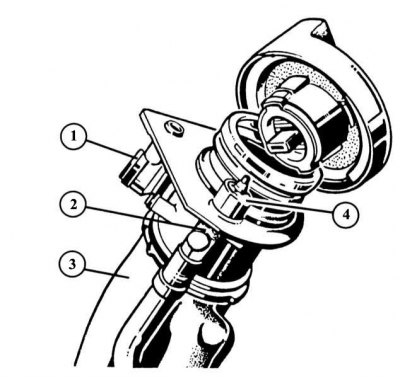
1 - safety valve; 2 - restrictive valve of the bay; 3 - filler neck; 4 - air valve operating when the tank lid is closed.
There is no drain plug in the tank. Since the fuel lines are located at the top of the tank, it is not possible to simply remove the fuel line and drain the fuel.
1. If the tank is full enough, then insert the hose into the tank through the filler neck as far as possible.
2. Pinch the top opening of the hose with your fingers. Pull the hose out a little again and lower its end into a container below the level of the bottom of the tank.
3. If the hose is sufficiently immersed in the tank, then the fuel will begin to flow into the container you have placed.
4. When the tank is nearly empty, this method cannot be used, so evacuate the fuel with a suitable tool.
5. Sucking fuel of any kind by mouth is hazardous to health!
Removing the fuel tank
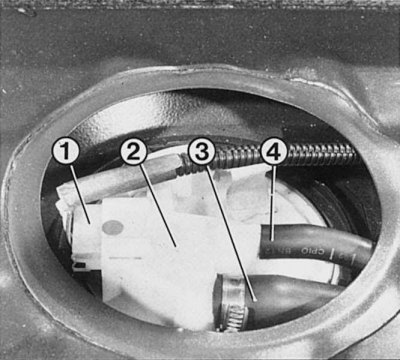
3 - ventilation hose for the filler neck of the fuel tank; 4 - air valve hose in the filler neck of the fuel tank.
After removing the trunk flooring, you can remove the fuel level sensor cover (2) from a recess in the body. When troubleshooting electrical problems, you can check whether there is a passage in the supply pipe (1) and in the sensor itself.
1. Disconnect the ground wire from the battery terminal.
2. Drain fuel.
3. Fold away a cover of a luggage carrier and remove a casing of the gauge of level of fuel.
4. Disconnect a socket of the gauge of level of fuel in a tank.
5. Mark both ventilation hoses on the fuel level sensor and disconnect them.
6. Raise the rear of the vehicle.
7. Turn off fastening of a spare wheel and remove a wheel. Then remove the spare wheel bracket from the bottom of the car.
8. Clean the bottom around the tank so as not to clog the feed system.
9. Remove collars of a jellied mouth.
10. Disconnect the filler neck from the body.
11. Support or secure the fuel tank.
12. Turn off fixing bolts of a fuel tank.
13. Slightly lower the tank and remove the safety clip and fuel lines from the fuel pump.
14. Remove the tank completely and pull it out from under the car.
15. When installing the fuel tank, make sure that all fuel lines are free and not crushed or bent.
16. After completing the work, fill the tank with fresh fuel and check all connections for tightness.