



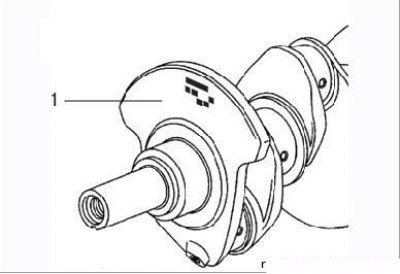
Figure 3.68. Marking the diameters of the main bearing journals on the crankshaft counterweight (1)
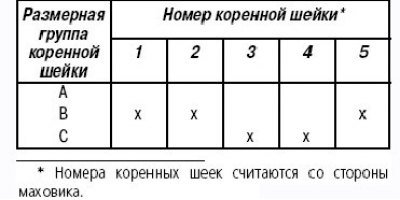
Wash the crankshaft with kerosene or another suitable solvent. Dry it with compressed air if possible. Clean the lubrication holes with wire and blow them out with compressed air. There is a marking on the counterweight on the side of the shaft nose, by which you can determine the diameters of the main bearing journals (Figure 3.68). The marking decoding is given in Table 3.5.
Table 3.5. Decoding markings on the crankshaft
Inspect the main and connecting rod journals for wear, cracks, scoring, and electrochemical corrosion. If such signs are found, have the crankshaft ground at a specialized service station.
In this case, it will be necessary to install new liners of the appropriate repair size.
Using a micrometer, measure the diameter of each bearing journal in several places. Compare the measurement results with the values given in Table 3.3. If the journal wear exceeds 0.025 mm, the crankshaft should be reground to the repair size.
If measurements taken at 90° intervals yield different diameter values, this means that the main journal is oval. If the diameters measured at different points along the main journal are not the same, this indicates that the journal is taper. As in the previous case, grinding is required, followed by installation of repair-size liners.
Check the surfaces mating with the crankshaft seals. If they are significantly scored or damaged, consult a specialist for advice on the suitability of the crankshaft for further use.
Using a V-shaped prism and a dial indicator, measure the radial runout of the crankshaft. The maximum permissible radial runout is no more than 0.05 mm. If the runout exceeds this value, consult a specialist for advice on the suitability of the crankshaft for further use.
Inspection of main and connecting rod bearing shells
Even if you plan to use new bearings, which is highly recommended, do not discard the old ones immediately after removal, as their careful inspection can provide valuable information about the condition of the engine and the causes of any malfunctions. Signs of major defects can be seen in Figure 3.69.
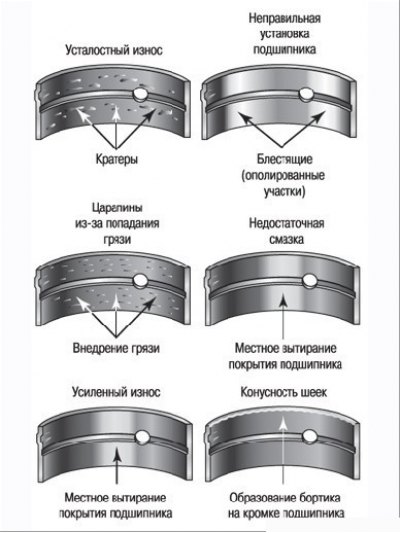
Figure 3.69. Main types of bearing shell damage
Damage caused by foreign particles entering the engine appears as longitudinal scratches on the main and connecting rod bearings. Abrasive particles sometimes remain in engine parts after reconditioning, especially if the parts have not been thoroughly cleaned using the proper methods. Often these are metal particles that have appeared after mechanical processing and as a result of engine wear during operation. They can get into the oil, and from there, after passing through filters, into the bearings. The best way to prevent such damage is to ensure that all engine parts are impeccably clean, both during assembly and during engine operation.
Change the engine oil and filter regularly as specified in the operating instructions.
Damage due to lack of lubrication looks like the bearing material has been worn through, chipped, or squeezed out of the steel base. This is caused by overheating, which causes the oil to liquefy (often the liners get a bluish tint), excessive load (which leads to the squeezing of oil from the bearing coating and, as a result, chipping and cracking). Insufficient lubrication can also be caused by excessive clearances in the oil pump or constant operation of the engine at high speed, blockage of the lubrication system channels (use of inappropriate oil, untimely replacement).
Electrochemical corrosion of bearing shells can be caused by repeated short-distance driving. In this case, the heat generated by the engine during a short drive is not enough to remove water vapor and corrosive gases. These substances accumulate in the engine oil, forming acid and sludge. As the oil flows to the engine bearings, the acid attacks the bearing material and causes corrosion.
Incorrect installation of the bearing during assembly also leads to its failure. Bearings that are installed too tightly leave insufficient working clearances, which leads to a lack of lubrication. Dirt or foreign particles that get on the back of the bearing lead to its bulging and wear. Therefore, do not touch the inner working surface of the bearings with your fingers during assembly - you can scratch the surface, which requires careful handling, or leave dirt particles on it.
As mentioned, it is recommended to replace the bearings whenever the engine is disassembled; by doing otherwise, you only get apparent savings.