
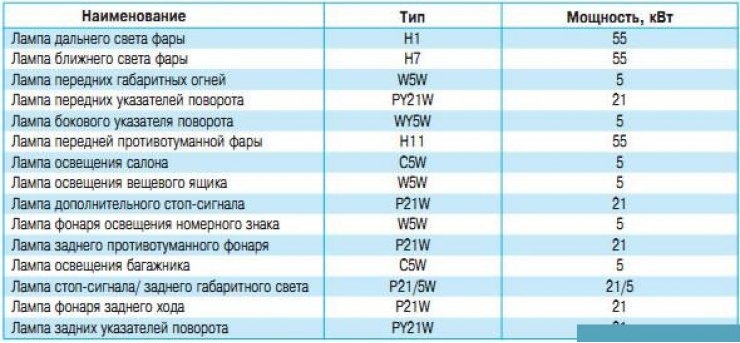
Type of one lamp: H4 60/55 W.
Be sure to use anti-ultraviolet lamps to prevent damage to the plastic headlight lenses.
Do not touch the lamp bulb. Hold her by the plinth.
Install the tabs correctly when installing.
 |  |
Due to the need to remove devices (battery, its holder), we recommend that you have the lamps replaced at a service station of the manufacturer.
In accordance with local regulations and as a precaution, obtain a replacement kit with a set of lamps and fuses from the manufacturer's service station.
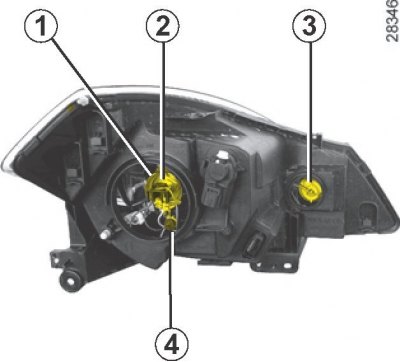
High/low beam headlights
Before removing, mark the position of the wires to lay them along the old route.
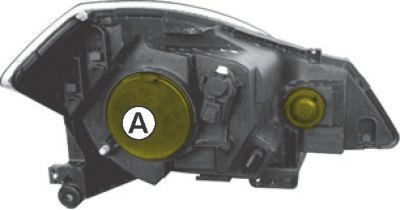
- Remove cover A;
- disconnect the lamp connector 2 and release the springs;
- remove the lamp from the block.
Installation is made in an order, the return to removal.
It is recommended to adjust the headlights after work is done.
The bulbs are pressurized inside and may explode if replaced.
This may cause injury.
When working in close proximity to the engine, be aware that it may be hot. And also remember that the cooling fan can turn on at any time.
Headlight cleaning
To clean headlights equipped with polycarbonate glass, use a soft cloth or cotton.
If dry cleaning does not work, lightly dampen a soft cloth (or cotton wool) in soapy water and wipe the dirty areas, and then wipe them again with a soft, damp cloth or cotton.
Finally, wipe gently with a dry soft cloth.
The use of detergents containing alcohol is prohibited.
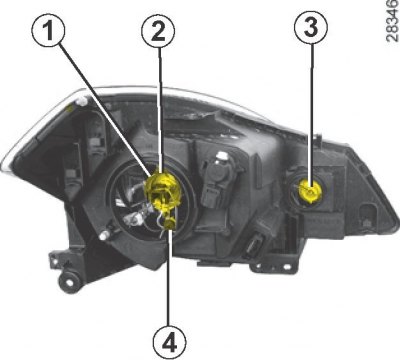 | 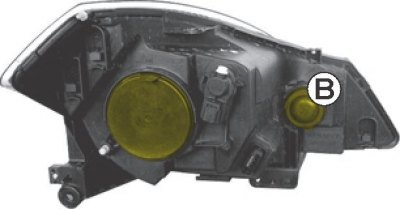 |
Front position light
Remove socket 4 to remove the bulb.
Lamp type: W5W.
Turn indicator
Remove cover B.
Turn bulb holder 3 a quarter of a turn. After replacing the lamp, make sure that cover B is correctly installed.
Lamp type: PY21W.
When working in close proximity to the engine, be aware that it may be hot. And also remember that the cooling fan can turn on at any time
There is a risk of injury.
Additional lights
If you want to install additional fog lamps or projector lamps on your car, contact the manufacturer's service station.
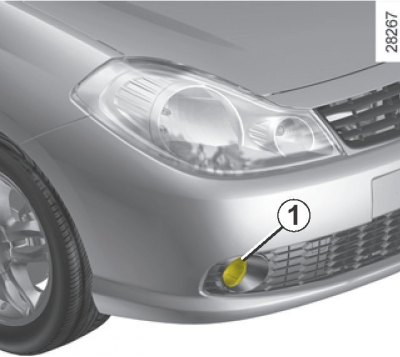
Fog lights 1
Lamp replacement:
- To gain access to the bulb holder, rotate the sunroof holder located at the bottom of the car a quarter of a turn;
- Turn the bulb a quarter of a turn and remove it;
- replace the lamp.
Lamp type: H11 55W.
Installation is made in an order, the return to removal.
Before inspecting the engine compartment, make sure the wiper switch is in the «turned off».
There is a risk of injury.
Lamps are under pressure and may explode when replaced.
All maintenance work or modifications to the electrical equipment of your car must be carried out by specialists of the manufacturer's service station, as incorrect connection of the electrical equipment can lead to its failure (wiring harnesses, devices, in particular, a generator), in addition, the service station has all the necessary devices for installing this equipment on your car.
 |  |

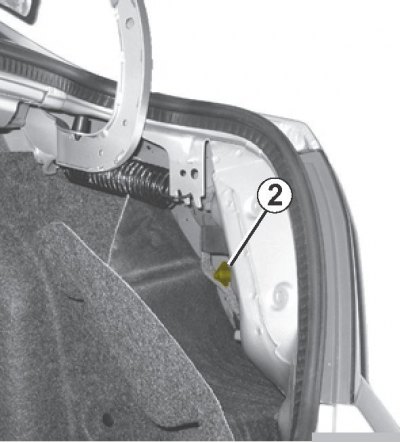
Detach the trim in zone 1.
Turn out the screw 2 and from the outside remove the block of back lanterns.
Disconnect the lamp sockets by retracting the tab 3.
The bulbs are pressurized inside and may explode if replaced.
4 Clearance lamp and brake lamp
Pear-shaped lamp with bayonet base and two filaments Р21/5 W
5 Direction indicators
Orange, pear-shaped lamp with bayonet socket and two filaments PY 21 W
6 Fog lamp
Pear-shaped lamp with bayonet base: P 21W.
7 Reversing lamp
Pear-shaped lamp with bayonet base: P 21W.
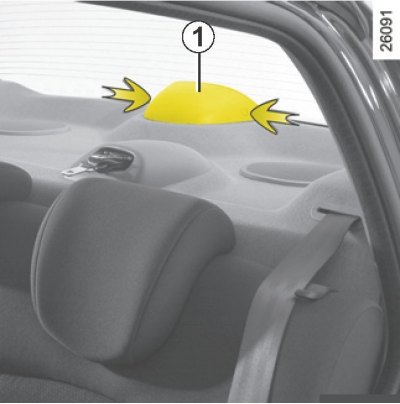 |  |
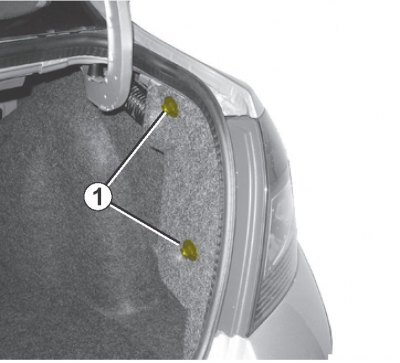
Third brake light 1
Remove the shield by simultaneously pressing on both sides of the locking plates (arrows).
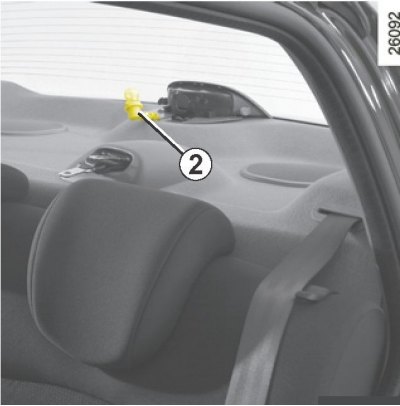
Disconnect the connector.
Turn socket 2 a quarter of a turn, disconnect it and remove the bulb.
Replace lamp.
Connect the connector.
Lamp type: P 21 W.
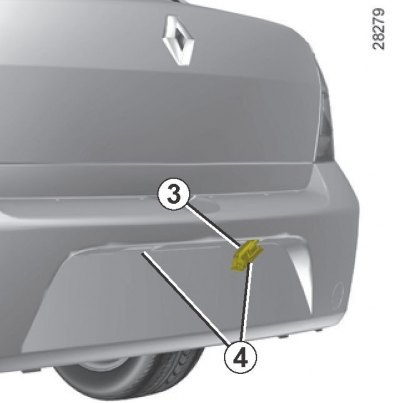
License plate lights 4
Remove them with a tool such as a flathead screwdriver.
To access the lamp, disconnect the diffuser 3 of the socket.
Lamp type: RN 5 W.
The bulbs are pressurized inside and may explode if replaced.
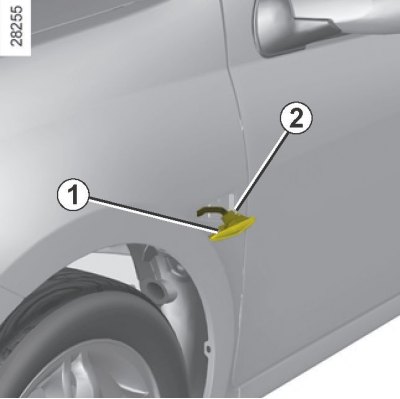
Disconnect the side turn signal repeater 1 using a flat head screwdriver.
Turn socket 2 a quarter of a turn and remove the bulb.
Lamp type: W5W.
The bulbs are pressurized inside and may explode if replaced.
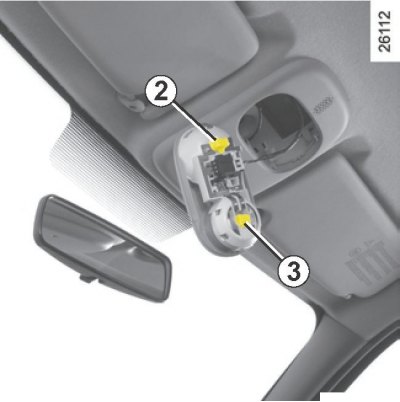 | 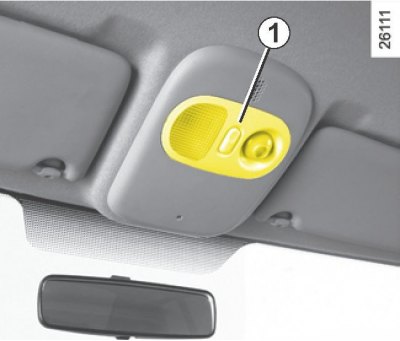 |
Plafond
Using a tool such as a flathead screwdriver, pry off cover 1.
Turn chuck 3 or 2 a quarter of a turn.
Lamp type: W5W or, in a conventional shade: cylindrical with 7W end caps.
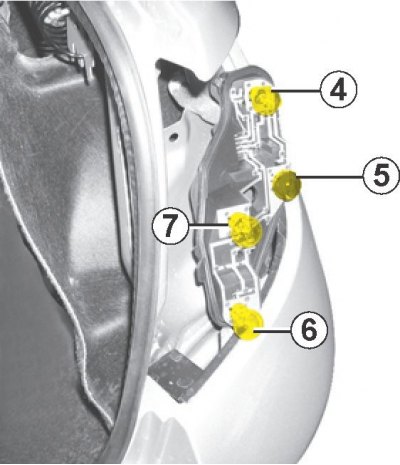
Luggage compartment lighting
Remove the cover 4 with a tool such as a flat screwdriver by pressing the tabs located on both sides of the cover.
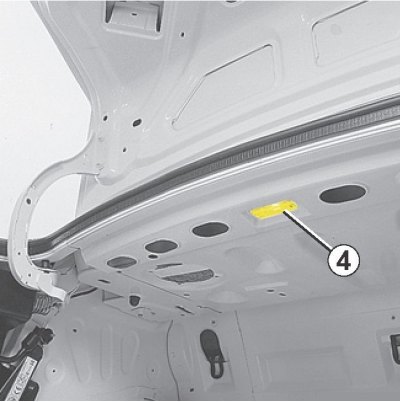
The bulbs are pressurized inside and may explode if replaced.
Disconnect the lampshade.
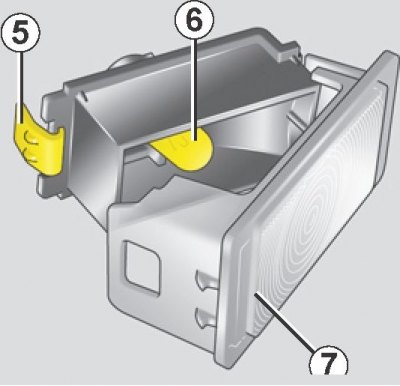
Press the latch 5 to detach the diffuser 7 and gain access to the lamp 6.
Lamp type: W5W.