
English Русский
Български
Беларускі
Український
Српски
Hrvatski
Română
Polski
Slovenský
Magyar
Bookmark Contacts Articles Sitemap
Company vehicles Peugeot Company vehicles Opel Company vehicles Skoda Company vehicles Land Rover Company vehicles Mitsubishi Company vehicles Volkswagen Company vehicles Honda
RenaultBook.ru


Duster   Fluence   Kangoo   Laguna   Logan   Megane   Sandero   Scenic   Symbol   Clio   Other
Symbol 1 (1999-2008, petrol) Symbol 2 (2008-2013, petrol)

Changing a wheel and using a jack (Renault Symbol 2)

  • Main
  • Symbol
  • Symbol 2 (2008-2013, petrol)
  • General information
  • User manual
  • Changing a wheel and using a jack
0
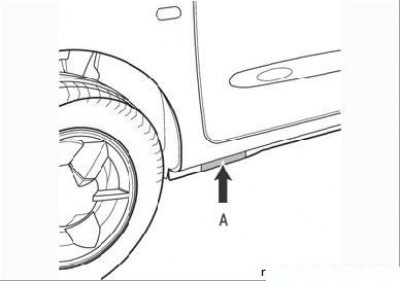
Figure 2.19. Location (A) in the front wheel area for installing a safety support

Figure 2.19. Location (A) in the front wheel area for installing a safety support


If it is necessary to replace a wheel or carry out any work in the wheel arch area (maintenance of brake devices, suspension elements, etc.), as a rule, a standard (mobile) jack is used. In case of long-term work, be sure to use safety support supports, which are installed under the reinforced places under the threshold of the body (Figure 2.19) in the area of both the front and rear wheels.

The supporting base of the car body is protected by special compounds that provide a guarantee against corrosion.

Never use equipment without rubber pads; as a last resort, install a wooden plate to completely.

avoid direct metal-to-metal contact, which could damage the factory anti-corrosion coating.

Do not lift the vehicle by placing the jack arm under the front suspension arms or under the rear suspension beam.

The original can be found on the website (renaultbook.ru)

After removing heavy knots (for example, the power unit, rear axle, fuel tank, etc.) the weight of the vehicle is significantly reduced and there is a risk of the vehicle tipping over if it is on a two-post lift. This is even more dangerous if the vehicle is raised high. Therefore, it is recommended to use a four-post lift in these cases whenever possible.
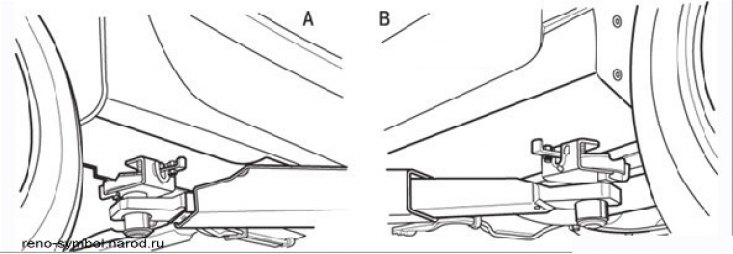


Figure 2.20. Installation of lift supports: A - in the front of the car; B - at the rear of the car

Figure 2.20. Installation of lift supports: A - in the front of the car; B - at the rear of the car


The installation locations of the lift supports are shown in Figure 2.20.

Replace the wheel in the following order:
  • disembark passengers from the car;
  • place the vehicle on solid ground. If necessary, place a reliable support under the jack base - a piece of wood, a sheet of metal, etc. If possible, stop the vehicle away from the traffic flow (roadside, platform);
  • turn on the hazard warning lights;
  • install a warning triangle;
  • set the front wheels to the straight ahead position;
  • lock the steering by removing the ignition key;
  • set the parking brake;
  • engage first gear or reverse gear. On a vehicle with an automatic transmission, set the selector lever to position "P";
  • install a wheel chock (a stone or other hard object) on the side diagonally to the wheel being replaced;
  • remove the spare tire, jack and wheel wrench from the trunk;
  • using the wrench from the tool kit, remove the decorative cap from the damaged wheel;
  • loosen the wheel bolts half a turn;
  • place the jack without tilting it under the threshold reinforcement so that its support is located on a solid surface;
  • jack up the vehicle so that the wheel being replaced is off the road surface;
  • unscrew the wheel bolts and remove the wheel;
  • clean and dry the threaded holes for the wheel mounting bolts;

Bolts must be dry and clean before installation. Do not lubricate bolts or threaded holes.


  • install the spare wheel and tighten the bolts slightly with a wheel wrench;
  • lower the car with a jack and remove the jack;
  • finally tighten the bolts crosswise to a torque of 90 Nm;
  • install the wheel cap, remove the wheel chock, jack and wheel wrench;
  • check the tire pressure with a pressure gauge and adjust it if necessary.
This article is available on: russian, bulgarian, belarusian, ukrainian, serbian, croatian, romanian, polish, slovak, hungarian
Article has been reviewed by editor: Kupriyanov Sergey
Share with friends:
Previous
Symbol 2: User manual
Next

Speed limiter
Windshield wiper — job description
Let's start the engine
Airbags and seat belt pretensioners
Seat belts
Towing a car
Audio system — description and control
Other articles on other Renault models

➽ Steering wheel, power steering Renault Duster 1 (2009-2017)
➽ Tool kit and mobile jack Renault Fluence 1 (2009-2020, petrol)
➽ Wheel replacement Renault Laguna 2 (2001-2007)
➽ Using a jack Renault Logan 1 (2004-2012, petrol)
➽ Checking the tightness of wheel bolts Renault Megane 1 (1995-2002)
Link to this article in different formats
Reviews and comments of visitors
No comments yet


Add two numbers 24 + 13


Symbol 2 (2008-2013, petrol) 
  • General information
  • User manual
  • Maintenance
  • Power unit
  • Engine repair
  • Cooling system
  • Fuel system
  • Exhaust system
  • Ignition system
  • Transmission
  • Clutch
  • Mechanical gearbox
  • Automatic gearbox
  • Drive shafts
  • Chassis, running gear
  • Front suspension
  • Rear suspension
  • Steering
  • Brake system
  • Body and interior
  • Exterior (external elements)
  • Interior (internal elements)
  • Doors, locks and windows
  • Heating and ventilation
  • Electrical equipment
  • Equipment and devices
  • Headlights and lighting
  • Power devices
  • Electrical circuits
Symbol 1 (1999-2008, petrol) 
  • General information
  • User manual
  • Car care
  • Maintenance
  • Power unit
  • Engine repair
  • Cooling and lubrication system
  • Supply system
  • Exhaust system
  • Ignition system
  • Transmission
  • Clutch
  • Mechanical gearbox
  • Automatic gearbox
  • Drive shafts
  • Chassis, running gear
  • Car suspension
  • Steering
  • Brake system
  • Body and interior
  • Exterior (external elements)
  • Interior (internal elements)
  • Doors, locks and windows
  • Restoration and repair
  • Electrical equipment
  • Equipment and devices
  • Headlights and lighting
  • Power devices
  • Heating and ventilation
  • Electrical circuits
RenaultBook.ru © 2018–2026 | Mobile version | News and articles | Sitemap: EN BG BY UA RS HR RO PL SK HU | Administration | Site search | Bookmark
Duster 1 (2009-2017) | Fluence 1 (2009-2020, petrol) | Kangoo 1 (1997-2007) | Laguna 2 (2001-2007) | Logan 1 (2004-2012, petrol) | Logan 2 (2012-2020) | Megane 1 (1995-2002) | Megan 2 (2002-2009, petrol) | Sandero 1 (2007-2012, petrol) | Scenic 1 (1996-2003) | Symbol 1 (1999-2008, petrol) | Symbol 2 (2008-2013, petrol) | Renault 19 (1988-1996) | Espace I and II (1984-1996) | Espace III (1996-2002) | Clio 1 (1990-1998) |
We want your visit to be comfortable 😌 and use cookies 🍪 to do so.