
Front direction indicators
1. Through the engine compartment, remove the turn signal spring retainer from the main headlight housing.
2. Remove the direction indicator outside.
3. Release the bayonet lock by turning it counterclockwise and remove the bulb from the frame.
4. When installing the lamp housing, make sure that the guides of the turn signal housing and the lamp housing are correctly connected.
5. After installation, check the correctness of the direction indicator.
Side direction indicators
1. Using a screwdriver, carefully pry the turn signal out of the wing cutout.
2. Release the bayonet lock by turning it counterclockwise and remove the lamp from the frame.
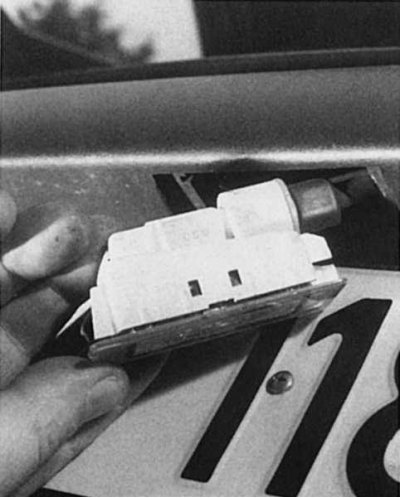
Right: All outdoor lamps can be replaced using just a screwdriver. Shown here is how to replace the side turn signal bulb. The procedure for replacing lamps is described earlier.
Left: Replacing a defective license plate light is also very easy. It is important, along with the correct installation of the pin connection, to check the correct installation of the lamp frame and lens in the lamp housing, since the license plate lamp is especially susceptible to moisture.
 |  |
Rear lights
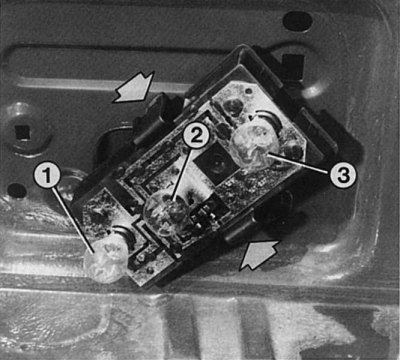
1 - reversing lamp (21 W); 2 - direction indicator (21 W); 3 - lamp of rear dimensions and brake light (5/21 W).
When removing the rear light to replace a damaged bulb, squeeze the two elastic pads (shown by arrows) and remove the lamp holder from the lamp (in the figure, the lamp holder of the left rear light). For testing, the lamp holder can be connected to the socket without a tail light. With the lamp installed, check the correct position of the pin connection. The figure shows:
1. Open the tailgate and unscrew the two screws securing the rear light housing in the trunk.
2. Remove the plastic cover.
3. Disconnect the connectors.
4. Remove the lamp housing from the outside.
5. Remove the lamp holder from the housing by squeezing the plastic tabs.
6. Disconnect the bayonet lock of the damaged lamp and remove it from the socket.
7. When replacing the double filament brake and tail lamp, make sure that the centering stop is correctly inserted into the lamp base.
8. Before installing the light housing, if necessary, clean the sealing gasket on the body cutout and apply a small amount of silicone grease to it.
9. Connect the connectors and check the operation of the lamps.
10. Before fixing the luminaire housing with screws, check that the plastic cover is correctly positioned.
Rear fog lights
1. Open the tailgate and remove the tailgate trim cover.
2. Turn the lamp holder counterclockwise and remove it from the lamp housing.
3. Disconnect the bayonet lock by turning it counterclockwise and remove the lamp from the socket.
4. When installing the lamp housing, make sure that the rails of the lamp holder and lamp housing are correctly connected to each other. Then lock the lamp holder by turning it clockwise.
Reversing light switch
The reversing lights are turned on by a switch located in the gearbox when the corresponding control rod is pressed on it when reversing is engaged.
1. If the reversing lights do not light when the reverse gear is engaged, check the fuse first.
2. If it is serviceable, remove a wire from the switch of a backing and close contacts a wire. If the reversing lights come on, the switch is faulty.
3. If the reversing lights do not light up, then the wiring is faulty (if the incandescent bulbs are good).
License plate lamp
1. Carefully remove the lamp from the bumper, gently pry with a screwdriver.
2. Squeezing out the side retaining tabs, remove the luminaire body from the diffuser.
3. Remove the soffit lamp from the spring holder.
Interior lighting
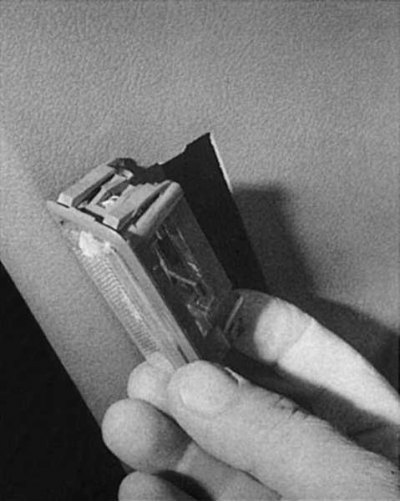
Left: Interior or glove box lamps can be removed from their holders using a small screwdriver. Soffit 10- or 5-Watt lamps are fixed with a spring clip.
Right: Use a screwdriver to pry up the cover of the combination interior light to replace the soffit bulb (7 W). To get to the contact connection, you need to remove the lamp holder from the ceiling of the car. To do this, press the spring clip on the left and right (shown by arrow) to the center.
 |  |
Soffit lamp (7 W) should light when the door is open and the switch is in the appropriate position. It constantly receives electric current directly from the battery. To remove the cover you will need a thin screwdriver or knife.
1. Carefully remove the lamp housing from the lamp housing using a thin screwdriver (loosening the spring clip) along with a diffuser and a reading light.
2. Remove the defective lamp from the spring holder.
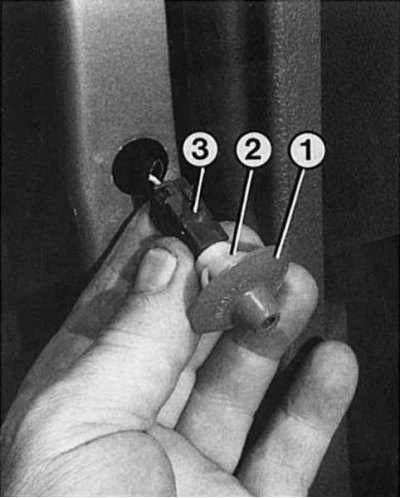
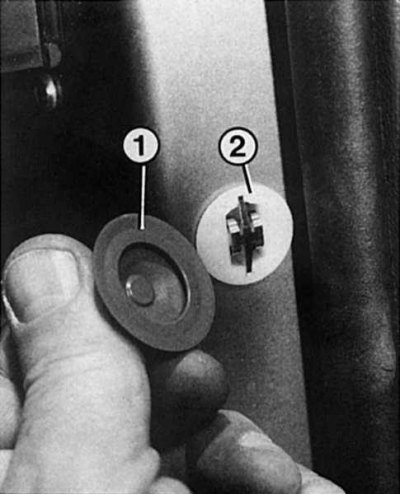
Door Light Switches
Faults in the new front door light door switches are a thing of the past. The basic prerequisite for this is a correctly installed plastic sealing collar (1) around the tip of the switch (2). An oxidized and therefore inoperative switch can be cleaned and treated with a contact spray. Check the plug connection if necessary (3).
 |  |
The interior lighting is switched on and off with the appropriate position of the contact switch in the door pillar. The front and rear door switches are slightly different in design. In case of malfunctions:
1. Front door light switch: use a small screwdriver to remove the switch from the A-pillar and disconnect the connector; the rest of the doors must be closed.
2. Connect both contacts with a piece of wire.
3. If the interior lighting works at the same time, then the cause of the malfunction is a corrosion-damaged door light switch. The switch should be replaced, neat motorists can open the switch and clean the contacts.
4. Rear door light switch: With the switch installed, remove the rubber cover and close both contacts while keeping the other doors closed.
5. If the lighting works at the same time, then the cause of the malfunction is a corrosion-damaged door light switch. This is possible with improperly dressed rubber coating.
6. Remove the door light switches from their sockets.
7. Strip all contacts.
8. If the contact connector is broken or bent, the door light switch should be replaced.
9. Both switches: when removing the plug, make sure that the wire does not get into the door post.
10. If the wire has fallen into the door pillar, remove the floor covering and, accordingly, the facing of the B-pillar in order to be able to pull the wire out.
Glove box lighting
To prevent the battery from running out, the soffit lamp only works when the dimensions or the main light are on.
1. Open the storage box.
2. Use a thin screwdriver to remove the lamp holder from the socket.
3. Take out the soffit lamp (5 W) from spring attachment.
4. When installing the lamp holder, make sure that the connector is well connected.
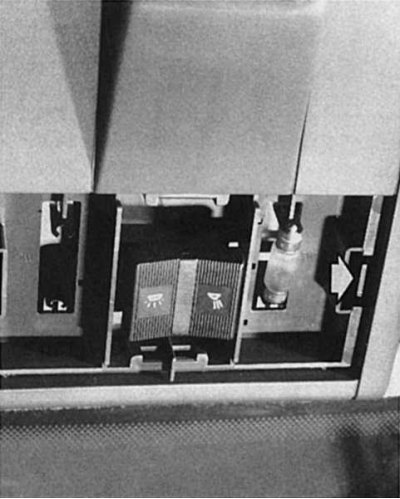
Cigarette lighter backlight
Renault 19 is equipped with a cigarette lighter, which is illuminated when the light is on from a 1.4 W incandescent bulb.
1. Remove the ashtray from the center console.
2. Carefully remove the cigarette lighter housing with lighting ring from the console. You may need to use a thin screwdriver.
3. Remove the wire end.
4. Remove the lighting ring from the socket. To do this, squeeze the two retaining tabs in the socket.
5. Replace the bulb (frame with bayonet fastening).
Heating controller lighting
1. Remove the cover under the switch (2 screws). Pull back the cover and remove.
2. Remove the heating and ventilation regulator (2 screws). Press down on the assembly and pull it out from under the instrument panel from below.
3. Turn the heating and ventilation control over. To provide space for work, disconnect the connectors if necessary.
4. Turn the lamp frame counterclockwise and take it out, then replace the incandescent lamp together with the frame.
Trunk light
The trunk light is switched on on the Renault 19 by a contact switch located next to the tailgate lock. The body of the luminaire with a 5 W soffit lamp is located on the side under the trim in the recess.
1. Carefully, using a thin screwdriver, remove the trunk light from the recess.
2. Replace the soffit lamp and check its operation.
3. If the lamp does not burn, disconnect a wire from the switch and connect it to weight.
4. If at the same time the lamp burns, the contact switch is faulty.
5. It is also possible that the switch is stuck.
6. In this case, remove the switch and firmly press and release it several times.
7. If the test fails, replace the switch.
8. It may be, however, that the wiring is faulty.