
 |  |
If the headlight has been replaced, the headlight adjustment must be checked. The most accurate setting is made with a measuring device in a car workshop. In addition, there are other, relatively accurate adjustment methods:
1. Park the machine on an equal horizontal area 5 m away from a light smooth wall. Set up the replaced headlight in the same way as the other. There is no side adjustment.
2. After fine adjustment, use a measuring instrument to mark the break points (at these points the dipped-beam beam rises approximately 15°upwards) on the wall of the garage. To do this, stop the Renault 19 at the garage door. In this way, the lateral beam direction of the headlights can also be checked.
3. Precise reference lines can be drawn on the wall before checking (screen), having at least 9 m of flat surface. The lines are shown in the figure below. This requires some preparatory work. You can stick an adhesive tape on the appropriate places on the wall and write down the measurement data on it.
Auxiliary lines for headlight adjustment
1. Place the car perpendicular to the wall at a distance of 5 m.
2. Measure the height of the center of the headlights on both sides and mark on the wall (magnitude «d»).
3. Draw a line on the wall 50mm below «A». This is the slope of the low beam at a distance of 5 m.
4. Look forward through the rear window and have an assistant draw an center vertical line exactly at the center of the vehicle «M».
5. Measure the distance from the center of the vehicle to the center of the headlight, mark the right and left of the center line «M» and apply there, respectively, one installation cross.
6. On these crosses, the break points of the low beam should be verified.
Headlight adjustment
Headlight adjustment values
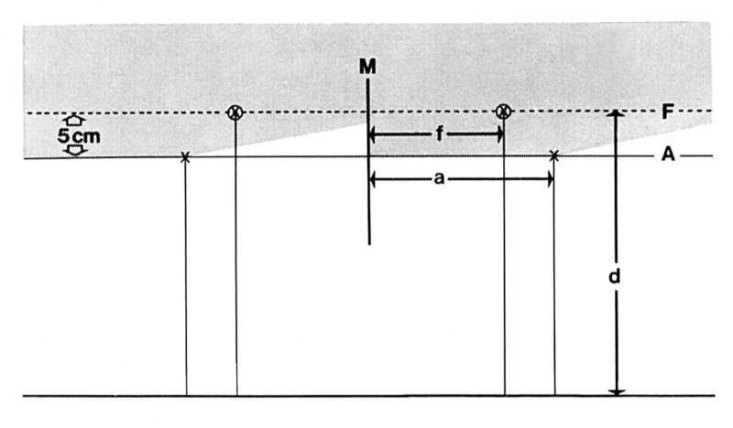
D - height of the middle of the headlight; F - installation height of the additional high-beam headlight; A - installation height of the main headlights; m - the center line of the vehicle; a is the distance between the centers of the headlights and the center line of the vehicle; f is the distance from the auxiliary driving headlamp to the center line of the vehicle.
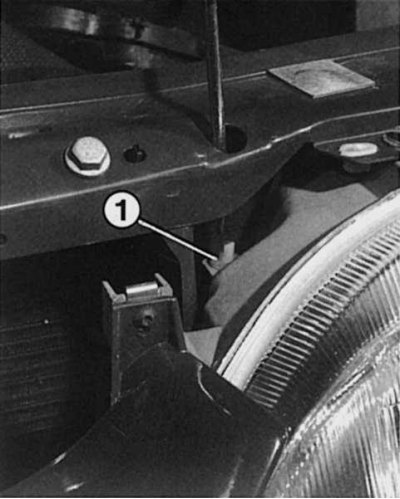
The adjusting bolts are located in the engine compartment and are easiest to turn using the SW 5 socket.
1. Prerequisite for fine adjustment is that the tank must be completely filled. Otherwise, load the luggage compartment accordingly.
2. During adjustment, have an assistant sit behind the wheel, or load the driver's seat with 75 kg of weight.
3. It is also necessary to check and, if necessary, correct the tire pressure.
4. The high beam setting control must be in position «0».
5. Before adjusting, check the position of the vehicle on the site, and then push hard on the front of the vehicle to bring the suspension to rest.
6. Turn on low beam.
7. First adjust the headlight height. The adjusting screw is located next to the direction indicator and, accordingly, the servomotor for setting the beam range. To adjust, turn the adjusting screw until the beam of the dipped beam headlights with its vertical border of the light spot coincides with the auxiliary adjustment line.
8. When adjusting sideways, turn the adjusting screw located next to the grille until the break point of the low beam headlights coincides with the adjusting cross.
9. At the same time, the high beam headlights will also be set correctly.
Additional headlight adjustment
If your Renault 19 is equipped with fog lights, then they also need to be adjusted so as not to blind drivers driving towards you.
1. Close all headlights before adjusting the fog lamp.
2. Adjust the headlight with the Phillips screw at the top left or right, respectively, so that the light spot of the headlight at a distance of 5 m from the installation wall is 100 mm below the center of the fog lamp.