
Low and high beam headlights
Attention! The halogen high beam, low beam and fog lamps are filled with gas and pressurized. Therefore, when working with them, wear safety goggles and work gloves to avoid cuts if the lamp is damaged.
2. Open the hood.
Vehicles with double headlights (a pair of headlights) release since 9/99. The dual block headlight is fundamentally different from the headlights with separate light. There are two covers on the back of the headlight that must be unscrewed.
3. Vehicles with twin headlamps manufactured before 8/99. Remove the clip on the back of the headlight and remove the cover (see arrow in illustration).
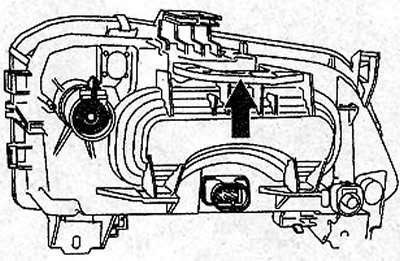
22.3 Remove the clip on the back of the headlight and remove the cover. Vehicles with twin headlamps up to 8/99
4. Replace the high or low beam bulb. To do this, remove the spring clip 2 or 5. Headlights A and B (far and near light) equipped with bulbs H1 (see illustration).
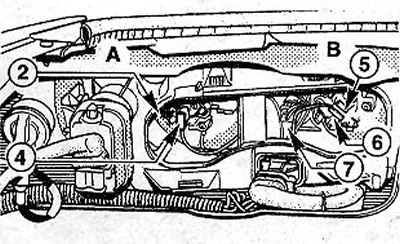
22.4 Replace high or low beam bulb
5. Disconnect the plugs 4 or 6 of the light bulb supply (see illustration 22.4).
6. Install the high or low beam bulb so that the protrusion on the bulb base fits into the groove on the cartridge. After that, return the spring clip to its original place.
7. Connect the plug.
8. Replacing parking/parking light bulbs. Remove light bulb 7, holding it by the base, from the reflector (see illustration 22.4).
9. Remove the parking light bulb from the socket (see illustration).
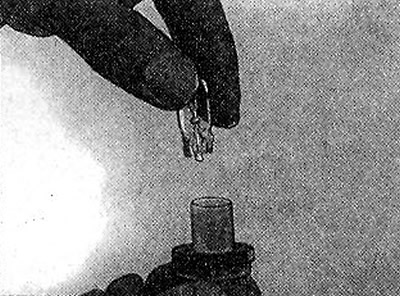
22.9 Remove parking light bulb from socket
10. Put a new bulb in the socket.
11. Insert the socket with the new bulb into the reflector and connect the plug.
12. Install the headlight cover and secure it with the clip.
13. Cars with separate headlights. Turn the cover on the back of the headlight 1/4 turn and remove it (see arrow in illustration).

22.13 Turn the cover on the back of the headlight 1/4 turn and remove it (see arrow). 1 - turn signal bulb holder
14. Replacing bulbs high and low beam. Disconnect the plug and fold up the clamp 4 (see illustration).

22.14 Disconnect the plug and fold up the clamp 4
15. Install the high or low beam bulb so that the protrusion on the bulb base fits into the groove on the cartridge. After that, return the spring clip to its original place and secure.
16. Connect the plug.
17. Replacing parking/parking light bulbs. Remove light bulb 5, holding it by the base, from the reflector (see illustration 22.14).
18. Remove the parking light bulb from the socket.
19. Put a new bulb in the cartridge.
20. Insert the socket with the new bulb into the reflector and connect the plug.
21. Replace the cover by turning it to the right.
Front turn signal
22. Disconnect the plug of the bulb holder 1 (see illustration 22.13).
23. Turn the bulb holder 1/4 turn to the left and disconnect it.
24. Press the bulb into the socket, turn to the left and remove it from the socket.
25. Insert a new light bulb into the socket, turn to the right so that it locks into place. Connect the cartridge with the plug.
Side repeaters
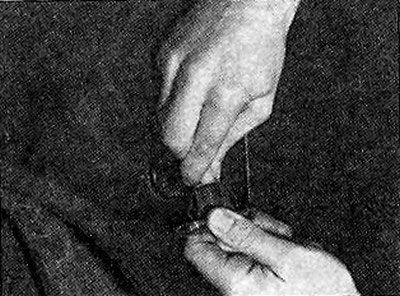
26. Pry off the repeater diffuser with a flathead screwdriver and remove it (see illustration).
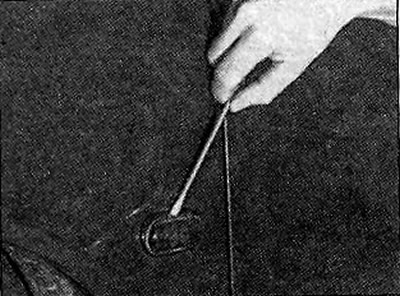
22.26 Pry off the repeater lens with a flathead screwdriver and remove it
Attention! Be careful not to damage the paintwork. It is recommended to cover the surface around the repeater with adhesive tape.
27. Turn the bulb in the diffuser socket 1/4 turn to release it and remove it (see illustration).
22.27 Turn the bulb in the socket 1/4 turn to release it and remove it
28. Install a new light bulb in the socket.
29. Fix the socket with the light bulb in the diffuser.
30. Put the repeater diffuser in place and fix it. Install the gasket first.
Fog lights
All models except SCENIC
31. Turn cover C on the back of the fog lamp 1/8 turn to the left and remove it (see illustration).
22.31 Turn cover C on the back of the fog lamp 1/8 turn to the left and remove it
A - plug
B- fastening of fog lamps
32. Disconnect plug C and fold back the clamp (see illustration 22.31).
33. Install the high or low beam bulb so that the protrusion on the lamp base fits into the groove on the cartridge.
After that, return the spring clip to its original place and secure.
34. Connect the plug.
SCENIC car fog lights
35. Remove the cover by releasing it from the latches. The cover is located at point A and is not visible in the illustration (see illustration).
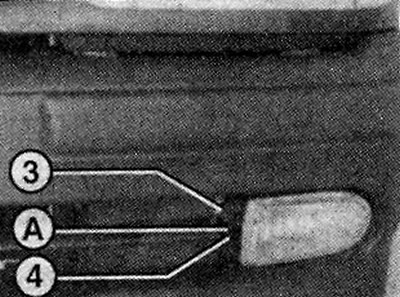
22.35 Remove cover A by releasing it from the latches
36. Unscrew bolts 3 and 4 and remove the headlight by pushing it forward (see illustration 22.35).
37. Disconnect the wire from the fog lamp.
Fog lamp bulbs are replaced in the same way as on other models. Installing the removed fog lamp is carried out in the reverse order of removal.
Side rear lights
All models except SCENIC
38. Open the trunk lid.
39. Unscrew lever 1 by turning it to the left and remove cover P (see illustration).
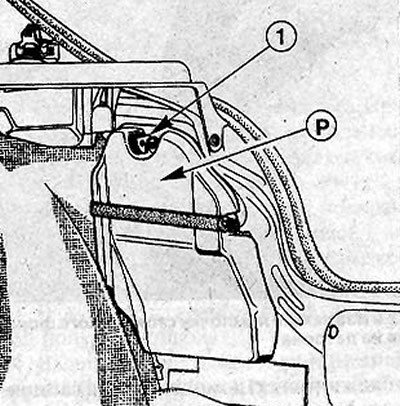
22.39 Unscrew lever 1 by turning it to the left and remove cover P
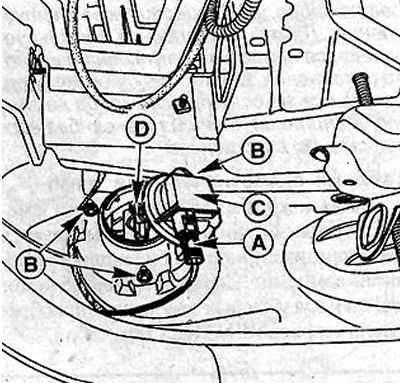
40. Remove the base plate of the bulbs by squeezing the leashes C (see illustration).
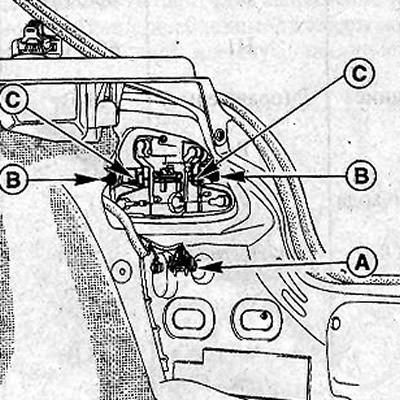
22.40 Remove the light bulb support plate by squeezing the drivers C
A - power plug
B - rear headlight mounting bolts
41. Press on the burned-out light bulb, turn it to the left in the seat and remove it.
42. Install a new light bulb and, pressing on it, turn to the right so that it locks into place.
43. Replace the base plate of the headlight bulbs, close the cover and screw on the lever.
SCENIC cars
44. Open cover 2 by turning the lock lever (see illustration).
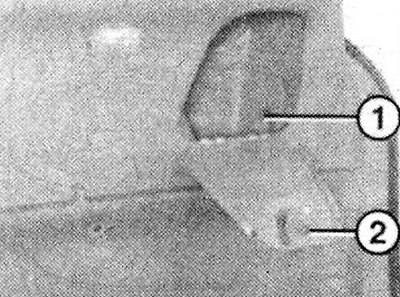
22.44 Open cover 2 by turning the locking lever
Attention! The cover is not available on all SCENIC vehicles.
45. Release cover 1 from the latches and remove it (see illustration 22.44).
46. Squeeze the leashes of the bulb base plate and pull the plate towards you a little.
47. Press on the burnt out light bulb, turn it to the left in the seat and remove (see illustration).
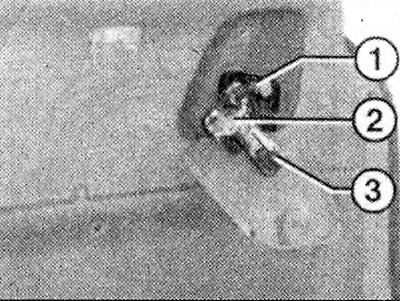
22.47 Press on the burned-out light bulb, turn it to the left in its seat and remove
1 - turn signal light
2 - reversing light bulb
3 - bulb size and brake light
Fog lights
Cars with a body «coupe» and SCENIC
48. Open the trunk lid.
49. Use a screwdriver to remove the black plastic plug A on the inside of the trunk lid (see arrows in illustration).
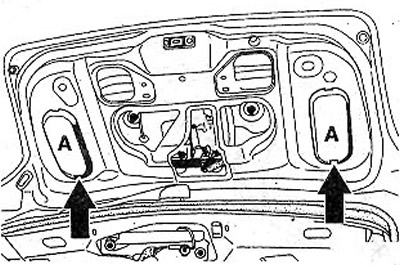
22.49 Use a screwdriver to remove the black plastic plug A on the inside of the trunk lid
50. Rotate the bulb base plate to the left and remove it,
51. Press on the light bulb, turn it to the left and remove.
52. Install a new light bulb and, pressing on it, turn to the right, fixing it in place.
53. Put the base plate of the bulbs in place and, turning to the right, fix it.
54. Replace the plastic plug.
Additional brake light
55. Open the trunk lid.
56. Squeeze the leashes B and remove the brake light bulb holder (see illustration).
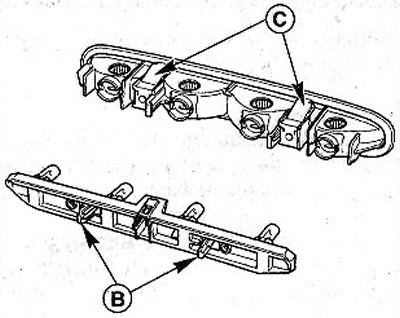
22.56 Squeeze the leashes B and remove the stop lamp holder
С - mounting protrusions of an additional brake light
57. Press on the light bulb, turn it to the left and remove.
58. Install a new bulb and, pressing on it, turn to the right, fixing it in place.
59. Replace the bulb base plate and secure it.
License plate lights, interior light, trunk light
60. Disconnect the lamp / cover, remove the diffuser and replace the spotlight bulb (see illustration). If necessary, clean the contacts of the spotlight bulb.
22.60 Disconnect the lamp/plafond, remove the diffuser and replace the soffit bulb
Reading light, glove box light
61. Remove the lamp by prying it from the side with a small screwdriver.
62. Turn bulb holder 4 1/4 turn and remove (see illustration).
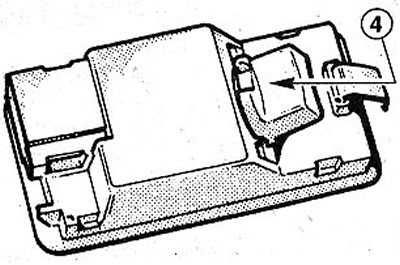
22.62 Turn bulb holder 4 1/4 turn and remove
63. Remove the light bulb and replace it with a new one.
64. Turn the bulb holder 1/4 turn, inserting it into the lamp.