
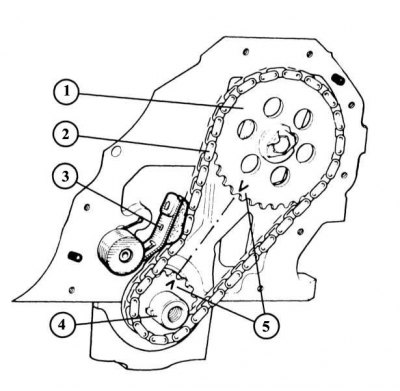
Tags (5) crankshaft sprockets (4) and camshaft (1) should look exactly at each other on the C-engine.
1 - Camshaft - gear;
2 - Camshaft drive chain;
3 - Chain tensioner.
Only for C-engine
The ringing sound of the engine idling in most cases indicates wear on the camshaft drive chain. In this case, the tensioner no longer provides the required tension to the chain stretched due to wear. To some extent, circuit noise, especially on a hot engine, is due to its design features. If the ringing sound disappears only at high speeds, then it's not just the chain. This means that both chain sprockets are also worn out. In this case, due to a violation of the valve timing, power is reduced and the exhaust gas characteristic deteriorates. The camshaft drive chain, chain sprockets, and chain tensioner must be replaced at the same time. Purchase a spur gear cover gasket kit and sealant from the parts store in advance (silicone paste CAF 4/60 THIXO).
1. Drain the oil and remove the oil pan. If the crankcase is firmly stuck, then carefully wring it out with a screwdriver, being careful not to damage the seal location.
2. Remove the V-belt.
3. Loosen the crankshaft V-belt pulley and remove it. To prevent the crankshaft from rotating, engage 4th gear and have an assistant apply the brake. Remove the gear cover. Do not damage the O-ring while doing this.
4. Turn the engine until the crankshaft chain sprocket mark and camshaft sprocket mark are exactly facing each other.
5. The workshop uses a special tool to fix the chain tensioner (Mot. 761). In the absence of a special tool, twist the tensioner and spring with wire until the chain is free from the tensioner.
6. Loosen both mounting bolts and unscrew them.
7. Remove the chain tensioner.
8. Bend the lock washer of the central bolt of the camshaft chain sprocket and unscrew the bolt.
9. Remove the camshaft sprocket along with the drive chain.
10. In no case do not turn the crankshaft and camshaft after this!
11. Remove the crankshaft chain sprocket using a standard puller. To avoid damage to the threads, screw a suitable bolt in the middle into the end of the crankshaft.
12. Remove the safety key from the crankshaft.
13. Before assembling, clean the surfaces of the unit and the covers that ensure the tightness of the motor.
14. Insert the safety key into the groove of the crankshaft.
15. Screw a suitable bolt into the end of the crankshaft and press the sprocket onto the crankshaft using a spacer (diameter 25 mm) and nuts with a large washer.
16. Put on the camshaft chain sprocket with the drive chain. In this case, the marks on the sprockets of the camshaft and crankshaft must look exactly at each other (sprocket marks must be on the same imaginary straight line drawn between the centers of the axes of the camshaft and crankshaft).
17. Screw in the camshaft chain sprocket bolt with a new lock washer and tighten to 30 Nm.
18. Bend the end of the lock washer.
19. Install the chain tensioner and remove the wire with which it was fixed.
20. Install the gear covers with a new gasket. To avoid slipping, fix the gasket in the lid with silicone paste.
21. Tighten the bolts evenly so as not to damage the gasket.
22. Clean the surfaces of the oil pan and engine element; degrease them with a solvent.
23. Apply to bearings (flywheel side) a layer of sealant 3 mm thick on the surface of the oil pan in contact with the engine. In this case, the sealant must not get into the holes for the bolts. Apply a little more sealant to the 4 corners of the oil pan near the main bearings.
24. In the main bearing - where the sealant was not applied - install a new rubber gasket.
25. If necessary, screw 4 suitable sawn-off bolts as centering pins into the motor housing.
26. Install the oil pan and secure with bolts with a force of 8-10 Nm.
27. Then replace the centering pins with bolts and tighten them to 8-10 Nm.
28. Put on the crankshaft pulley with a groove and tighten the bolts (bolts 40 mm long with a force of 80 Nm; screw 45 mm long with a force of 110 Nm).
29. Put on the V-belt and tension it, see chapter Cooling system.
30. Fill the engine with oil and check for oil leaks after a test drive.
Note. Recommendation: when installing the oil pan on the sealant layer or on the surface of the engine housing in contact with the oil pan, in no case should oil droplets get in, otherwise the tightness will be broken.