



Cars produced before 8/99, except SCENIC
Removal
1. Remove the turn signal lamp.
2. Remove the radiator grille.
3. Disconnect all connectors from the back of the headlight.
4. Mark the position of the headlight on both mounting brackets K by tracing the bolt head locations with a marker or felt-tip pen and unscrew them. This will allow you to return the headlights to their previous position (see illustration).
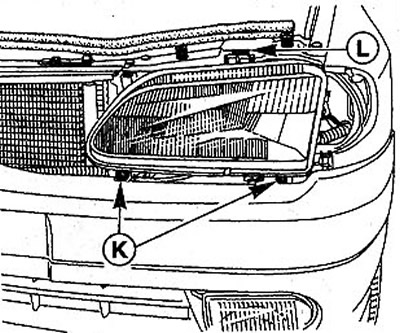
25.4 Mark the position of the headlight on both mounting brackets K by tracing the bolt head locations with a marker or felt-tip pen
5. Unscrew the upper bolt L and remove the headlight (see illustration 25.4). Be careful not to lose the metal clips on the headlight.
Installation
In order to properly fit the headlight during installation, it is recommended to assemble the headlight and turn signal lamp before installation.
6. Install the headlight in place, following the marks made before unscrewing the mounting bolts K (see illustration 25.4) and screw in the K bolts.
7. Screw in the bolts (see illustration 25.4).
8. Connect the power plugs and install the cover on the back of the headlight.
9. Connect the plug to the headlight range control motor.
10. Put the radiator grille back in place.
11. Contact a workshop to check the optical axis of the headlights.
Cars produced since 9/99, except SCENIC
The direction indicator and headlight on cars of this production period are combined into one unit.
Removal
12. Disconnect the headlight power wire.
13. Remove the front bumper.
14. Unscrew the three headlight mounting bolts (see arrows in the illustration).
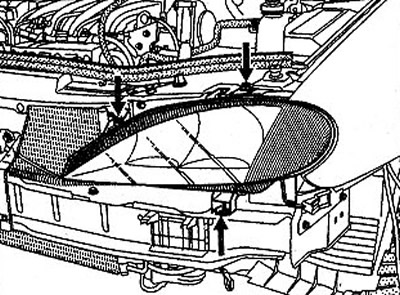
25.14 Unscrew the three headlight mounting bolts (see arrows)
15. Move the headlight forward and remove it.
Attention! The headlight lenses of cars produced since 9/99 are made of transparent plastic, so the lenses should only be washed with soapy water and a cotton cloth. The use of alcohol-based cleaning agents is not allowed.
Installation
16. Place the headlight back in place and secure with three bolts.
17. Put the front bumper back in place.
18. Connect the headlight power wire.
19. Contact a workshop to check the angle of the optical axis of the headlights.
[Original publication on the website: RenaultBook]