
English Русский
Български
Беларускі
Український
Српски
Hrvatski
Română
Polski
Slovenský
Magyar
Bookmark Contacts Articles Sitemap
Company vehicles Peugeot Company vehicles Opel Company vehicles Skoda Company vehicles Land Rover Company vehicles Mitsubishi Company vehicles Volkswagen Company vehicles Honda
RenaultBook.ru


Duster   Fluence   Kangoo   Laguna   Logan   Megane   Sandero   Scenic   Symbol   Clio   Other
Renault 19 (1988-1996) Espace I and II (1984-1996) Espace III (1996-2002)

Cylinder head repair (Renault Espace III)

  • Main
  • Renault
  • Espace III (1996-2002)
  • Power unit
  • Petrol engines Z7X
  • Cylinder head repair
0
Contents: Disassembly 🠛 Assembly 🠛
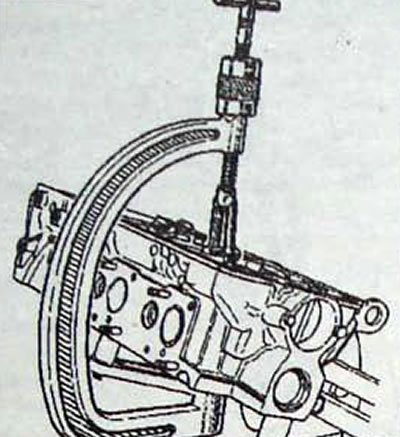
Fig. 2.28. Using the valve spring compressor
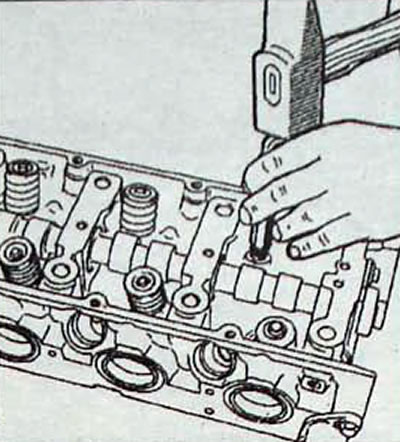
Fig. 2.28. Using the valve spring compressor


Fig. 2.29. Using a special device to install the oil deflector cap
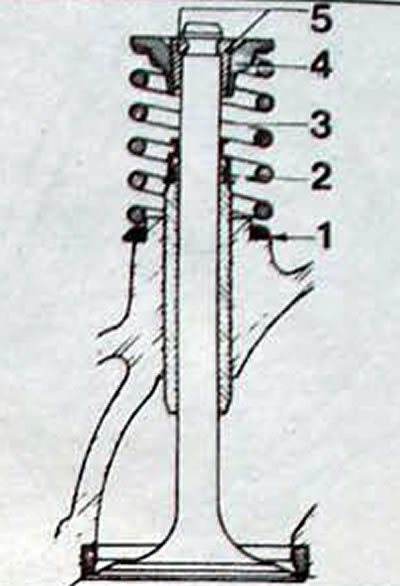
Fig. 2.29. Using a special device to install the oil deflector cap


Fig. 2.30. Details of the valve installed in the cylinder head: 1 - spring seat; 2 - oil deflector…

Fig. 2.30. Details of the valve installed in the cylinder head: 1 - spring seat; 2 - oil deflector cap; 3 - spring; 4 - upper spring plate; 5 - crackers


Disassembly


  • Remove the camshaft thrust bearing mounting bolt.
  • Loosen the bolt, remove the longitudinal movement lock and release the camshaft.
  • Using a valve spring compressor, compress the first valve spring and remove the keepers.
  • Gently loosen the spring compressor and remove it.
  • Remove the spring plate, spring and spring seat and arrange the parts in the order they were removed.
  • Remove the springs from the remaining valves in the same manner.
  • Remove the oil seals and valves.
  • Check the valve guides for wear. Insert the valve into the guide. The valve should move easily in the guide, without any lateral play. Special tools are required to replace worn guides with new ones.
  • Check the valve heads and valve seats for chipping and burning. Light chipping on the valve and seat can be removed by lapping, first with coarse and then with fine grinding paste.
  • If there are deep traces of chipping, the valves must be ground on a valve grinding machine, and the seats - on a valve seat milling machine. For the last two types of work, you must contact specialists.
  • After any treatment, clean the cylinder head.
  • Neutralization of sodium contained in exhaust valves
  • Before disposing of the exhaust valves, the sodium contained in them must be neutralized.
  • Valves should be sawed in a dry room without any contact with water (do not use wet abrasive sharpening tools).
  • Wear safety glasses.
  • Saw the valve stems where they expand.
  • Prepare a container filled with water and place it outside (approximately 10 liters of water for four valves).
  • Immediately after sawing, immerse the sawn valves in water, avoiding splashing.
  • Sodium reacts with water to form caustic soda with the release of hydrogen. The complete destruction of sodium is indicated by the cessation of hydrogen release (in the form of bubbles).
  • Keep the container away from fire until the reaction is complete (no smoking).
  • Valves treated in this way can be thrown away. Before removing them from the container, put on waterproof gloves.
  • Rinse the container with plenty of water.
  • If the solution comes into contact with your skin or eyes, rinse immediately with plenty of water and consult a doctor


Assembly


  • Lubricate the first valve stem with engine oil and insert it into the guide. Install the valve stem seal.
  • Install the spring seat, spring and spring plate
  • Compress the valve spring with a spring compressor and insert the crackers into the top of the valve stem
  • Slowly remove the spring compressor and check that the crackers are in place.
  • Install the remaining valves into the cylinder head in the same manner.
  • Once all the valves are in place, lightly tap the top of the valve springs with a plastic hammer to ensure the keepers are seated.
  • Install the camshaft and camshaft retainer, but do not tighten the camshaft retaining bolt
This article is available on: russian, bulgarian, belarusian, ukrainian, serbian, croatian, romanian, polish, slovak, hungarian
Article has been reviewed by editor: Trofimova Anastasia
Share with friends:
Previous
Espace III: Petrol engines Z7X
Next

Rear cylinder head
Front cylinder head
Replacing the camshaft drive chains
Exhaust manifold rear cylinder head
Front cylinder head exhaust manifold
Generator drive belt
Water Pump/A/C Compressor Drive Belt
Auxiliary Drive Belt Tension
Throttle assembly
Fuel distribution line
Other articles on other Renault models

➽ Disassembly, repair and assembly of the cylinder head Renault Logan 1 (2004-2012, petrol)
➽ Disassembly, repair and assembly of the cylinder head Renault Sandero 1 (2007-2012, petrol)
➽ Disassembly, repair and assembly of the cylinder head Renault Symbol 1 (1999-2008, petrol)
➽ Cylinder head cover Renault Duster 1 (2009-2017)
➽ Cylinder head gasket for K4M engine Renault Fluence 1 (2009-2020, petrol)
Link to this article in different formats
Reviews and comments of visitors
No comments yet


Add two numbers 14 + 14


Renault 19 (1988-1996) 
  • General information
  • Maintenance
  • Power unit
  • Engine repair
  • Exhaust system
  • Cooling system
  • Supply system
  • Single-point injection
  • Multi-point injection
  • Diesel injection system
  • Transmission
  • Clutch
  • Car gearbox
  • Chassis, running gear
  • Car suspension
  • Steering
  • Brake system
  • Wheels and tires
  • Body and interior
  • Exterior (external elements)
  • Interior (internal elements)
  • Heating and ventilation
  • Electrical equipment
  • Equipment and devices
  • Headlights and lighting
  • Ignition system
  • Power devices
  • Electrical circuits
Espace I and II (1984-1996) 
  • General information
  • Introduction to the guide
  • Troubleshooting
  • Power unit
  • Engine repair
  • Cooling system
  • Carburetor fuel system
  • Injection fuel system
  • Diesel fuel system
  • Ignition system
  • Transmission
  • Clutch
  • Car gearbox
  • Drive shafts
  • Chassis, running gear
  • Brake system
  • Steering
  • Front suspension
  • Rear suspension
  • Body and interior
  • Exterior (external elements)
  • Interior (internal elements)
  • Doors, locks and windows
  • Electrical equipment
  • Equipment and devices
  • Electrical circuits
Espace III (1996-2002) 
  • General information
  • Introduction to the manual
  • User manual
  • Power unit
  • Petrol engines F3R
  • Petrol engines Z7X
  • Diesel engines G8T
  • Diesel engines G9T
  • Transmission
  • Clutch
  • Mechanical gearbox
  • Automatic gearbox
  • Drive shafts
  • Chassis, running gear
  • Steering
  • Front suspension
  • Rear suspension
  • Brake system
  • Body and interior
  • Exterior (external elements)
  • Interior (internal elements)
  • Doors, locks and windows
  • Heating and ventilation
  • Electrical equipment
  • Equipment and instruments
  • Power devices
  • Electrical circuits
RenaultBook.ru © 2018–2026 | Mobile version | News and articles | Sitemap: EN BG BY UA RS HR RO PL SK HU | Administration | Site search | Bookmark
Duster 1 (2009-2017) | Fluence 1 (2009-2020, petrol) | Kangoo 1 (1997-2007) | Laguna 2 (2001-2007) | Logan 1 (2004-2012, petrol) | Logan 2 (2012-2020) | Megane 1 (1995-2002) | Megan 2 (2002-2009, petrol) | Sandero 1 (2007-2012, petrol) | Scenic 1 (1996-2003) | Symbol 1 (1999-2008, petrol) | Symbol 2 (2008-2013, petrol) | Renault 19 (1988-1996) | Espace I and II (1984-1996) | Espace III (1996-2002) | Clio 1 (1990-1998) |
We want your visit to be comfortable 😌 and use cookies 🍪 to do so.