
English Русский
Български
Беларускі
Український
Српски
Hrvatski
Română
Polski
Slovenský
Magyar
Bookmark Contacts Articles Sitemap
Company vehicles Peugeot Company vehicles Opel Company vehicles Skoda Company vehicles Land Rover Company vehicles Mitsubishi Company vehicles Volkswagen Company vehicles Honda
RenaultBook.ru


Duster   Fluence   Kangoo   Laguna   Logan   Megane   Sandero   Scenic   Symbol   Clio   Other
Renault 19 (1988-1996) Espace I and II (1984-1996) Espace III (1996-2002)

Parking brake — adjustment (Renault Espace I)

  • Main
  • Renault
  • Espace I and II (1984-1996)
  • Chassis, running gear
  • Brake system
  • Parking brake — adjustment
0
Contents: Drum brakes 🠛 Disc brakes 🠛

Drum brakes


If the brake shoes have been replaced or new drive cables have been installed, the parking brake only needs adjustment. The parking brake cables must be installed in a certain way to ensure automatic adjustment. If the rear wheels are not installed, if the parking brake lever is to be used in the normal way, do not adjust the clearance as described below, as this will only tighten the cables and will not make any adjustment.

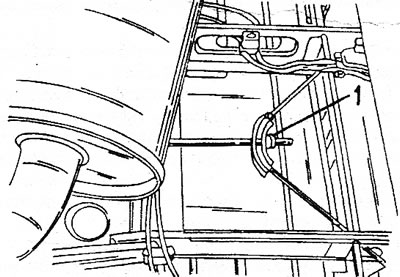
To check the cable adjustment, jack up the car completely and place it on axle stands. Now the drive cable balancing lever is visible from the bottom of the car (see illustrations 17.1 and 17.2). In both cases, loosen the lock nut. On early models, loosen the middle rod; on later models, loosen the adjusting nut. In both cases, the cable should be completely free.
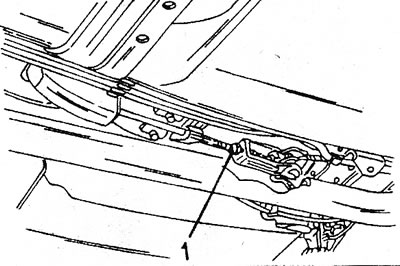
17.1 Adjusting the parking brake on early models. The lock nut (1) secures the adjusting rod
17.1 Adjusting the parking brake on early models. The lock nut (1) secures the adjusting rod


17.2 Adjusting the Parking Brake on Later Models (drum and disc brakes). Loosen and tighten the nut…

17.2 Adjusting the Parking Brake on Later Models (drum and disc brakes). Loosen and tighten the nut (1) again


Remove both rear wheels and check the operation of the adjusting mechanism by turning the toothed segment (1) to release three or four teeth (see illustration 17.3). Make sure that the cables can move freely and that the parking brake lever (2) on both sides of the vehicle is against the brake shoes.
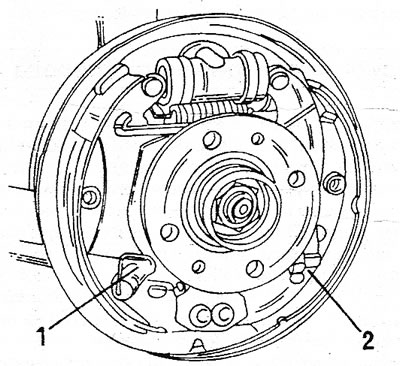
17.3 Automatic adjustment control (see text)

17.3 Automatic adjustment control (see text)


From the underside of the vehicle, tighten the adjusting nut or middle adjuster of the parking brake rod until the parking brake levers (see illustration 17.3) move away from the brake shoes if the handbrake lever in the passenger compartment is set to position 1 or 2. They should remain in this position if the lever is switched to the second position.

Tighten the locknuts (1) and reinstall the brake drums. Ask an assistant to slowly press the brake pedal several times. During normal operation of the adjuster, if the shoes are pressed against the brake drum, a ringing sound will be heard.

Apply the parking brake and make sure the rear wheels are locked. When the parking brake is fully released, the wheels should turn without dragging.

Disc brakes


The drive cables are adjusted in a similar manner to those on vehicles with drum brakes. The location of the drive cable balancer corresponds to that shown in Illustration 17.2.


(View the original source on this resource renaultbook.ru)

Check from the inside of the caliper that the handbrake lever rests against the stop. Without moving the drive cables, tighten them using the nut (1) until the cable ends rest against the lever. Set the handbrake lever in the passenger compartment between positions I and 2. Tighten the adjusting nut again so that the lever moves only when the parking brake is set to position 1 - 2.

Make sure the wheels lock when the parking brake lever is pulled with normal force. The wheels should rotate freely when the parking brake is released.
This article is available on: russian, bulgarian, belarusian, ukrainian, serbian, croatian, romanian, polish, slovak, hungarian
Article has been reviewed by editor: Fedoseev Denis
Share with friends:
Previous
Espace I and II: Brake system
Next

Brake discs
Rear Disc Brake Calipers — Repair
Rear Disc Brake Caliper — Removal and Installation
Replacing the pads in the rear disc brakes
Wheel Brake Cylinder — Disassembly
Bleeding the brake system
Brake Drive Booster
Vacuum pump — diesel
Anti-lock braking system (ABS)
Front wheel speed sensors and rim gears
Other articles on other Renault models

➽ Parking brake — adjustment Renault Scenic 1 (1996-2003)
➽ Parking brake Renault Duster 1 (2009-2017)
➽ Parking brake Renault Fluence 1 (2009-2020, petrol)
➽ Parking brake Renault Kangoo 1 (1997-2007)
➽ Removal and installation the parking brake drive and control unit Renault Laguna 2 (2001-2007)
Link to this article in different formats
Reviews and comments of visitors
No comments yet


Add two numbers 13 + 41


Renault 19 (1988-1996) 
  • General information
  • Maintenance
  • Power unit
  • Engine repair
  • Exhaust system
  • Cooling system
  • Supply system
  • Single-point injection
  • Multi-point injection
  • Diesel injection system
  • Transmission
  • Clutch
  • Car gearbox
  • Chassis, running gear
  • Car suspension
  • Steering
  • Brake system
  • Wheels and tires
  • Body and interior
  • Exterior (external elements)
  • Interior (internal elements)
  • Heating and ventilation
  • Electrical equipment
  • Equipment and devices
  • Headlights and lighting
  • Ignition system
  • Power devices
  • Electrical circuits
Espace I and II (1984-1996) 
  • General information
  • Introduction to the guide
  • Troubleshooting
  • Power unit
  • Engine repair
  • Cooling system
  • Carburetor fuel system
  • Injection fuel system
  • Diesel fuel system
  • Ignition system
  • Transmission
  • Clutch
  • Car gearbox
  • Drive shafts
  • Chassis, running gear
  • Brake system
  • Steering
  • Front suspension
  • Rear suspension
  • Body and interior
  • Exterior (external elements)
  • Interior (internal elements)
  • Doors, locks and windows
  • Electrical equipment
  • Equipment and devices
  • Electrical circuits
Espace III (1996-2002) 
  • General information
  • Introduction to the manual
  • User manual
  • Power unit
  • Petrol engines F3R
  • Petrol engines Z7X
  • Diesel engines G8T
  • Diesel engines G9T
  • Transmission
  • Clutch
  • Mechanical gearbox
  • Automatic gearbox
  • Drive shafts
  • Chassis, running gear
  • Steering
  • Front suspension
  • Rear suspension
  • Brake system
  • Body and interior
  • Exterior (external elements)
  • Interior (internal elements)
  • Doors, locks and windows
  • Heating and ventilation
  • Electrical equipment
  • Equipment and instruments
  • Power devices
  • Electrical circuits
RenaultBook.ru © 2018–2026 | Mobile version | News and articles | Sitemap: EN BG BY UA RS HR RO PL SK HU | Administration | Site search | Bookmark
Duster 1 (2009-2017) | Fluence 1 (2009-2020, petrol) | Kangoo 1 (1997-2007) | Laguna 2 (2001-2007) | Logan 1 (2004-2012, petrol) | Logan 2 (2012-2020) | Megane 1 (1995-2002) | Megan 2 (2002-2009, petrol) | Sandero 1 (2007-2012, petrol) | Scenic 1 (1996-2003) | Symbol 1 (1999-2008, petrol) | Symbol 2 (2008-2013, petrol) | Renault 19 (1988-1996) | Espace I and II (1984-1996) | Espace III (1996-2002) | Clio 1 (1990-1998) |
We want your visit to be comfortable 😌 and use cookies 🍪 to do so.