
English Русский
Български
Беларускі
Український
Српски
Hrvatski
Română
Polski
Slovenský
Magyar
Bookmark Contacts Articles Sitemap
Company vehicles Peugeot Company vehicles Opel Company vehicles Skoda Company vehicles Land Rover Company vehicles Mitsubishi Company vehicles Volkswagen Company vehicles Honda
RenaultBook.ru


Duster   Fluence   Kangoo   Laguna   Logan   Megane   Sandero   Scenic   Symbol   Clio   Other
Renault 19 (1988-1996) Espace I and II (1984-1996) Espace III (1996-2002)

Rear Brake Pads — Installation (Renault Espace I)

  • Main
  • Renault
  • Espace I and II (1984-1996)
  • Chassis, running gear
  • Brake system
  • Rear Brake Pads — Installation
0
1. Move the setting lever of the leading brake shoe and the handbrake lever of the slave brake shoe to the new brake shoes, if they are being replaced:

2. Move the setting lever on the drive shoes as follows:
  • a) Remove the spring clip from the outside of the brake shoe and remove the lever.
  • b) At the other end of the brake shoe, remove the thrust ring, mark how the spring is suspended and remove the spring.
  • c) Remove the small toothed segment and pull out the bearing pin.
  • d) Install the parts in the opposite order on the new brake shoe. Always replace the pressure spring and thrust ring.

3. Move the parking brake actuator lever from the old driven shoes to the new ones as follows:
  • a) Remove the spring clip and remove the parking brake lever. Remove the pins.
  • b) Secure the lever with a new spring clip to the new brake shoe.

4. Install the small spring (1) on the inside of the brake shoe and fit the push rod (see illustration). Make sure that the correct push rod is installed, as they vary. The spring must be properly tensioned for the mechanism to function properly.
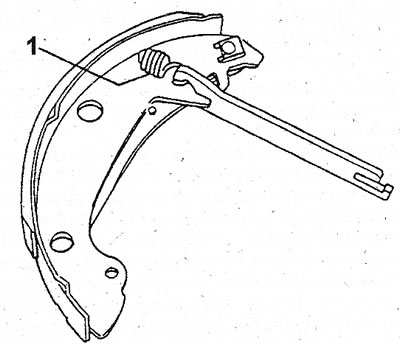
11.4 The tension of the spring (1) is important for the correct functioning of the automatic…

11.4 The tension of the spring (1) is important for the correct functioning of the automatic adjustment mechanism


5. It should be mentioned that after installing the pads, it is necessary to check the left brake pad, whether the gap between the end of the push rod and the inner edge of the wheel arch in the brake pads is 1 mm (see illustration). The adjusting lever should fit snugly against the shoe. If the gap is not set, replace the small spring (see illustration 11.4) and both tension springs.
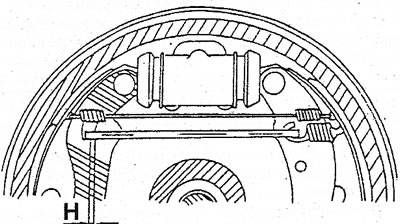
11.5 The gap «H» after installing the brake pads must correspond to the specified value. Otherwise,…

11.5 The gap "H" after installing the brake pads must correspond to the specified value. Otherwise, replace the spring (1) (see illustration 11.4)


6. Install the lower tension springs from the inside. The spring hooks should be on the outside.

7. Insert the pads into the brake shield and hook the lower tension springs onto the cam.

(The text is available on this website: renaultbook)

8. Move the adjusting lever towards the end of the axle (see illustration 10.7), until it is possible to install the push rod on the other shoe. Rotate the small toothed segment against the spring tension to engage it with the teeth of the large lever.

9. Place the adjusting lever back on the brake shoes, and use a screwdriver or pliers to hook the upper tension springs from the outside inwards.


10. Grasp the end of the brake cable with pliers, use your other hand to lock the tension spring and compress it. Once the brake cable is loose, hook it onto the parking brake lever. Disconnect the spring from the end of the cable. Make sure the brake cable is installed correctly.

11. Insert the anchor pins from the back of the shield and install the spring and locking cup from the front. Hold the anchor pin with your finger from behind, grab the cup with pliers. Overcoming the elasticity of the spring, put the anchor on the cup and fix the assembly by turning the cup 90°.

12. Center the brake pads on the brake shield.

13. Install the brake drum onto the end of the axle and tighten the nut to 160 Nm.

14. Lubricate the hub seal with a small amount of grease and carefully place it on the brake drum.

15. Apply the parking brake and service brake several times to work in the automatic adjustment mechanism and accurately center the brake shoes.
This article is available on: russian, bulgarian, belarusian, ukrainian, serbian, croatian, romanian, polish, slovak, hungarian
Article has been reviewed by editor: Fedoseev Denis
Share with friends:
Previous
Espace I and II: Brake system
Next

Rear Brake Pads — Removal
Rear Brake Drums — Removal and Installation
Brake discs — inspection, removal and installation
Front Disc Brake Caliper — Disassembly
Front Disc Brake Caliper — Removal and Installation
Wheel Brake Cylinder — Disassembly
Replacing the pads in the rear disc brakes
Rear Disc Brake Caliper — Removal and Installation
Rear Disc Brake Calipers — Repair
Brake discs
Other articles on other Renault models

➽ Replacing rear brake pads Renault Fluence 1 (2009-2020, petrol)
➽ Removal and installation rear brake pads Renault Laguna 2 (2001-2007)
➽ Replacing the brake pads of the rear wheel brake mechanism Renault Logan 1 (2004-2012, petrol)
➽ Checking the thickness of the rear brake pads Renault Megane 1 (1995-2002)
➽ Replacing the brake pads of the rear wheel brake mechanism Renault Sandero 1 (2007-2012, petrol)
Link to this article in different formats
Reviews and comments of visitors
No comments yet


Add two numbers 11 + 40


Renault 19 (1988-1996) 
  • General information
  • Maintenance
  • Power unit
  • Engine repair
  • Exhaust system
  • Cooling system
  • Supply system
  • Single-point injection
  • Multi-point injection
  • Diesel injection system
  • Transmission
  • Clutch
  • Car gearbox
  • Chassis, running gear
  • Car suspension
  • Steering
  • Brake system
  • Wheels and tires
  • Body and interior
  • Exterior (external elements)
  • Interior (internal elements)
  • Heating and ventilation
  • Electrical equipment
  • Equipment and devices
  • Headlights and lighting
  • Ignition system
  • Power devices
  • Electrical circuits
Espace I and II (1984-1996) 
  • General information
  • Introduction to the guide
  • Troubleshooting
  • Power unit
  • Engine repair
  • Cooling system
  • Carburetor fuel system
  • Injection fuel system
  • Diesel fuel system
  • Ignition system
  • Transmission
  • Clutch
  • Car gearbox
  • Drive shafts
  • Chassis, running gear
  • Brake system
  • Steering
  • Front suspension
  • Rear suspension
  • Body and interior
  • Exterior (external elements)
  • Interior (internal elements)
  • Doors, locks and windows
  • Electrical equipment
  • Equipment and devices
  • Electrical circuits
Espace III (1996-2002) 
  • General information
  • Introduction to the manual
  • User manual
  • Power unit
  • Petrol engines F3R
  • Petrol engines Z7X
  • Diesel engines G8T
  • Diesel engines G9T
  • Transmission
  • Clutch
  • Mechanical gearbox
  • Automatic gearbox
  • Drive shafts
  • Chassis, running gear
  • Steering
  • Front suspension
  • Rear suspension
  • Brake system
  • Body and interior
  • Exterior (external elements)
  • Interior (internal elements)
  • Doors, locks and windows
  • Heating and ventilation
  • Electrical equipment
  • Equipment and instruments
  • Power devices
  • Electrical circuits
RenaultBook.ru © 2018–2026 | Mobile version | News and articles | Sitemap: EN BG BY UA RS HR RO PL SK HU | Administration | Site search | Bookmark
Duster 1 (2009-2017) | Fluence 1 (2009-2020, petrol) | Kangoo 1 (1997-2007) | Laguna 2 (2001-2007) | Logan 1 (2004-2012, petrol) | Logan 2 (2012-2020) | Megane 1 (1995-2002) | Megan 2 (2002-2009, petrol) | Sandero 1 (2007-2012, petrol) | Scenic 1 (1996-2003) | Symbol 1 (1999-2008, petrol) | Symbol 2 (2008-2013, petrol) | Renault 19 (1988-1996) | Espace I and II (1984-1996) | Espace III (1996-2002) | Clio 1 (1990-1998) |
We want your visit to be comfortable 😌 and use cookies 🍪 to do so.