English Русский
Български
Беларускі
Український
Српски
Hrvatski
Română
Polski
Slovenský
Magyar
Bookmark Contacts Articles Sitemap
Company vehicles Peugeot Company vehicles Opel Company vehicles Skoda Company vehicles Land Rover Company vehicles Mitsubishi Company vehicles Volkswagen Company vehicles Honda
RenaultBook.ru


Duster   Fluence   Kangoo   Laguna   Logan   Megane   Sandero   Scenic   Symbol   Clio   Other
Symbol 1 (1999-2008, petrol) Symbol 2 (2008-2013, petrol)

Replacing the front wheel hub bearing (Renault Symbol 2)

  • Main
  • Symbol
  • Symbol 2 (2008-2013, petrol)
  • Chassis, running gear
  • Front suspension
  • Replacing the front wheel hub bearing
0
Contents: Removal 🠛 Installation 🠛
Special tool:
  • Protective cap for puller - Rou. 15-01
  • Hub Lock - Rou. 604-01
  • Ball joint puller - T.Av. 476
  • Drive shaft puller - T.Av. 1050-02

Tightening torques:
  • Drive shaft nut - 280 Nm
  • Wheel bolt - 90 Nm
  • Shock absorber support bolt - 180 Nm
  • Brake caliper bolt - 100 Nm
  • Ball joint nut - 37 Nm
  • Lower arm nut to hub - 55 Nm

Lower arm nut to hub - 55 Nm


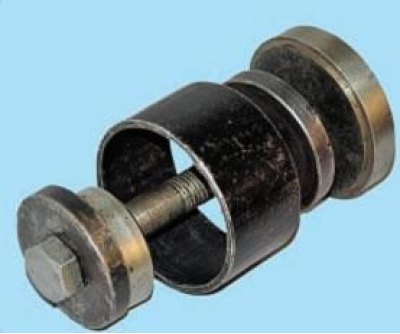
To replace the bearing, it is also convenient to use a commercially available puller for pressing out and pressing in hub bearings.

The front wheel hub bearings do not require maintenance during vehicle operation and are replaced only in the event of increased wear. To determine the bearing condition, a dial indicator is used, the bracket (stand) of which is fixed on the steering knuckle. The indicator leg is placed against the brake disc, the rocking of which will give an assessment of the bearing condition. If the indicator reading exceeds 0.05 mm, the bearing must be replaced.

Caution: Attempting to reduce bearing clearance by over-tightening the hub nut will result in accelerated bearing failure.


When a bearing is pressed out, it is destroyed and replaced with a new one.


Removal


1. Disconnect the battery.

2. Remove the front wheel.

3. Remove the brake caliper and hang it to the side using a wire.

4. Unscrew the nut of the ball joint of the guide arm, disconnect the arm from the hub using the puller T.Av. 476.

5. Unscrew the drive shaft mounting nut.

6. Push the shaft out of the hub using the T.Av. 1050-02 puller.

7. Remove the brake disc.

8. Unscrew the nut securing the ball joint of the lower suspension arm, disconnect the arm from the hub.

9. Unscrew the two shock absorber support bolts.

10. Remove the hub assembly.

11. Using a press, press the hub out of the housing.
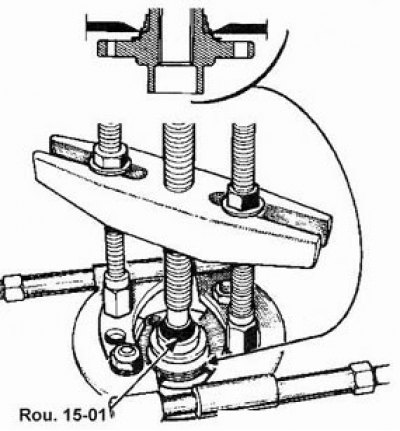
11. Using a press, press the hub out of the housing.


12. Remove the retaining ring.

13. Using a press and a suitable mandrel, press the hub bearing out of the housing.

Install the mandrel on the inner ring of the bearing.
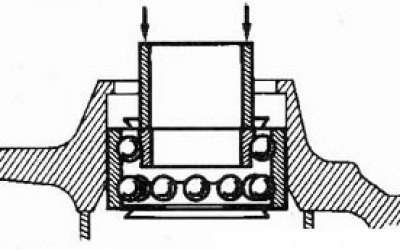
Install the mandrel on the inner ring of the bearing.


Thoroughly clean the steering knuckle and hub from grease and dirt, remove possible nicks and burrs with a file. Inspect the parts for cracks and other damage. Replace the bearing and retaining ring with new ones.


Installation


  • make sure (if possible) the presence of grease in the internal cavity of the bearing;
  • lightly lubricate the bearing ring surfaces with grease;
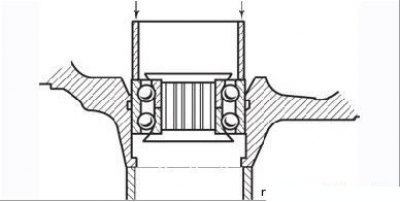
Figure 5.10. Pressing the bearing into the steering knuckle

Figure 5.10. Pressing the bearing into the steering knuckle

  • using a press, press the bearing into the steering knuckle using a mandrel with an outside diameter of 70 mm and an inside diameter of 66 mm, applying force to the outer ring (Figure 5.10);
  • install a new snap ring into the groove on the steering knuckle;
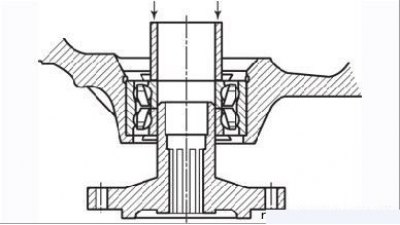
Figure 5.11. Pressing the bearing onto the front wheel hub

Figure 5.11. Pressing the bearing onto the front wheel hub

  • place the inner race on the hub and press the bearing onto the hub using a 48mm outer diameter and 42mm inner diameter mandrel, applying load to the inner bearing race (Figure 5.11);
  • make sure the hub flange rotates freely and remove excess grease;
make sure the hub flange rotates freely and remove excess grease;


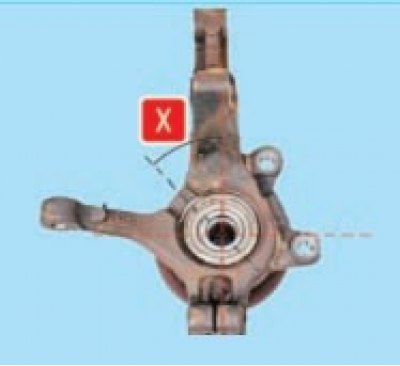
On vehicles equipped with ABS, install the wheel speed sensor bracket so that the X angle is 35'±5'.


Install the steering knuckle as described above.

Check and adjust wheel alignment if necessary.

[Source is located on the website www.RENAULTBOOK.ru]
This article is available on: russian, bulgarian, belarusian, ukrainian, serbian, croatian, romanian, polish, slovak, hungarian
Article has been reviewed by editor: Kupriyanov Sergey
Share with friends:
Previous
Symbol 2: Front suspension
Next

Replacing the ball joint
Lower control arm and control arm bushings
Removal the steering knuckle
Replacing the anti-roll bar
Disassembly and repair of the shock absorber
Engine subframe — removal and installation
Other articles on other Renault models

➽ Replacing the front wheel hub bearing Renault Sandero 1 (2007-2012, petrol)
➽ Front wheel hub bearing Renault Duster 1 (2009-2017)
➽ Front wheel hub bearing Renault Fluence 1 (2009-2020, petrol)
➽ Replacing the front hub bearing Renault Logan 1 (2004-2012, petrol)
➽ Checking and replacing front wheel hub bearings Renault Megane 1 (1995-2002)
Link to this article in different formats
Reviews and comments of visitors
No comments yet


Add two numbers 23 + 23


Symbol 2 (2008-2013, petrol) 
  • General information
  • User manual
  • Maintenance
  • Power unit
  • Engine repair
  • Cooling system
  • Fuel system
  • Exhaust system
  • Ignition system
  • Transmission
  • Clutch
  • Mechanical gearbox
  • Automatic gearbox
  • Drive shafts
  • Chassis, running gear
  • Front suspension
  • Rear suspension
  • Steering
  • Brake system
  • Body and interior
  • Exterior (external elements)
  • Interior (internal elements)
  • Doors, locks and windows
  • Heating and ventilation
  • Electrical equipment
  • Equipment and devices
  • Headlights and lighting
  • Power devices
  • Electrical circuits
Symbol 1 (1999-2008, petrol) 
  • General information
  • User manual
  • Car care
  • Maintenance
  • Power unit
  • Engine repair
  • Cooling and lubrication system
  • Supply system
  • Exhaust system
  • Ignition system
  • Transmission
  • Clutch
  • Mechanical gearbox
  • Automatic gearbox
  • Drive shafts
  • Chassis, running gear
  • Car suspension
  • Steering
  • Brake system
  • Body and interior
  • Exterior (external elements)
  • Interior (internal elements)
  • Doors, locks and windows
  • Restoration and repair
  • Electrical equipment
  • Equipment and devices
  • Headlights and lighting
  • Power devices
  • Heating and ventilation
  • Electrical circuits
RenaultBook.ru © 2018–2026 | Mobile version | News and articles | Sitemap: EN BG BY UA RS HR RO PL SK HU | Administration | Site search | Bookmark
Duster 1 (2009-2017) | Fluence 1 (2009-2020, petrol) | Kangoo 1 (1997-2007) | Laguna 2 (2001-2007) | Logan 1 (2004-2012, petrol) | Logan 2 (2012-2020) | Megane 1 (1995-2002) | Megan 2 (2002-2009, petrol) | Sandero 1 (2007-2012, petrol) | Scenic 1 (1996-2003) | Symbol 1 (1999-2008, petrol) | Symbol 2 (2008-2013, petrol) | Renault 19 (1988-1996) | Espace I and II (1984-1996) | Espace III (1996-2002) | Clio 1 (1990-1998) |
We want your visit to be comfortable 😌 and use cookies 🍪 to do so.