
English Русский
Български
Беларускі
Український
Српски
Hrvatski
Română
Polski
Slovenský
Magyar
Bookmark Contacts Articles Sitemap
Company vehicles Peugeot Company vehicles Opel Company vehicles Skoda Company vehicles Land Rover Company vehicles Mitsubishi Company vehicles Volkswagen Company vehicles Honda
RenaultBook.ru


Duster   Fluence   Kangoo   Laguna   Logan   Megane   Sandero   Scenic   Symbol   Clio   Other
Renault 19 (1988-1996) Espace I and II (1984-1996) Espace III (1996-2002)

Front wheel hub and bearing (Renault Espace III)

  • Main
  • Renault
  • Espace III (1996-2002)
  • Chassis, running gear
  • Front suspension
  • Front wheel hub and bearing
0
Contents: Removal 🠛 Installation 🠛
Note: Since considerable force is required to press in the outer race of the hub bearing, if this race has been removed, the entire bearing must be replaced, as the bearing race will be damaged.


Removal


  • Disconnect the cable from the negative battery terminal.
  • Raise the car on a lift and remove the wheel from the required side.
  • Using the Tav. 476 puller, disconnect the steering tie rod end from the steering knuckle (fig. 10.7).
  • Remove the two bolts securing the brake mechanism to the steering knuckle.
  • Disconnect the brake hose and brake pad wear indicator lamp wire from the holders on the shock absorber strut and secure them to the front suspension spring.
  • Remove the caliper bracket assembly, caliper holder and brake pads and, without disconnecting the brake hose, secure them to the front suspension strut with soft wire. Be careful not to damage the brake hose.
  • Remove the ABS sensor.
  • Use special tool Rou. 604-01 to lock the hub from turning.
  • Loosen the nut securing the drive shaft to the hub.

Text provided by an online resource (www.renaultbook.ru)

Caution: Do not block the hub from turning by pressing the brake pedal, as this may damage or shear the brake disc mounting bolts.

  • Remove the two Torx T30 bolts securing the brake disc to the front wheel hub.
  • Remove the brake disc.

Attention. The splines of the drive shaft joints are glued to the front wheel hubs, so a special puller must be used to remove the drive shafts.

  • Using the T. Av. 1050-02 puller, secured to the brake disc, push the drive shaft out of the front wheel hub.
  • Install the protective cover onto the outer joint boot of the drive shaft
  • Loosen the lower arm ball joint pin nut as much as possible and use a ball joint impact remover to press the joint out of the steering knuckle (fig. 10.8).
  • Loosen the bolts securing the shock absorber strut to the steering knuckle and remove the steering knuckle.
  • Using the Rou. 1392 tool and a press, press the hub out of the steering knuckle (fig. 10.18).
  • Using a puller with jaws and the Rou. 15-01 tool, remove the inner bearing race from the hub (fig. 10.19).
  • Remove the bearing retaining rings (fig. 10.20).
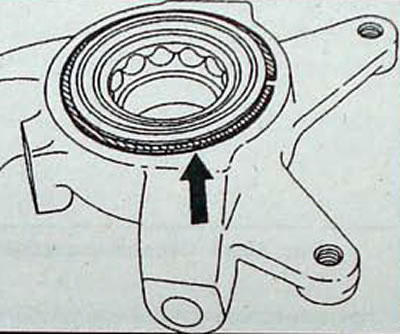
Fig. 10.20. Bearing retaining ring location

Fig. 10.20. Bearing retaining ring location


  • Using a press and a Rou. 1392 mandrel of the appropriate diameter, rest the steering knuckle on the T. Av. 1230 mandrel and press the outer bearing ring out of the steering knuckle (fig. 10.21).
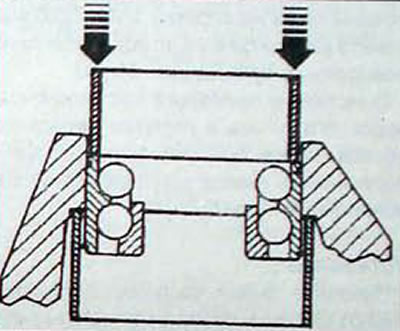
Fig. 10.21. Using a press and mandrels Rou. 1392 and T. Av. 1230 to press the outer bearing ring…

Fig. 10.21. Using a press and mandrels Rou. 1392 and T. Av. 1230 to press the outer bearing ring out of the steering knuckle

  • Clean and inspect the condition of the steering knuckle and front wheel hub. Make sure that the bearing seat surface in the steering knuckle is not damaged.

Installation


  • Apply a thin layer of Loctite SELBLOC around the circumference of the bearing outer race.
  • Using the mandrels used for removal, press the outer bearing race into the steering knuckle (fig. 10.22).
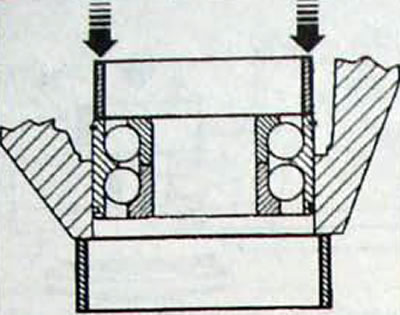
Fig. 10.22. Using a press and mandrels Rou. 1392 and T. Av. 1230 to press the outer bearing ring…

Fig. 10.22. Using a press and mandrels Rou. 1392 and T. Av. 1230 to press the outer bearing ring into the steering knuckle
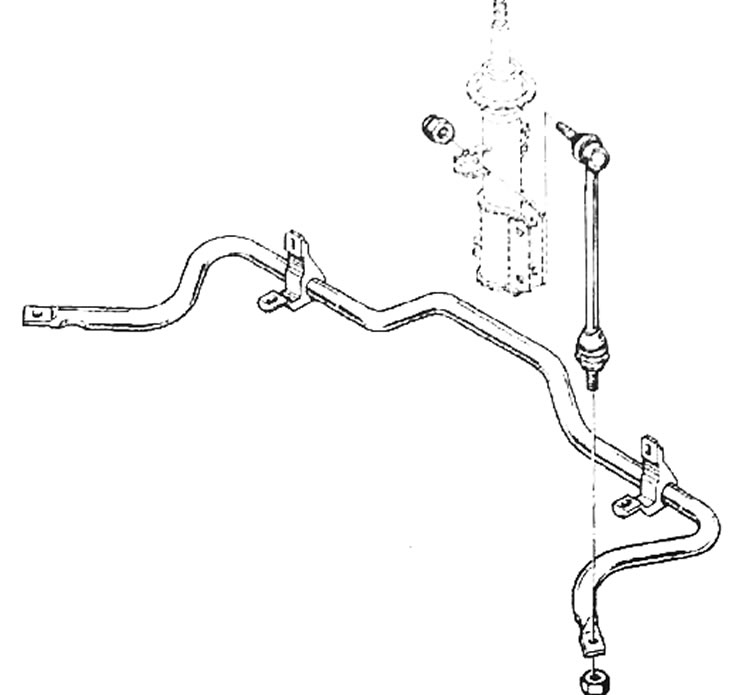


Fig. 10.23. Front anti-roll bar

Fig. 10.23. Front anti-roll bar

  • Install the second bearing outer race retaining ring.
  • Install the inner bearing race onto the Rou. f392 tubular mandrel and press the front wheel hub into it.
  • Check the correct placement of the parts and the smooth rotation of the hub.
  • Use the end of the old drive shaft to clean the hub splines of any remaining Loctite SELBLOC adhesive. To remove the old SELBLOC adhesive, insert the mandrel into the hub several times.
  • Connect the lower control arm ball joint to the steering knuckle and tighten the new ball joint pin nut to the specified torque.
  • Apply Loctite SELBLOC to the splined end of the drive shaft outer joint
  • Insert the splined portion of the drive shaft into the front wheel hub. The drive shaft should fit freely into the front wheel hub until a thread appears to screw on the drive shaft mounting nut.
  • Install a new nut securing the drive shaft to the front wheel hub.
  • Install the steering knuckle.
  • Further installation is carried out in the reverse order of removal.
  • Install the wheel and lower the vehicle.
  • Press the brake pedal several times to press the brake pads against the brake disc.
  • Check the front wheel alignment angles.
This article is available on: russian, bulgarian, belarusian, ukrainian, serbian, croatian, romanian, polish, slovak, hungarian
Article has been reviewed by editor: Trofimova Anastasia
Share with friends:
Previous
Espace III: Front suspension
Next

Replacing the lower arm ball joint
Replacing the silent block of the lower arm
Lower control arm of the front suspension
Spring and shock absorber
Shock absorber strut
Anti-roll bar
Sub-engine frame
Bottom of the body checkpoints
Influence of front wheel alignment angles
Principle of checking the front wheel alignment angles
Other articles on other Renault models

➽ Front wheel hub bearing Renault Duster 1 (2009-2017)
➽ Front wheel hub bearing Renault Fluence 1 (2009-2020, petrol)
➽ Removal and installation the front wheel bearing Renault Logan 2 (2012-2020)
➽ Removal and installation the front wheel hub bearing Renault Megan 2 (2002-2009, petrol)
➽ Replacing the front wheel hub bearing Renault Sandero 1 (2007-2012, petrol)
Link to this article in different formats
Reviews and comments of visitors
No comments yet


Add two numbers 35 + 15


Renault 19 (1988-1996) 
  • General information
  • Maintenance
  • Power unit
  • Engine repair
  • Exhaust system
  • Cooling system
  • Supply system
  • Single-point injection
  • Multi-point injection
  • Diesel injection system
  • Transmission
  • Clutch
  • Car gearbox
  • Chassis, running gear
  • Car suspension
  • Steering
  • Brake system
  • Wheels and tires
  • Body and interior
  • Exterior (external elements)
  • Interior (internal elements)
  • Heating and ventilation
  • Electrical equipment
  • Equipment and devices
  • Headlights and lighting
  • Ignition system
  • Power devices
  • Electrical circuits
Espace I and II (1984-1996) 
  • General information
  • Introduction to the guide
  • Troubleshooting
  • Power unit
  • Engine repair
  • Cooling system
  • Carburetor fuel system
  • Injection fuel system
  • Diesel fuel system
  • Ignition system
  • Transmission
  • Clutch
  • Car gearbox
  • Drive shafts
  • Chassis, running gear
  • Brake system
  • Steering
  • Front suspension
  • Rear suspension
  • Body and interior
  • Exterior (external elements)
  • Interior (internal elements)
  • Doors, locks and windows
  • Electrical equipment
  • Equipment and devices
  • Electrical circuits
Espace III (1996-2002) 
  • General information
  • Introduction to the manual
  • User manual
  • Power unit
  • Petrol engines F3R
  • Petrol engines Z7X
  • Diesel engines G8T
  • Diesel engines G9T
  • Transmission
  • Clutch
  • Mechanical gearbox
  • Automatic gearbox
  • Drive shafts
  • Chassis, running gear
  • Steering
  • Front suspension
  • Rear suspension
  • Brake system
  • Body and interior
  • Exterior (external elements)
  • Interior (internal elements)
  • Doors, locks and windows
  • Heating and ventilation
  • Electrical equipment
  • Equipment and instruments
  • Power devices
  • Electrical circuits
RenaultBook.ru © 2018–2026 | Mobile version | News and articles | Sitemap: EN BG BY UA RS HR RO PL SK HU | Administration | Site search | Bookmark
Duster 1 (2009-2017) | Fluence 1 (2009-2020, petrol) | Kangoo 1 (1997-2007) | Laguna 2 (2001-2007) | Logan 1 (2004-2012, petrol) | Logan 2 (2012-2020) | Megane 1 (1995-2002) | Megan 2 (2002-2009, petrol) | Sandero 1 (2007-2012, petrol) | Scenic 1 (1996-2003) | Symbol 1 (1999-2008, petrol) | Symbol 2 (2008-2013, petrol) | Renault 19 (1988-1996) | Espace I and II (1984-1996) | Espace III (1996-2002) | Clio 1 (1990-1998) |
We want your visit to be comfortable 😌 and use cookies 🍪 to do so.