English Русский
Български
Беларускі
Український
Српски
Hrvatski
Română
Polski
Slovenský
Magyar
Bookmark Contacts Articles Sitemap
Company vehicles Peugeot Company vehicles Opel Company vehicles Skoda Company vehicles Land Rover Company vehicles Mitsubishi Company vehicles Volkswagen Company vehicles Honda
RenaultBook.ru


Duster   Fluence   Kangoo   Laguna   Logan   Megane   Sandero   Scenic   Symbol   Clio   Other
Megane 1 (1995-2002) Megan 2 (2002-2009, petrol)

Rear brake shoe brake disk (Renault Megane 2)

  • Main
  • Megane
  • Megan 2 (2002-2009, petrol)
  • Chassis, running gear
  • Brake system
  • Rear brake shoe brake disk
0
Contents: Removal 🠛 Measuring the thickness of the brake…🠛 Examination 🠛 Installation 🠛

Removal


Note: Brake discs cannot be ground. If they are significantly worn or have deep scratches, replace the discs.


Note: When replacing brake discs, replace them together with the brake pads.


Place the vehicle on a two-post lift.

Remove the wheels.
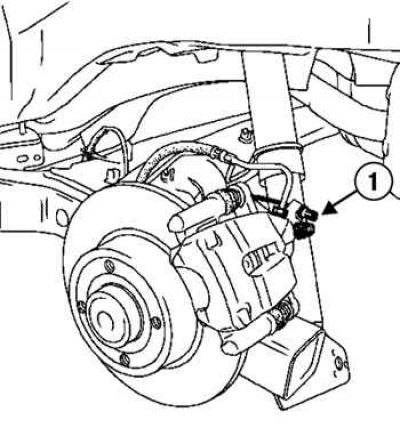
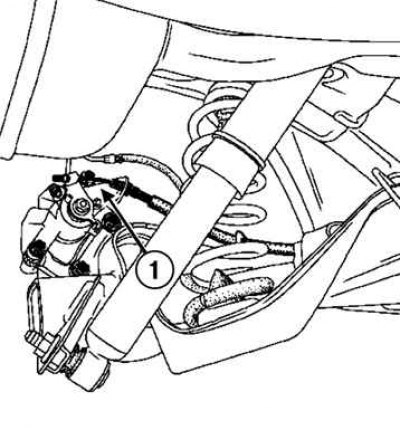
Fig. 6.78. Releasing the parking brake cables: 1 – cables

Fig. 6.78. Releasing the parking brake cables: 1 – cables


Information is located on the website: www.RenaultBook.ru

Release the parking brake cables (Fig. 6.78).

Remember the cable route for installation.
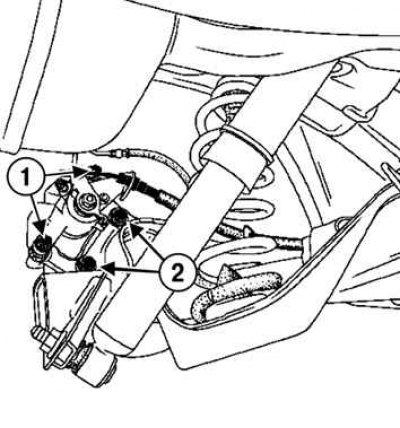
Fig. 6.79. Removing the guide pin fasteners and guide shoe: 1 – guide pin mounting bolts; 2 – brake…

Fig. 6.79. Removing the guide pin fasteners and guide shoe: 1 – guide pin mounting bolts; 2 – brake shoe guide mounting bolts


Unscrew the guide pin mounting bolts (Fig. 6.79).


Measuring the thickness of the brake disc
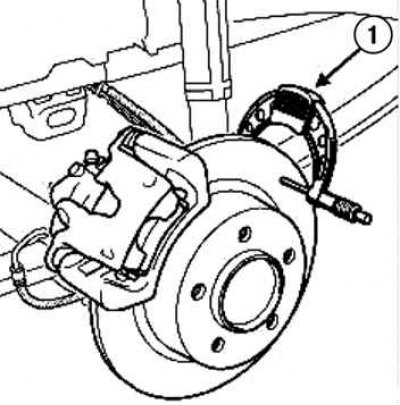


Fig. 6.80. Installing a micrometer to measure the thickness of the brake disc: 1 – micrometer

Fig. 6.80. Installing a micrometer to measure the thickness of the brake disc: 1 – micrometer


Install a micrometer to measure the thickness of the brake disc (Fig. 6.80).
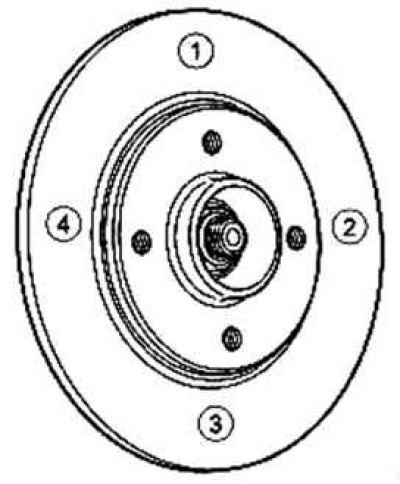
Fig. 6.81. Brake disc thickness measurement points

Fig. 6.81. Brake disc thickness measurement points


Measure the thickness of the brake disc in order at four points shown in Figure 6.81, around the circumference (at 90° intervals).

Standard rear brake disc thickness: 8mm (all engines).

If the thickness is less than specified, replace the discs.

Remove the bracket.

Hang the bracket to the body.

Remove the brake pads.

Unscrew the brake shoe guide mounting bolts.

Remove:
  • shoe guides;
  • hub caps.

Unscrew the hub nuts.

Remove the brake discs.

Examination


Check the inner cylinder walls for corrosion, wear and damage. Replace the cylinder body if necessary. Minor defects caused by corrosion or foreign particles can be removed by sanding the surface with fine emery cloth. Check the piston surface, guide pin and its boot, and brake disc surface for corrosion, wear and damage. Replace the relevant component if necessary.


Installation


Clean the shoe guides and brackets.

Note: Apply FREN-BLOC to the guide shoe mounting bolts and guide pins of the brackets before installation (or its equivalent).


Move the caliper piston into the cylinder until it stops using a special tool (Fre. 1190-01).

Installation is carried out in the reverse order of removal.

Tighten to the specified torque:
  • hub nuts (standard chassis) (220 Nm);
  • hub nuts (long wheelbase chassis) (280 Nm);
  • guide shoe bolts (105 Nm);
  • guide pin mounting bolts (36 Nm).

Fig. 6.82. Installing the parking brake cables: 1 – cables

Fig. 6.82. Installing the parking brake cables: 1 – cables


Install the parking brake cables (Fig. 6.82).

Make sure the parking brake cable stops are properly inserted into the sockets.

Note: Press the brake pedal several times to set the pistons to the working position.


Note: Check the brake fluid level.


Pull the parking brake handle several times to operate the parking brake system and the automatic brake pad wear compensation device.

Install the wheels.
This article is available on: russian, bulgarian, belarusian, ukrainian, serbian, croatian, romanian, polish, slovak, hungarian
Article has been reviewed by editor: Kupriyanov Sergey
Share with friends:
Previous
Megan 2: Brake system
Next

Removal and installation a rigid brake line
Rear brake shoe guide
Removal and installation the rear brake caliper
Removal and installation rear brake pads
Brake disk of the front brake mechanism
Anti-lock braking system (ABS)
Removal and installation the hydraulic unit
Removal and installation the angular and lateral acceleration sensor
Removal and installation of ABS ECU
Decoding the symbols of the basic diagram of the electric pump
Other articles on other Renault models

➽ Rear brake shoe guide Renault Fluence 1 (2009-2020, petrol)
➽ Every 58,000 km — Check the rear brake shoe and drum Renault Clio 1 (1990-1998)
➽ Fastening the front brake shoe guide Renault Duster 1 (2009-2017)
➽ Removal and installation rear brake pads Renault Laguna 2 (2001-2007)
➽ Rear drum brake shoes Renault Logan 2 (2012-2020)
Link to this article in different formats
Reviews and comments of visitors
No comments yet


Add two numbers 10 + 10


Megan 2 (2002-2009, petrol) 
  • User manual
  • Introduction to manual
  • Controls and instruments
  • Salon equipment
  • Operation and driving
  • Maintenance and care
  • Power unit
  • Engine repair
  • Fuel system
  • Injection system
  • Intake and exhaust system
  • Starting and charging system
  • Cooling system
  • Decreased toxicity
  • Transmission
  • Clutch
  • Mechanical gearbox
  • Automatic gearbox
  • Wheel drive mechanism
  • Chassis, running gear
  • Suspension and wheels
  • Steering
  • Brake system
  • Body and interior
  • Exterior (external elements)
  • Interior (internal elements)
  • Doors, locks and windows
  • Heating and air conditioning
  • Electrical equipment
  • Equipment and devices
  • Headlights and lighting
  • Electrical circuits
Megane 1 (1995-2002) 
  • General information
  • User manual
  • Maintenance
  • Power unit
  • Petrol engines 1.4/1.6 l
  • Petrol engines 2.0 l
  • Diesel engines 1.9 l
  • Overhaul of engines
  • Cooling system
  • Fuel system (petrol)
  • Fuel system (diesel)
  • Decreased toxicity
  • Charge and launch systems
  • Ignition system (petrol)
  • Preheat system (diesel)
  • Transmission
  • Clutch
  • Mechanical gearbox
  • Automatic gearbox
  • Drive shafts
  • Chassis, running gear
  • Brake system
  • Car suspension
  • Steering
  • Body and interior
  • Exterior (external elements)
  • Interior (internal elements)
  • Doors, locks and windows
  • Electrical equipment
  • Equipment and devices
  • Electrical circuits
RenaultBook.ru © 2018–2026 | Mobile version | News and articles | Sitemap: EN BG BY UA RS HR RO PL SK HU | Administration | Site search | Bookmark
Duster 1 (2009-2017) | Fluence 1 (2009-2020, petrol) | Kangoo 1 (1997-2007) | Laguna 2 (2001-2007) | Logan 1 (2004-2012, petrol) | Logan 2 (2012-2020) | Megane 1 (1995-2002) | Megan 2 (2002-2009, petrol) | Sandero 1 (2007-2012, petrol) | Scenic 1 (1996-2003) | Symbol 1 (1999-2008, petrol) | Symbol 2 (2008-2013, petrol) | Renault 19 (1988-1996) | Espace I and II (1984-1996) | Espace III (1996-2002) | Clio 1 (1990-1998) |
We want your visit to be comfortable 😌 and use cookies 🍪 to do so.