



Removal and installation the fuel filter
Note: Before removing the fuel filter, a new fuel filter must be prepared.
Draining water from the fuel filter
Note:
- Some versions are equipped with a water sensor located at the bottom of the fuel filter. When water is detected in the filter, a warning light on the instrument panel lights up.
- It is necessary to periodically drain the water from the fuel filter.
Filters without water sensor
1. Open the drain plug.
2. Drain the water from the filter.
3. Close the drain plug.
Filters with water presence sensor
1. Disconnect the water presence sensor connector.
2. Disconnect the water presence sensor connector.
3. Unscrew the water presence sensor one turn.
4. Drain the water from the filter.
5. Tighten the water presence sensor.
6. Connect the water presence sensor connector.
Removal the fuel filter
1. Place the vehicle on a two-post lift.
2. Remove the front right wheel from the vehicle.
3. Unscrew the bolts (1) of the front right mudguard.
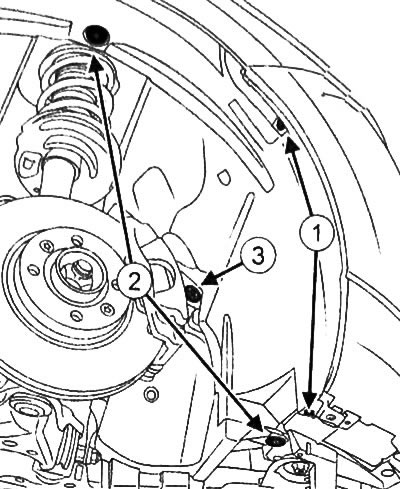
4. Remove the clips (2) of the front right mudguard.
5. Unscrew the nut (3) of the front right mudguard.
6. Slightly move the front right fender liner to the side.
7. Unscrew the nuts (4) of the fuel filter protective plate.
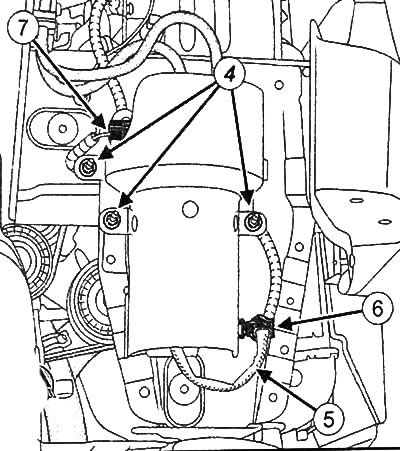
8. Remove the fuel filter protective plate.
9. In versions with water presence sensor:
- Disconnect the wire (5) of the water presence sensor in the filter from the protective plate.
- Disconnect the water presence sensor connector (6).
10. Disconnect the fuel filter heating connector (7).
11. Remove the fuel filter from the holder, marking its installation position.
12. Place the container under the fuel filter.
Caution: Do not allow fuel line connectors to come into contact with contaminated areas.
Note: Before removal, mark the position of the fuel line connectors relative to the fuel filter.
13. Disconnect the fuel line connectors (8) from the fuel filter.
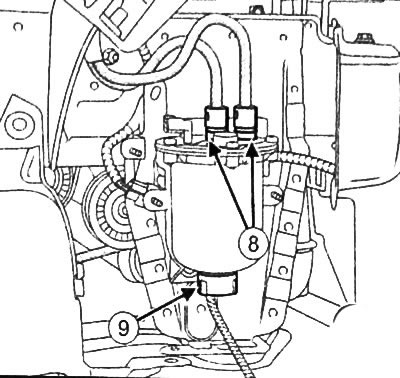
14. Allow the fuel to drain from the fuel lines into a previously prepared container.
15. Install plugs on the fuel lines.
16. If equipped, remove the water presence sensor (9) by turning it counterclockwise.
17. On the workbench, unscrew the bolts (10) of the fuel filter cover.
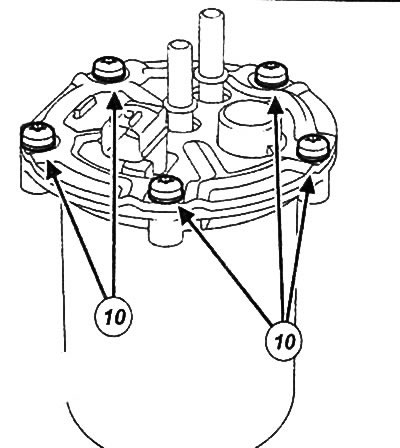
18. Using a flat-head screwdriver (11), pry off the fuel filter cover.
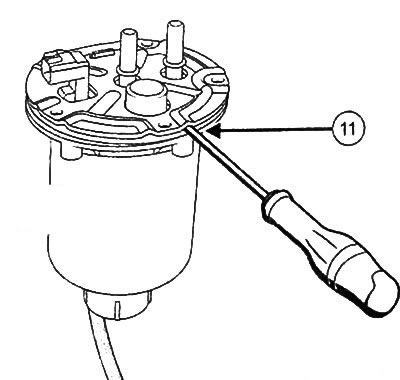
19. Remove the filter element.
Installing a fuel filter
1. Insert a new filter element.
2. Install the fuel filter cover.
3. Install the fuel filter cover bolts.
4. If equipped, insert the water presence sensor by turning it clockwise.
(Original version on our portal: RenaultBook.ru)
5. Connect the fuel line connectors to the fuel filter.
6. In versions with water presence sensor:
- Connect the water presence sensor connector.
- Connect the water sensor wire to the protective plate.
7. Install the fuel filter to its original position.
8. Install the fuel filter protective plate.
9. Tighten the fuel filter protective plate nuts.
10. Install the front right fender liner.
11. Install a plastic screen under the fuel filter.
12. Fill the system with fuel using a hand priming pump (with automatic air removal).