
English Русский
Български
Беларускі
Український
Српски
Hrvatski
Română
Polski
Slovenský
Magyar
Bookmark Contacts Articles Sitemap
Company vehicles Peugeot Company vehicles Opel Company vehicles Skoda Company vehicles Land Rover Company vehicles Mitsubishi Company vehicles Volkswagen Company vehicles Honda
RenaultBook.ru


Duster   Fluence   Kangoo   Laguna   Logan   Megane   Sandero   Scenic   Symbol   Clio   Other
Renault 19 (1988-1996) Espace I and II (1984-1996) Espace III (1996-2002)

Intake manifold (Renault Espace III)

  • Main
  • Renault
  • Espace III (1996-2002)
  • Power unit
  • Diesel engines G8T
  • Intake manifold
0

Removal


  • Disconnect the cable from the negative battery terminal.
  • Place the car on a lift and remove the front wheels.
  • Disconnect, without removing, the oil cooler from the engine cooling system radiator.
  • Be sure to make and install a radiator shield (fig. 3.39).
  • Remove the air filter housing by releasing the clamp at the rear and disconnect the housing from the hoses and centering mount.
  • Remove the rigid air-to-air heat exchanger tubes
  • Disconnect the air temperature sensor from the tube and remove the tube together with the sensor.
  • Remove the plastic protective shields under the engine.
  • Remove the protective fender liners.
  • Partially drain the oil from the gearbox (within 3 minutes).
  • Disconnect the oil pipe mounting bracket from the oil filter base, making sure that no oil can escape.
  • Remove the oil cooler.

On the right side of the car


  • Remove the front right floating brake caliper bracket and secure it to the suspension spring to protect the brake hose from damage (fig. 3.26).
  • Remove the two bolts securing the intermediate support of the drive shaft in the support bearing (fig. 3.27)
  • Using the Tav 476 puller, remove the tie rod end.
  • Loosen the lower shock absorber strut mounting bolts.
  • Remove the wheel speed sensor if the vehicle is equipped with ABS.
  • Loosen the lower ball joint tip nut as much as possible and press out the tip using a ball joint impact puller (fig. 3.29).
  • Remove the drive shaft - steering knuckle - brake disc assembly. Do not damage the drive shaft corrugated boots.

On the left side of the car


  • Remove the brake caliper floating bracket and secure it to the suspension spring.
  • Remove the three bolts securing the drive shaft corrugated boot (fig. 3.34).
  • Using the Tav. 476 puller, remove the steering rod end.
  • Disconnect the wire from the brake pad wear sensor.
  • Remove the wheel speed sensor.
  • Remove the lower shock absorber strut mounting bolts.
  • Disconnect the steering rod ends and lower ball joints from the steering knuckles
  • Remove the drive shaft - steering knuckle - brake disc assembly.
  • Loosen the torque rod mounting bolt.
  • Remove the intake pipe of the exhaust system.
  • Install a universal support and lift the engine up until it is free (do it together).
  • Remove 4 bolts and right swingarm bracket.
  • Unscrew 1 bolt securing the left pendulum suspension.
  • Disconnect the connector from the Ne 1 fuel injector and remove the plastic cover (2 connectors + 1 fuel pipe).
  • Unscrew the 13 manifold mounting nuts.
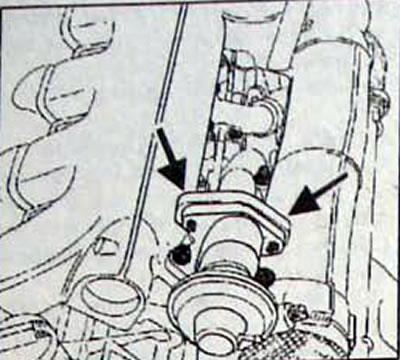
Fig. 3.46. Location of bolts for fastening the exhaust gas recirculation system pipe to the vacuum…

Fig. 3.46. Location of bolts for fastening the exhaust gas recirculation system pipe to the vacuum chamber


  • Lower the power steering expansion tank.
  • Remove the two bolts located on the right rear side of the intake manifold.
  • Remove the two bolts securing the exhaust gas recirculation system pipe to the vacuum chamber.
  • Remove the manifold. If necessary, unscrew the 5 threaded studs.
  • Installation is carried out in the reverse order of removal.
  • Install new gaskets.
  • Add oil to the gearbox.


(Original publication on the portal: «www.RENAULTBOOK.ru»)
This article is available on: russian, bulgarian, belarusian, ukrainian, serbian, croatian, romanian, polish, slovak, hungarian
Article has been reviewed by editor: Trofimova Anastasia
Share with friends:
Previous
Espace III: Diesel engines G8T
Next

Pressure regulator
Checking the boost pressure
Air supercharging — turbocharger
Removal and installation of the G8T TURBO — PK1 engine
Auxiliary equipment drive belt
Exhaust manifold with turbocharger
Cylinder head
Cylinder head bolt tightening sequence
Cylinder head repair
Engine repair — disassembly, inspection and assembly
Other articles on other Renault models

➽ Intake manifold Renault Duster 1 (2009-2017)
➽ Intake manifold and throttle body (K4M engine) Renault Fluence 1 (2009-2020, petrol)
➽ Intake manifold Renault Kangoo 1 (1997-2007)
➽ Removal and installation the intake manifold (F4P and K4M… Renault Laguna 2 (2001-2007)
➽ Replacing the intake manifold seal Renault Logan 1 (2004-2012, petrol)
Link to this article in different formats
Reviews and comments of visitors
No comments yet


Add two numbers 26 + 17


Renault 19 (1988-1996) 
  • General information
  • Maintenance
  • Power unit
  • Engine repair
  • Exhaust system
  • Cooling system
  • Supply system
  • Single-point injection
  • Multi-point injection
  • Diesel injection system
  • Transmission
  • Clutch
  • Car gearbox
  • Chassis, running gear
  • Car suspension
  • Steering
  • Brake system
  • Wheels and tires
  • Body and interior
  • Exterior (external elements)
  • Interior (internal elements)
  • Heating and ventilation
  • Electrical equipment
  • Equipment and devices
  • Headlights and lighting
  • Ignition system
  • Power devices
  • Electrical circuits
Espace I and II (1984-1996) 
  • General information
  • Introduction to the guide
  • Troubleshooting
  • Power unit
  • Engine repair
  • Cooling system
  • Carburetor fuel system
  • Injection fuel system
  • Diesel fuel system
  • Ignition system
  • Transmission
  • Clutch
  • Car gearbox
  • Drive shafts
  • Chassis, running gear
  • Brake system
  • Steering
  • Front suspension
  • Rear suspension
  • Body and interior
  • Exterior (external elements)
  • Interior (internal elements)
  • Doors, locks and windows
  • Electrical equipment
  • Equipment and devices
  • Electrical circuits
Espace III (1996-2002) 
  • General information
  • Introduction to the manual
  • User manual
  • Power unit
  • Petrol engines F3R
  • Petrol engines Z7X
  • Diesel engines G8T
  • Diesel engines G9T
  • Transmission
  • Clutch
  • Mechanical gearbox
  • Automatic gearbox
  • Drive shafts
  • Chassis, running gear
  • Steering
  • Front suspension
  • Rear suspension
  • Brake system
  • Body and interior
  • Exterior (external elements)
  • Interior (internal elements)
  • Doors, locks and windows
  • Heating and ventilation
  • Electrical equipment
  • Equipment and instruments
  • Power devices
  • Electrical circuits
RenaultBook.ru © 2018–2026 | Mobile version | News and articles | Sitemap: EN BG BY UA RS HR RO PL SK HU | Administration | Site search | Bookmark
Duster 1 (2009-2017) | Fluence 1 (2009-2020, petrol) | Kangoo 1 (1997-2007) | Laguna 2 (2001-2007) | Logan 1 (2004-2012, petrol) | Logan 2 (2012-2020) | Megane 1 (1995-2002) | Megan 2 (2002-2009, petrol) | Sandero 1 (2007-2012, petrol) | Scenic 1 (1996-2003) | Symbol 1 (1999-2008, petrol) | Symbol 2 (2008-2013, petrol) | Renault 19 (1988-1996) | Espace I and II (1984-1996) | Espace III (1996-2002) | Clio 1 (1990-1998) |
We want your visit to be comfortable 😌 and use cookies 🍪 to do so.