
English Русский
Български
Беларускі
Український
Српски
Hrvatski
Română
Polski
Slovenský
Magyar
Bookmark Contacts Articles Sitemap
Company vehicles Peugeot Company vehicles Opel Company vehicles Skoda Company vehicles Land Rover Company vehicles Mitsubishi Company vehicles Volkswagen Company vehicles Honda
RenaultBook.ru


Duster   Fluence   Kangoo   Laguna   Logan   Megane   Sandero   Scenic   Symbol   Clio   Other
Logan 1 (2004-2012, petrol) Logan 2 (2012-2020)

Battery charging system (Renault Logan 2)

  • Main
  • Logan
  • Logan 2 (2012-2020)
  • Power unit
  • Engine electrical equipment
  • Battery charging system
0
Contents: Rules for performing work on a…🠛 Removal and installation the battery 🠛

Rules for performing work on a battery


Attention:
  • Sulfuric acid, contained in battery electrolyte, is an extremely aggressive and toxic liquid that causes corrosion of most metals.
  • If acid gets on clothing, the affected area must be thoroughly washed with plenty of running water.
  • If acid comes into contact with skin or eyes, seek immediate medical attention.
  • When handling a battery, it is very important to use the following protective measures:
    • protect your eyes with work glasses,
    • use work clothes and gloves made of acid-resistant materials.
  • To avoid damage to the battery or even an explosion, do not place the battery near heat sources or sparking objects.
  • Incorrect tightening of threaded connections can cause overheating of contacts, cause failures in electrical systems or even lead to an explosion of the battery.


When charging a battery, oxygen and hydrogen are produced. The mixture of these gases is explosive.

The slightest spark or heat source can cause an explosion that can not only destroy the battery case but also release sulfuric acid into the environment, putting people nearby at risk (damage from battery fragments, acid splashes). Acid splashes are dangerous because, in addition to causing direct harm to health, they can also cause damage to clothing and surrounding objects.

Precautions must be taken to prevent explosion due to careless handling of the battery.

Attention:
  • To avoid accidental sparking, make sure that all electrical consumers are switched off.
  • If the battery is charged inside a building, the charger must be turned off before connecting or disconnecting the battery.
  • Do not place metal objects on the battery as they may cause a short circuit between the terminals.
  • Do not use open flame, welding torch, blowtorch, cigarettes or matches near the battery.


Attention:
  • The vehicle uses a low water content battery, so there is no need to top up the battery with electrolyte.
  • Before disconnecting the battery, wait until the radiator fan of the cooling system stops and wait at least one minute for all vehicle control units to complete the data saving process.
  • Some vehicles are equipped with only "TV" type batteries (low mass). To avoid damage to the hood, only use batteries identical to those originally installed.


Removal and installation the battery


Removal the battery


1. Turn off the ignition.

Caution: Before disconnecting the battery, wait until the radiator fan of the cooling system stops and wait at least one minute for all vehicle control units to complete the data saving process.


(Information is located on the website Renaultbook.ru)

Note: It is recommended to mark the installation position of the negative battery cable for proper connection during installation.


2. Unscrew the nut (1) of the battery cable.
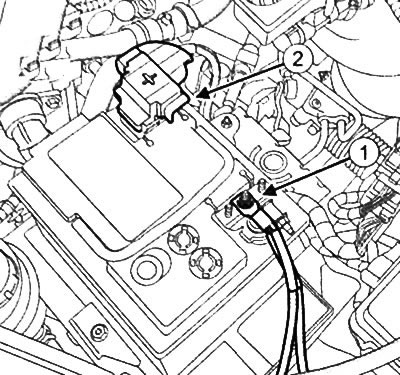
2. Unscrew the nut (1) of the battery cable.


3. Disconnect the negative battery terminal and move the cable aside.

4. Remove the cover (2) from the positive terminal of the battery.

Note: It is recommended to mark the position of the positive battery cable.


5. Unscrew the nut (3) of the positive terminal of the battery.
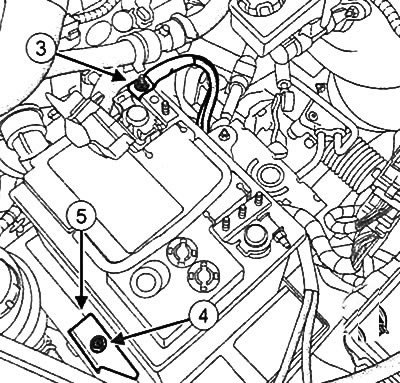
5. Unscrew the nut (3) of the positive terminal of the battery.


6. Move the positive battery cable to the side.


7. Loosen the bolt (4) of the battery bracket.

8. Remove the mounting clamp (5).

9. Remove the battery from the vehicle.

10.If necessary (in case of replacement), loosen the nuts and remove the connecting plates from the battery terminals.
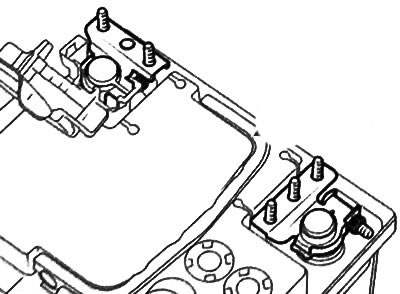
10.If necessary (in case of replacement), loosen the nuts and remove the connecting plates from the…


Note: It is recommended to mark the installation position of the battery terminals.


Installing the battery


1. Check the technical condition of the battery.

2. If using a new battery, press the connector plates onto the battery terminals.

Caution: Poor contact may cause electrical system failures.


3. Tighten the nuts of the connecting plates on the battery terminals to a torque of 6 N·m.

4. Installation is carried out in the reverse order of removal.

5. Tighten the threaded connections to the specified tightening torques:
  • battery bracket bolt: 12 Nm;
  • positive battery terminal nut: 8 N·m;
  • negative battery terminal nut: 8 Nm.
This article is available on: russian, bulgarian, belarusian, ukrainian, serbian, croatian, romanian, polish, slovak, hungarian
Article has been reviewed by editor: Petrovsky Roman
Share with friends:
 
Logan 2: Engine electrical equipment
Next

 
Removal and installation the generator, engine D4F (1.2 l)
Removal and installation of the generator, K7M engine (1.6 l, 8…
Removal and installation of the generator, K4M engine (1.6 l, 16…
Removal and installation of the generator, K9K engine (diesel 1.5 l)
Generator repair
Other articles on other Renault models

➽ Battery charging system with D7F engines (models from 1999) Renault Kangoo 1 (1997-2007)
➽ Starting and charging circuit for the battery, cooling system… Renault Symbol 2 (2008-2013, petrol)
➽ Checking the battery charging system Renault Espace III (1996-2002)
➽ Battery charging circuit Renault Duster 1 (2009-2017)
➽ Battery Charging Circuit Diagram (F4P Engines) Renault Laguna 2 (2001-2007)
Link to this article in different formats
Reviews and comments of visitors
No comments yet


Add two numbers 39 + 28


Logan 2 (2012-2020) 
  • General information
  • Faults en route
  • Daily checks
  • Governing bodies
  • Maintenance
  • Power unit
  • Petrol engines 1.2 l
  • Petrol engines 1.6 l
  • Diesel engines 1.5 l
  • Cooling system
  • Lubrication system
  • Power and control system
  • Intake and exhaust system
  • Engine electrical equipment
  • Transmission
  • Clutch
  • Car gearbox
  • Drive shafts
  • Chassis, running gear
  • Suspension and wheels
  • Brake system
  • Steering
  • Body and interior
  • Exterior (external elements)
  • Interior (internal elements)
  • Safety system
  • Heating and air conditioning
  • Electrical equipment
  • Equipment and devices
  • Wiring diagrams (sedan)
  • Wiring diagrams (wagon)
Logan 1 (2004-2012, petrol) 
  • General information
  • Vehicle device
  • User manual
  • Faults en route
  • Daily maintenance
  • First maintenance
  • Second maintenance
  • Driver tips
  • Power unit
  • Engine repair
  • Lubrication system
  • Cooling system
  • Power and exhaust system
  • Transmission
  • Clutch
  • Car gearbox
  • Drive shafts
  • Chassis, running gear
  • Front suspension
  • Rear suspension
  • Steering
  • Brake system
  • Wheels and tires
  • Body and interior
  • Exterior (external elements)
  • Interior (internal elements)
  • Doors, locks and windows
  • Body Care
  • Electrical equipment
  • Equipment and devices
  • Headlights and lighting
  • Power devices
  • Electrical circuits
RenaultBook.ru © 2018–2026 | Mobile version | News and articles | Sitemap: EN BG BY UA RS HR RO PL SK HU | Administration | Site search | Bookmark
Duster 1 (2009-2017) | Fluence 1 (2009-2020, petrol) | Kangoo 1 (1997-2007) | Laguna 2 (2001-2007) | Logan 1 (2004-2012, petrol) | Logan 2 (2012-2020) | Megane 1 (1995-2002) | Megan 2 (2002-2009, petrol) | Sandero 1 (2007-2012, petrol) | Scenic 1 (1996-2003) | Symbol 1 (1999-2008, petrol) | Symbol 2 (2008-2013, petrol) | Renault 19 (1988-1996) | Espace I and II (1984-1996) | Espace III (1996-2002) | Clio 1 (1990-1998) |
We want your visit to be comfortable 😌 and use cookies 🍪 to do so.