
Spare wheel
The wheel is located in the luggage compartment.
To get it:
- open the trunk;
- depending on the car, remove the luggage rack or fold it up and place it in its end position;
- rest the luggage compartment mat vertically against the back of the rear seat or folded luggage compartment shelf, if equipped;
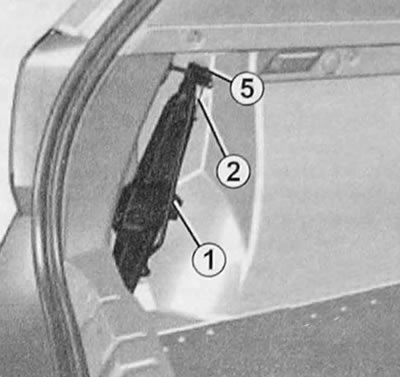
- unscrew the center mount (1);
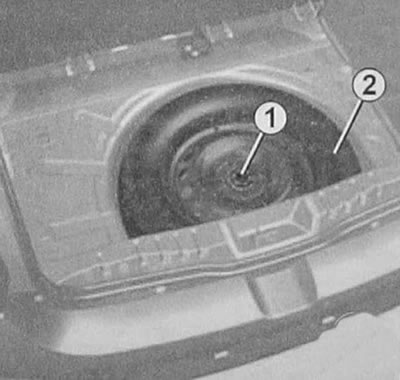
- remove the spare wheel (2).
Note:
Make sure the spare or punctured wheel and wheel arch are in place so that the luggage compartment mat does not fall through.
After installation, make sure that the luggage compartment mat is correctly inserted into the stops so as not to damage it (if the car is equipped accordingly).
Attention:
If the spare wheel has been stored for several years, take it to a service station mechanic to check that the wheel is suitable for safe use
Vehicle equipped with a spare tire of a different diameter
- Installing more than one such spare wheel on one vehicle is prohibited.
- Because the regular tire is larger than the spare tire, the vehicle's ride height will decrease.
- As soon as possible, change the spare wheel to a wheel identical to the one originally installed.
- When using this spare wheel (Only temporary use is allowed) the speed of the vehicle must not exceed the value indicated on the wheel label.
- Installing a spare tire can affect vehicle performance. Do not accelerate or slow down too quickly. Reduce speed when turning.
- If snow chains are required, mount the spare wheel on the rear axle and check the air pressure in the tire.
Tire repair kit
Attention:
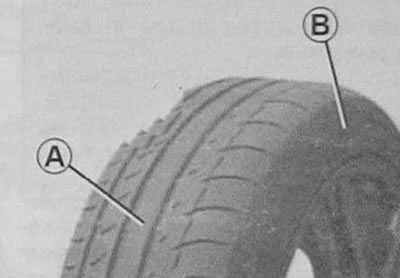
- The kit is designed to repair the tire tread (A), the damage size of which does not exceed 4 mm. The kit is not suitable for repairing damage larger than 4 mm and cuts on the sidewall (IN) tires.
- Also, make sure the rim is in good condition.
- Do not remove the item that caused the puncture if it is still in the tire.
- Do not use the kit if the wheel is damaged due to driving with a flat tire.
- Before carrying out repairs, carefully inspect the side surfaces of the tires.
- Also, driving when there is insufficient or no tire pressure (tires punctured), can lead to a decrease in safety and the impossibility of repairing tires.
- This repair method is a temporary measure. A punctured tire should be examined by a specialist as soon as possible (and repair if possible).
- When replacing a tire repaired with this kit, you must notify the tire changer.
- While driving, due to the presence of a special agent in the tire, a slight vibration may be felt.
- The kit is only certified for inflating car tires. to which it was originally attached. Never use this kit to inflate another vehicle's tires or any other inflatable items (rubber ring, boat, etc.).
- When working with a reservoir of tire repair agent, avoid skin contact with the agent. If drops come into contact with the skin, wash them off with plenty of water.
- Keep the tire repair kit out of the reach of children.
- Do not throw away the empty bottle. Take it to the dealer (service station or organization responsible for collection of such waste).
- The shelf life of the product is indicated on the label on the bottle. Check if the product has expired.
- To replace the tire inflation tube and the product bottle, contact the manufacturer's service station.
Depending on the vehicle, the tire inflation kit may be located in the luggage compartment or under the luggage compartment carpet.
Attention:
Before using the kit, park the vehicle well away from the roadway, turn on the hazard warning lights and emergency brake, get all passengers out of the vehicle and ensure that they do not end up on the roadway.
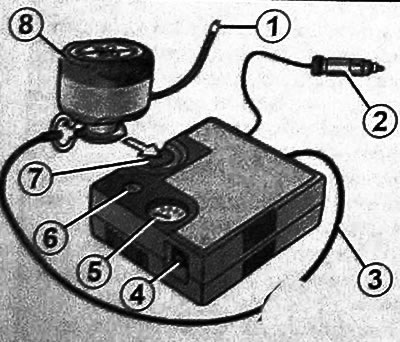
With the engine running and the parking brake applied:
- unfold the cylinder hose;
- connect the hose (3) compressor to the cylinder outlet (8);
- connect or screw on the cylinder depending on the vehicle equipment (8) to the compressor at the recess level (7) balloon;
- unscrew the valve cap of the corresponding wheel and screw on the cylinder tip instead (1);
- be sure to plug in (2) into the socket for additional equipment of the car;
- press the switch (4). to inflate tires to the specified pressure level (see paragraph «Tire pressure»);
- no later than 15 minutes, stop inflating the tire and check the air pressure in it on the pressure gauge (5);
Note:
- While the balloon is empty (about 30 seconds), pressure
- by pressure gauge (5) for a short time it can rise to 6 bar, then the pressure drops.
- adjust the pressure: to increase the pressure, continue to inflate the tire, and to decrease the pressure, press the button (6).
If after 15 minutes the minimum pressure of 1.8 bar cannot be reached, no repair is possible; do not continue driving and contact the manufacturer's representative.
Attention: When parking on the side of the road, you must warn other road users of the presence of your vehicle by installing a signal triangle or other devices prescribed by local regulations of the country in which you are located.
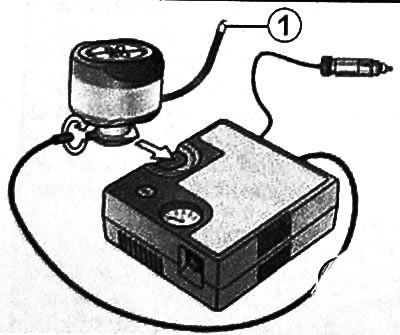
After inflating the tire, remove the kit: slowly unscrew the inflation tip (1), to prevent leakage of the product, and place the container in a plastic bag to avoid spilling its contents in the future.
Attention: No objects should be placed on the floor in front of the driver, as in the event of sudden braking, they can get under the pedals and interfere with their movement.
- Affix the repaired driving reminder sticker in a prominent location on the dashboard.
- Remove the kit.
- After the first pumping, the tire will continue to leak air, so to eliminate it, it is necessary to run the tire in order to seal the puncture site.
- Immediately start driving for a distance of 3 km at a speed of 20-60 km / h so that the product is evenly distributed in the tire, then stop and check the tire pressure.
- If the pressure is higher than 1.3 bar but less than prescribed, bring it back to normal (see sticker on the end of the driver's door), and if this fails, contact the manufacturer's service station: repair is not possible.
Precautions for Using the Kit
The kit must not be operated for more than 15 minutes continuously.
Attention:
- A loose or missing valve cap can cause tire leaks and pressure drops.
- Valve caps must always be fully screwed on and identical to those originally installed.
- After repairs made with the kit, the vehicle must not have traveled more than 200 km and the speed must not exceed 80 km/h. You will be reminded of this by a sticker that you must stick after repair in a prominent place on the dashboard.
- Depending on the country or according to local regulations, a tire repaired with a tire inflation kit must be replaced.
Tools
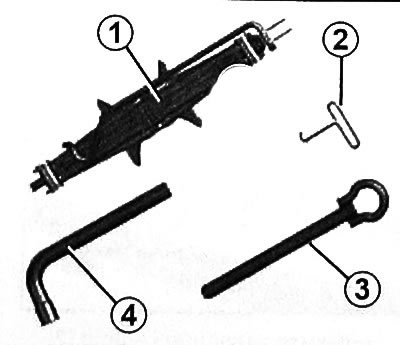
1. Jack. 2. Wrench for removing the decorative wheel trim. 3. Tow hook 4. Wheel wrench
The presence and location of the tools in the vehicle depends on the equipment of the vehicle.
Jack
Attention:
- Never leave tools lying in a mess in the car: they can injure you during hard braking. After using the tools, place them correctly in their respective sockets, otherwise there is a risk of injury.
- If wheel bolts are included in the tool kit, use these bolts for the spare wheel only (see spare wheel label).
- The jack is for wheel replacement only. Never use a jack during repairs or to access under the vehicle.
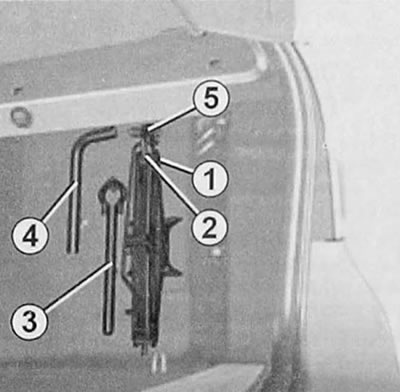
To use the jack (1) unscrew the nut (5). When laying down the jack, fold it properly, then stow it in place. tighten the nut (5) to secure the jack.
Wrench for removing the decorative wheel trim
Used to remove decorative wheel covers.
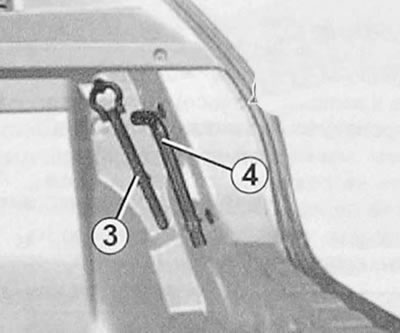
Towing hook
See section «Towing» below.
Wheel wrench
It is used for tightening / unscrewing the wheel bolts.
Attention:
- Never leave tools lying in a mess in the car: they can injure you during hard braking. After using the tools, place them correctly in their respective sockets, otherwise there is a risk of injury.
- If wheel bolts are included in the tool kit, use these bolts for the spare wheel only (see spare wheel label).
- The jack is for wheel replacement only. Never use a jack during repairs or to access under the vehicle.
Decorative caps/ rims
Central decorative cap that does not cover the wheel bolts
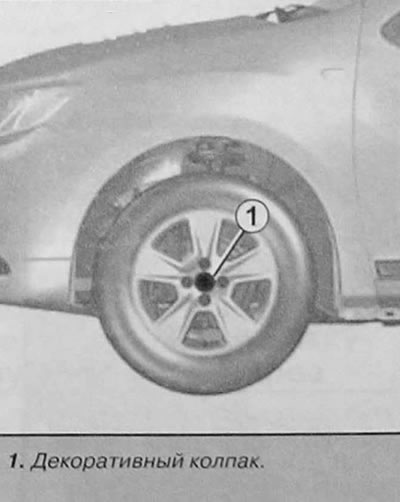
Bolts are directly accessible.
Central decorative cap covering the wheel bolts
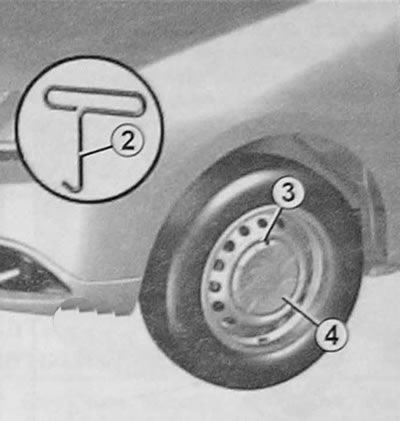
Remove the cap (4) with cap wrench (2). inserting it into a special groove (3).
When installing, correctly position the cap relative to the rim and snap it into place.
Decorative cap covering the wheel bolts
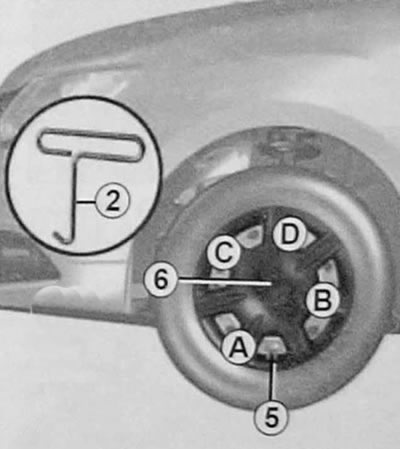
Remove the decorative cap (6) using the key to remove the decorative cap (2), by inserting the key into the valve recess (5).
When installing, position it correctly relative to the valve (5). Insert the fasteners starting at the side of valve A, then B and C, ending with the side opposite valve D.
Wheel replacement
Turn on the alarm.
Park your vehicle off the road on a hard, level and non-slip surface.
Apply the parking brake, then shift into gear (first or reverse).
Ask all passengers to get out of the vehicle and keep clear of the road.
Vehicles with jack and wheel wrench
If necessary, remove the decorative cap.
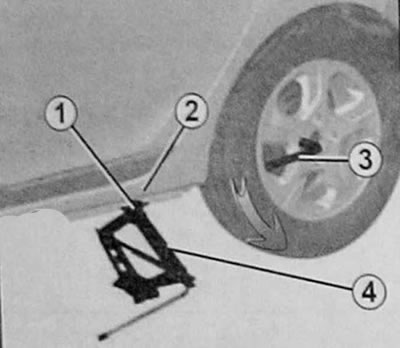
Loosen the wheel bolts with the wheel wrench (3). Position it in such a way that you can press from above.
Note:
If your car does not have a jack and a wheel wrench, you can purchase them from the manufacturer's representatives.
Attention: When parking on the side of the road, you must warn other road users of the presence of your vehicle by installing a signal triangle or other devices prescribed by local regulations of the country in which you are located.
Position the jack (4) horizontally. be sure to install its head at the height of the stiffener (1) near the corresponding wheel at the mark level (2).
Start spinning the jack (4) manually to set its foot correctly (it should go under the car a little).
Make a few turns until the wheel is off the ground.
Caution: To avoid personal injury or damage to the vehicle, raise the jack until the wheel is no higher than 3 cm from the ground.
Turn out bolts and remove a wheel.
Slide the spare wheel onto the center hub and rotate it until the mounting holes on the hub and wheel are aligned.
If bolts are included with the spare wheel, use them only to secure the spare wheel.
Tighten the bolts, making sure the wheel is correctly positioned on the hub, and lower the jack.
After lowering the jack, tighten the bolts tightly and contact a service station to check the tightness of the bolts (tightening torque - 110 N·m) and air pressure in the spare tire.
Note: If you are using security wheel bolts, they must be installed according to the pattern on the inside of the hubcap (otherwise you will not be able to attach the cap).
Attention:
If a tire is damaged, replace the wheel immediately.
Damaged tire should be inspected (and repair if possible) specialist.
Tires
Tires and traffic safety
Tires are the only element of your car that is in constant contact with the road, so it is very important to keep your tires in good condition.
You must strictly follow the local traffic regulations.
For replacement, use only tires of the same brand, size, type and tread pattern as those that were originally installed on the vehicle.
New tires installed on the car must be completely identical to the tires installed originally, or match the tires recommended by the manufacturer's service station.
Tire care
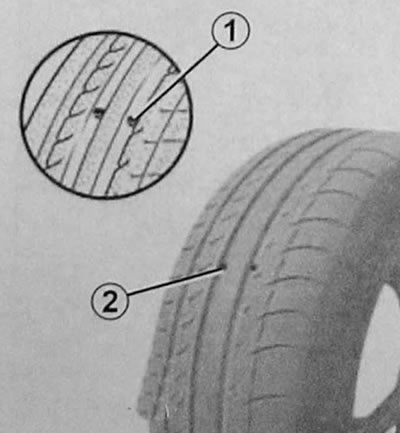
Tires must be in good condition and the tread must have sufficient tread depth. Tires recommended by the manufacturer's technical departments have special wear indicator protrusions (1). which are molded on the treadmill wheels.
When the tread pattern is worn to a level where the indicator lugs are visible (2), the tires need to be replaced because the tread depth has decreased to 1.6 mm, resulting in poor grip on wet roads.
Overloading the vehicle, driving on motorways for a long time, especially in hot weather, or constantly driving on poorly paved roads cause rapid tire wear and reduce tire safety.
Attention: Driving errors such as driving over obstacles (e.g. on a curbstone), can lead to damage to tires and rims, as well as to the violation of the correct geometry of the front or rear suspension. In this case, contact the manufacturer's service station for verification.
Tire pressure
Tire pressure (including the spare wheel) should always strictly comply with the recommended values, it should be checked at least once a month, and also before each long trip (see the sticker affixed to the edge of the driver's door).
Attention:
- Insufficient tire pressure leads to their intensive and uneven wear and overheating, which reduces traffic safety and can cause:
- deterioration of vehicle stability on the road;
- rupture or destruction of the tread tread.
- Tire inflation pressure depends on vehicle load and speed. Adjust tire pressure to suit operating conditions (see label affixed to edge of driver's door).
Air pressure should be checked with cold tires. Do not pay attention if the tire pressure after driving at high speed or in hot weather exceeds the recommended values.
If it is not possible to measure the pressure with cold tires, the recommended values should be increased by 0.2-0.3 bar.
Attention:
- Never bleed hot tires to correct air pressure.
- A loose or missing valve cap can cause tire leaks and pressure drops.
- Valve caps must always be fully screwed on and identical to those originally installed.
Wheel swap
Wheel rotation is not recommended.
Tire change
Attention:
For safety reasons, tire replacement should only be carried out by a specialist.
Simultaneous installation of tires of different types on a car will lead to the fact that:
- your vehicle will no longer comply with current regulations;
- the behavior of the car when cornering will change;
- increased effort on the steering wheel;
- difficult to install snow chains.
Features of tire operation in winter
Anti-skid chains
For safety reasons, the installation of snow chains on the rear wheels is strictly prohibited.
If you install tires larger than the original tires, the installation of snow chains becomes impossible.
Attention:
- Chains can only be fitted to tires that are the same size as the tires originally fitted to your vehicle.
- Only special snow chains may be fitted to the wheels. Contact the manufacturer's service station.
Tires for driving on ice and snow («winter» tires)
We recommend that you install these tires on all four wheels, which will give your car the best grip on the road.
Attention: Sometimes these tires are marked with the direction of rotation of the wheel when the vehicle is moving forward and the maximum speed value, which may be lower than the maximum speed of your vehicle.
Studded tires
Studded tires may only be used for a limited time and in accordance with local laws and regulations.
You must adhere to the speed limits set by the current regulations.
Attention: In all cases, we recommend that you contact the representative of the manufacturer, where you will receive recommendations on choosing the most suitable equipment for your car.