
English Русский
Български
Беларускі
Український
Српски
Hrvatski
Română
Polski
Slovenský
Magyar
Bookmark Contacts Articles Sitemap
Company vehicles Peugeot Company vehicles Opel Company vehicles Skoda Company vehicles Land Rover Company vehicles Mitsubishi Company vehicles Volkswagen Company vehicles Honda
RenaultBook.ru


Duster   Fluence   Kangoo   Laguna   Logan   Megane   Sandero   Scenic   Symbol   Clio   Other
Logan 1 (2004-2012, petrol) Logan 2 (2012-2020)

Trunk lid (sedan) (Renault Logan 2)

  • Main
  • Logan
  • Logan 2 (2012-2020)
  • Body and interior
  • Exterior (external elements)
  • Trunk lid (sedan)
0
Contents: Removal and installation the trunk…🠛 Adjusting the trunk lid 🠛
Note:: a special tool/device must be used.
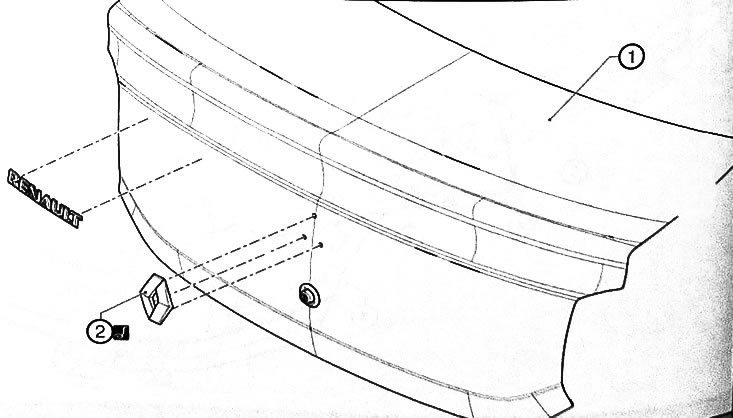

1. Trunk lid. 2. Emblem.
1. Trunk lid. 2. Emblem.


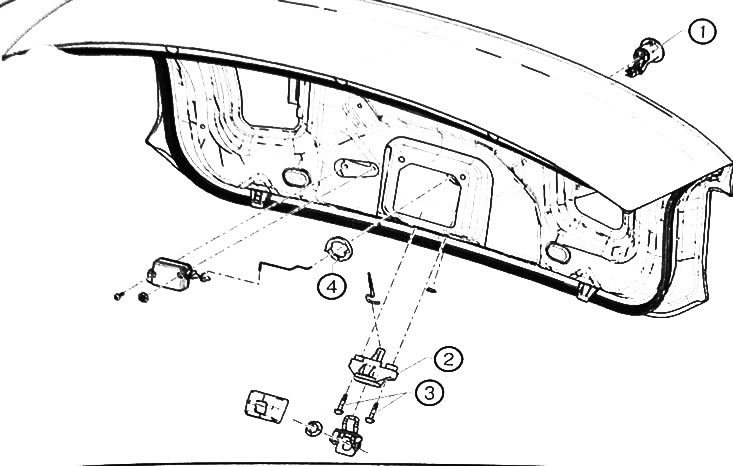
1. Trunk lid lock secret. 2. Trunk lid lock. 3. Trunk lid lock fastening bolt. 4. Trunk lid secret…

1. Trunk lid lock secret. 2. Trunk lid lock. 3. Trunk lid lock fastening bolt. 4. Trunk lid secret fastening nut.


Removal and installation the trunk lid


Note:

This operation can be performed in two ways:
  • removal without overhangs (used when replacing doors)
  • removal with awnings (used to provide initial adjustment)


The front door can be removed without removing the front fender.


Removal the trunk lid without hinges


1. Remove the trunk lid wiring harness (depending on the level of equipment).

2. Loosen the bolts (1) on both sides of the vehicle.
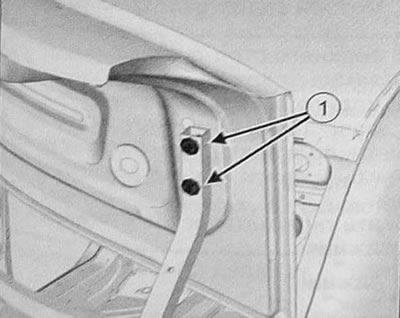
2. Loosen the bolts (1) on both sides of the vehicle.


3. Remove the trunk lid from the car (two people will be needed).

Installing a trunk lid without hinges


Installation is carried out in the reverse order of removal.

Adjust the gaps around the perimeter of the trunk lid and the alignment of the lid surfaces and adjacent body surfaces.

Removal the trunk lid with hinges


1. Remove the trunk lid wiring harness (depending on the level of equipment).

2. Remove the trunk lid pillars.

3. Remove the rear shelf trim.

4. Unscrew the fasteners (2) of the trunk lid hinge on both sides of the vehicle.
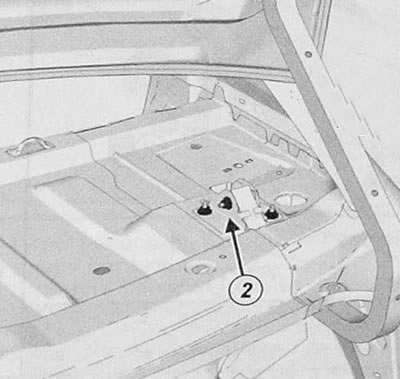
4. Unscrew the fasteners (2) of the trunk lid hinge on both sides of the vehicle.


5. Remove the trunk lid (two people will be needed).


Installing a trunk lid with hinges


Installation is carried out in the reverse order of removal.

Adjust the gaps around the perimeter of the trunk lid and the alignment of the lid surfaces and adjacent body surfaces.

Adjusting the trunk lid


Note: Body clearance values are given in the "Body Repair and Dimensions" section below.


There are three ways to adjust the trunk lid:
  • by means of the mounting bolts of the trunk lid hinges;
  • by means of the nuts securing the trunk lid hinges;
  • via the trunk lid locking bracket panel.

Original article is on the portal www.renaultbook.ru


Note: Observe the sequence of adjustment zones shown in the figure.
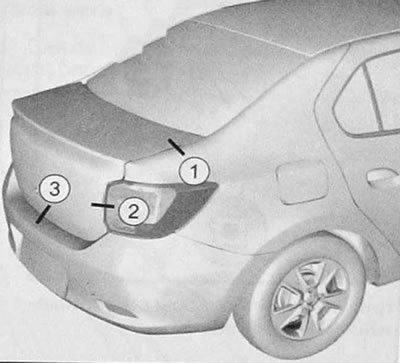

Note: Observe the sequence of adjustment zones shown in the figure.


Note: The symbols A, B, C and D represent the adjustment method. The black dot in the center corresponds to the bolt shaft. The gray areas correspond to the adjustable component. The white areas correspond to the adjustment area.
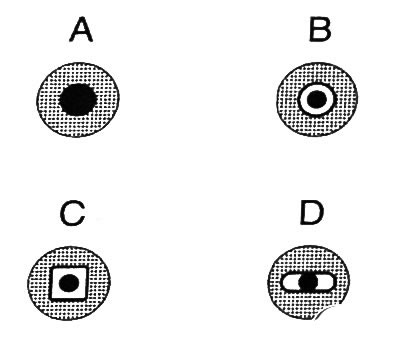

Note: The symbols A, B, C and D represent the adjustment method. The black dot in the center…


Adjustment by means of mounting bolts of the trunk lid hinges


1. Loosen the bolts (1) securing the awnings to the trunk lid on both sides of the vehicle.
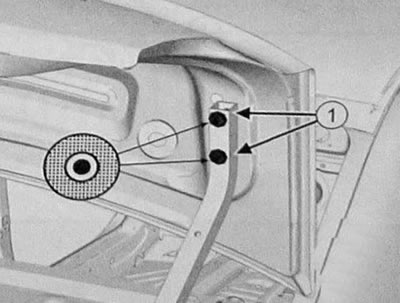


1. Loosen the bolts (1) securing the awnings to the trunk lid on both sides of the vehicle.


2. Adjust the gaps around the perimeter of the trunk lid.

3. Tighten the bolts securing the awnings to the trunk lid.

Adjustment by means of nuts for fastening the hinges of the trunk lid


1. Remove the rear shelf trim.

2. Unscrew the nuts (2) of the hinges on both sides of the vehicle.
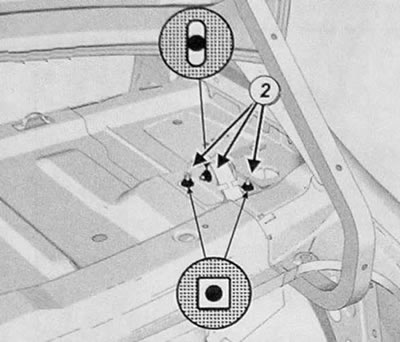
2. Unscrew the nuts (2) of the hinges on both sides of the vehicle.


3. Adjust the gaps around the perimeter of the trunk lid.

4. Tighten the nuts securing the hinges.

5. Install the rear shelf trim.

Adjustment via the trunk lid locking bracket panel


1. Loosen the lock bracket bolts (3).
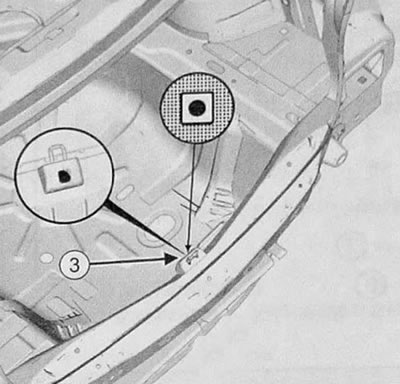
1. Loosen the lock bracket bolts (3).


2. Adjust the gaps around the perimeter of the trunk lid.

3. Tighten the lock bracket mounting bolts.
This article is available on: russian, bulgarian, belarusian, ukrainian, serbian, croatian, romanian, polish, slovak, hungarian
Article has been reviewed by editor: Petrovsky Roman
Share with friends:
Previous
Logan 2: Exterior (external elements)
Next

Rear bumper
Rear doors
Front doors
Front body panel
Front fenders and hood
Trunk door (station wagon)
Trunk release cable
Fuel tank filler flap release drive cable
Exterior rear view mirrors
General information on car glass repair
Other articles on other Renault models

➽ Tailgate and trunk lid Renault Fluence 1 (2009-2020, petrol)
➽ Replacing the trunk light bulb Renault Laguna 2 (2001-2007)
➽ Removal and installation the trunk lid Renault Megane 1 (1995-2002)
➽ Removal and installation trunk trims Renault Sandero 1 (2007-2012, petrol)
➽ Folding trunk lid — removal, installation, adjustment Renault Scenic 1 (1996-2003)
Link to this article in different formats
Reviews and comments of visitors
No comments yet


Add two numbers 26 + 10


Logan 2 (2012-2020) 
  • General information
  • Faults en route
  • Daily checks
  • Governing bodies
  • Maintenance
  • Power unit
  • Petrol engines 1.2 l
  • Petrol engines 1.6 l
  • Diesel engines 1.5 l
  • Cooling system
  • Lubrication system
  • Power and control system
  • Intake and exhaust system
  • Engine electrical equipment
  • Transmission
  • Clutch
  • Car gearbox
  • Drive shafts
  • Chassis, running gear
  • Suspension and wheels
  • Brake system
  • Steering
  • Body and interior
  • Exterior (external elements)
  • Interior (internal elements)
  • Safety system
  • Heating and air conditioning
  • Electrical equipment
  • Equipment and devices
  • Wiring diagrams (sedan)
  • Wiring diagrams (wagon)
Logan 1 (2004-2012, petrol) 
  • General information
  • Vehicle device
  • User manual
  • Faults en route
  • Daily maintenance
  • First maintenance
  • Second maintenance
  • Driver tips
  • Power unit
  • Engine repair
  • Lubrication system
  • Cooling system
  • Power and exhaust system
  • Transmission
  • Clutch
  • Car gearbox
  • Drive shafts
  • Chassis, running gear
  • Front suspension
  • Rear suspension
  • Steering
  • Brake system
  • Wheels and tires
  • Body and interior
  • Exterior (external elements)
  • Interior (internal elements)
  • Doors, locks and windows
  • Body Care
  • Electrical equipment
  • Equipment and devices
  • Headlights and lighting
  • Power devices
  • Electrical circuits
RenaultBook.ru © 2018–2026 | Mobile version | News and articles | Sitemap: EN BG BY UA RS HR RO PL SK HU | Administration | Site search | Bookmark
Duster 1 (2009-2017) | Fluence 1 (2009-2020, petrol) | Kangoo 1 (1997-2007) | Laguna 2 (2001-2007) | Logan 1 (2004-2012, petrol) | Logan 2 (2012-2020) | Megane 1 (1995-2002) | Megan 2 (2002-2009, petrol) | Sandero 1 (2007-2012, petrol) | Scenic 1 (1996-2003) | Symbol 1 (1999-2008, petrol) | Symbol 2 (2008-2013, petrol) | Renault 19 (1988-1996) | Espace I and II (1984-1996) | Espace III (1996-2002) | Clio 1 (1990-1998) |
We want your visit to be comfortable 😌 and use cookies 🍪 to do so.