
The grid of conductive filaments of the glass heater, applied by screen printing on the inside of the glass, can be damaged by careless handling, as a result of which the corresponding part of the electrical circuit may fail.
The exact location of the break can be determined with a voltmeter.
These faults can be repaired using Rear Defogger Repair Varnish, catalog number MPR 77 01 421 135 (packaging 2 g).
Locating a break with a voltmeter
Search in zone A-B
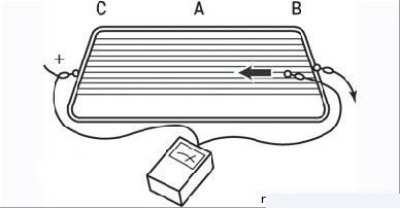
Figure 8.52. Detection of a break in the rear window heating element in zone A-B
Turn on the ignition. Turn on the heated rear window.
Connect the voltmeter lead from the positive terminal to «positive» rear window defroster outlet.
Connect the wire coming from «negative» voltmeter output, to the thread from the side «negative» rear window heater outlet (line B) - The voltage should be approximately equal to the battery voltage.
move «negative» wire to line A (in the direction of the arrow) - the voltage should drop gradually.
A sharp drop in voltage means that the filament is damaged in this place (perform this operation for each thread). Mark the damaged area with a marker.
Search in zone C-A
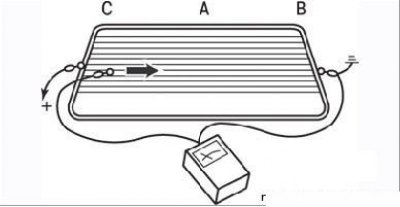
Figure 8.53. Detection of a break in the rear window heating element in zone C–A
Connect the wire coming from «negative» voltmeter output, to «negative» rear window defroster outlet.
Connect the wire coming from «positive» voltmeter output, to one of the threads from the side «positive» rear window heater outlet (line C) – the voltage must be equal to the battery voltage.
move «positive» wire to line A (in the direction of the arrow) - the voltage should drop gradually.
A sharp drop in voltage means that the filament is damaged in this place (perform this operation for each thread). Mark the damaged area with a marker.
Heating filament repair
Using alcohol or glass cleaner, treat the repair area to remove dust and grease, then wipe it with a clean, dry cloth.
To get a straight line, glue the repaired area on both sides with adhesive tape, leaving only the damaged thread itself open.
Shake the bottle before applying the polish so that no silvery residue remains on its bottom.
Apply a sufficient layer of varnish with a thin brush. In case of applying several (no more than three) layers, observe the drying time of each layer.
If a drip does form, it can be removed with a knife or razor blade after a few hours, when the product has completely hardened.
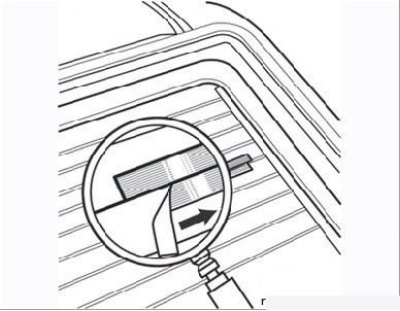
Figure 8.54. Removing the adhesive tape after repairing the rear window heating element
The adhesive tape used as a guide can only be removed approximately one hour after application. The tape is torn off by applying force perpendicular to the thread in the direction of the arrow (Figure 8.54). At an air temperature of 20°C, the varnish dries completely after three hours. At lower temperatures, the drying time is slightly longer.