
English Русский
Български
Беларускі
Український
Српски
Hrvatski
Română
Polski
Slovenský
Magyar
Bookmark Contacts Articles Sitemap
Company vehicles Peugeot Company vehicles Opel Company vehicles Skoda Company vehicles Land Rover Company vehicles Mitsubishi Company vehicles Volkswagen Company vehicles Honda
RenaultBook.ru


Duster   Fluence   Kangoo   Laguna   Logan   Megane   Sandero   Scenic   Symbol   Clio   Other
Megane 1 (1995-2002) Megan 2 (2002-2009, petrol)

Replacing seals in manual transmission (Renault Megane 1)

  • Main
  • Megane
  • Megane 1 (1995-2002)
  • Transmission
  • Mechanical gearbox
  • Replacing seals in manual transmission
0
Contents: Right drive shaft oil seal 🠛 Left drive shaft oil seal 🠛 Input shaft seal 🠛

Right drive shaft oil seal


Note: New roll pins securing the drive shaft to the differential will be required during installation (refer to Chapter Drive shafts).


1. Set the handbrake, then jack up the front of the car and place it on axle stands. Remove the right wheel.

2. Drain the transmission oil (refer to Section Gearbox oil change).

3. Refer to Chapter Drive shafts and disconnect the drive shaft from the transmission. Note that it is not necessary to separate the drive shaft from the hub, but to remove the inner end of the shaft from the differential gear slots, allowing the hub/shaft assembly to come out.

Note: Do not allow the shaft to hang under its own weight, this may cause damage to the CV joints/boots.


4. Remove the sealing ring from the differential side gear shaft.

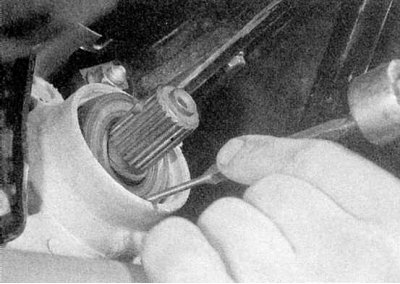
5. Wipe off the old seal. Measure the depth of the seal relative to the edge of the crankcase. This will help to correctly position the new seal if it is not possible to use the appropriate special Renault tool.
5. Wipe off the old seal. Measure the depth of the seal relative to the edge of the crankcase. This…


6. Using a small punch, push the outer edge of the old seal inward so that its opposite peripheral part comes out of the crankcase (refer to the accompanying illustration). Grasp the exposed edge of the seal with pliers and pull it out of the crankcase. Try not to damage the grooves of the differential side gear.


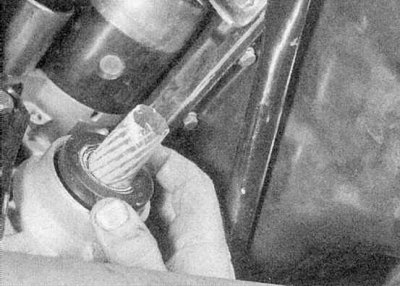
7. Wipe the walls of the seal mounting hole in the crankcase and wrap adhesive tape around the splined end of the differential pinion shaft to avoid damaging the new seal.
7. Wipe the walls of the seal mounting hole in the crankcase and wrap adhesive tape around the…


8a. Apply a small amount of grease to the sealing lip of the new oil seal and carefully press it onto the differential pinion shaft with the sealing lip facing inward.
8a. Apply a small amount of grease to the sealing lip of the new oil seal and carefully press it…


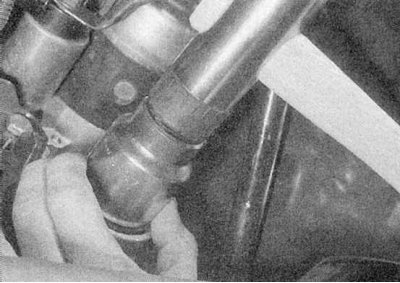
8b. Drive the seal into the transmission to the depth measured before removal, resting a piece of metal tubing or head against its hard outer edge (refer to the illustrations).

9. Remove the adhesive tape from the end of the side gear shaft and install a new O-ring on it.

10. Connect the drive shaft to the transmission shaft (refer to Chapter Drive shafts).

11. Fill the transmission with oil as described in Section Gearbox oil change.


12. Install the wheel and lower the vehicle to the ground. Tighten the wheel bolts to the specified Specifications effort.

Left drive shaft oil seal


1. On the left side of the transmission, the oil seal is not used. Sealing is provided by the protective boot of the drive shaft. If oil leaks, replace the boot as described in Chapter Drive shafts.

Input shaft seal


JB1 and JB3 transmissions


1. Replacing the input shaft seal involves removing the transmission, since the guide bushing assembly is pressed into the crankcase and is removed inward. It is recommended to entrust this work to a specialist.

JC5 Transmission


Note: The release bearing guide bushing is pressed into the transmission case and requires special tools to remove and install (Renault Emb. 880 and Emb. 1163). Removal and installation without these tools will result in damage to the crankcase/guide bushing.


1. Remove the transmission as described in Section Removal and installation the gearbox, then remove the clutch release mechanism (refer to Chapter Clutch).

2. Loosen and remove the two bolts securing the release bearing guide bushing to the transmission. Remove the guide bushing from the transmission case (see Note) and remove it from the input shaft. The Renault tool is a sliding hammer and is installed on the outer part of the guide bushing.

3. Where necessary, carefully press the seal, taking care not to scratch the shaft or crankcase, and remove it from the end of the shaft. The seal and guide bush must be replaced.

4. Wrap tape around the end of the input shaft and install the new oil seal/guide bushing assembly into position.


5. Remove the adhesive tape and install the guide bushing into the transmission case.

6. Install the guide bushing mounting bolts and tighten them to the specified Specifications effort.

7. Install the clutch release mechanism (refer to Chapter Clutch), then install the transmission as described in Section Removal and installation the gearbox.
This article is available on: russian, bulgarian, belarusian, ukrainian, serbian, croatian, romanian, polish, slovak, hungarian
Article has been reviewed by editor: Fedoseev Denis
Share with friends:
Previous
Megane 1: Mechanical gearbox
Next

Removal and installation the gear shift mechanism
Adjusting the gear shift mechanism
Gearbox oil change
Manual gearbox — description
Manual Transmission Specifications
Checking, removing and installing the reversing light switch
Removal and installation the speedometer drive
Removal and installation the gearbox
General description of manual transmission overhaul
Other articles on other Renault models

➽ Replacing the control rod of a manual transmission Renault Sandero 1 (2007-2012, petrol)
➽ Manual transmission Renault Fluence 1 (2009-2020, petrol)
➽ Starting system with E7J engines, manual transmission, without… Renault Kangoo 1 (1997-2007)
➽ Replacing camshaft seals Renault Laguna 2 (2001-2007)
➽ Replacing valve stem seals Renault Logan 1 (2004-2012, petrol)
Link to this article in different formats
Reviews and comments of visitors
No comments yet


Add two numbers 43 + 17


Megan 2 (2002-2009, petrol) 
  • User manual
  • Introduction to manual
  • Controls and instruments
  • Salon equipment
  • Operation and driving
  • Maintenance and care
  • Power unit
  • Engine repair
  • Fuel system
  • Injection system
  • Intake and exhaust system
  • Starting and charging system
  • Cooling system
  • Decreased toxicity
  • Transmission
  • Clutch
  • Mechanical gearbox
  • Automatic gearbox
  • Wheel drive mechanism
  • Chassis, running gear
  • Suspension and wheels
  • Steering
  • Brake system
  • Body and interior
  • Exterior (external elements)
  • Interior (internal elements)
  • Doors, locks and windows
  • Heating and air conditioning
  • Electrical equipment
  • Equipment and devices
  • Headlights and lighting
  • Electrical circuits
Megane 1 (1995-2002) 
  • General information
  • User manual
  • Maintenance
  • Power unit
  • Petrol engines 1.4/1.6 l
  • Petrol engines 2.0 l
  • Diesel engines 1.9 l
  • Overhaul of engines
  • Cooling system
  • Fuel system (petrol)
  • Fuel system (diesel)
  • Decreased toxicity
  • Charge and launch systems
  • Ignition system (petrol)
  • Preheat system (diesel)
  • Transmission
  • Clutch
  • Mechanical gearbox
  • Automatic gearbox
  • Drive shafts
  • Chassis, running gear
  • Brake system
  • Car suspension
  • Steering
  • Body and interior
  • Exterior (external elements)
  • Interior (internal elements)
  • Doors, locks and windows
  • Electrical equipment
  • Equipment and devices
  • Electrical circuits
RenaultBook.ru © 2018–2026 | Mobile version | News and articles | Sitemap: EN BG BY UA RS HR RO PL SK HU | Administration | Site search | Bookmark
Duster 1 (2009-2017) | Fluence 1 (2009-2020, petrol) | Kangoo 1 (1997-2007) | Laguna 2 (2001-2007) | Logan 1 (2004-2012, petrol) | Logan 2 (2012-2020) | Megane 1 (1995-2002) | Megan 2 (2002-2009, petrol) | Sandero 1 (2007-2012, petrol) | Scenic 1 (1996-2003) | Symbol 1 (1999-2008, petrol) | Symbol 2 (2008-2013, petrol) | Renault 19 (1988-1996) | Espace I and II (1984-1996) | Espace III (1996-2002) | Clio 1 (1990-1998) |
We want your visit to be comfortable 😌 and use cookies 🍪 to do so.