
Removing
1. Disconnect the ground cable from the battery. Loosen the tension of the auxiliary drive belt as described in Chapter Maintenance and remove the drive belt from the alternator pulley.
Note. Renault recommends changing the drive belt after each removal.
Models with E7J and K7M engines
1. Apply the handbrake, then jack up the front of the vehicle and place it on axle stands.
Remove the right wheel, engine guard and wheel arch liner.
2. If the drive belt is to be replaced, on models without air conditioning, first remove the power steering drive belt as described in Chapter Maintenance.

3a. Remove the rubber covers (where there are) from the generator terminals, then unscrew the fixing nuts.
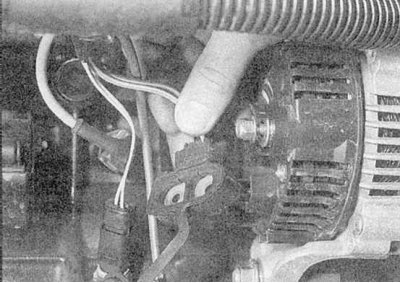
3b. Disconnect the electrical wiring from the rear of the generator (refer to illustrations).
4. Loosen the pivot and adjusting bolts and turn the alternator towards the engine. Remove the drive belt from the pulley.
5. Turn away and remove the top adjusting bolt of the generator.
6. Turn away and remove the lower hinge bolt of the generator.
7. Disconnect a tip of cross steering draft from the right rotary fist as it is described in the Head Suspension and steering.
8. On all models except Scenic, unscrew and remove the right bolts of the upper mounting of the suspension strut as described in Chapter Suspension and steering.
9. On Scenic models, remove the bolt securing the front subframe support bar to the wing spar, and the nut attaching it to the lower arm front pivot bushing, and remove the bar. Remove the rear support bar of the subframe in the same way. Contact the Head Suspension and steering and remove the two nuts and washers from the bolts holding the steering knuckle to the suspension strut. Remove the bolts and support the knuckle assembly.
10. Ask an assistant to lower the right suspension down and remove the generator.
Models with F3R engines
1. Remove the eight bolts securing the BB ignition coils to the bracket and move the coils to the side. Remove the top two bolts and loosen the bottom ignition coil bracket bolt. Rotate the bracket down to access the alternator mounting bolt.
2. Remove the rubber shells (where there are) from the generator terminals, then remove the mounting nuts and disconnect the electrical wiring from the rear of the generator.
Models with F7R engines
1. Apply the handbrake, then jack up the front of the vehicle and place it on axle stands. Remove the right wheel, lower engine shield and wheel arch liners.
2. On models with an air conditioner, remove the drive belt as described in Chapter Maintenance.
3. Remove the top tensioner mounting bolt and the tensioner bracket mounting bolt. Remove the tensioner, being careful not to lose the washer behind the mounting bracket.
4. Where necessary, remove the power steering hydraulic reservoir and move it to the side.
5. Remove the rubber shells (where there are) from the generator terminals, then remove the mounting nuts and disconnect the electrical wiring from the rear of the generator.
6. Turn away fixing bolts and nuts of the generator and remove the block from the engine.
Models with diesel engines
1. Behind the generator, remove the fuel line bracket bolt and move it to the side.
2. If the drive belt is to be replaced, jack up the front of the vehicle and place it on axle stands.
3. Remove the rubber shells (where there are) from the generator terminals, then remove the mounting nuts and disconnect the electrical wiring from the rear of the generator.
4. Turn away and remove fixing bolts, remove a driving belt from a pulley, then take the generator from the engine.
Installation
1. Install in reverse order.