
English Русский
Български
Беларускі
Український
Српски
Hrvatski
Română
Polski
Slovenský
Magyar
Bookmark Contacts Articles Sitemap
Company vehicles Peugeot Company vehicles Opel Company vehicles Skoda Company vehicles Land Rover Company vehicles Mitsubishi Company vehicles Volkswagen Company vehicles Honda
RenaultBook.ru


Duster   Fluence   Kangoo   Laguna   Logan   Megane   Sandero   Scenic   Symbol   Clio   Other
Megane 1 (1995-2002) Megan 2 (2002-2009, petrol)

Removal and installation the intake manifold and exhaust manifold (Renault Megane 1)

  • Main
  • Megane
  • Megane 1 (1995-2002)
  • Power unit
  • Fuel system (diesel)
  • Removal and installation the intake manifold and exhaust manifold
0
Contents: Models without turbocharger 🠛 Models with turbocharger 🠛
Note: Use a new gasket when installing.


Models without turbocharger


Removal


1. The collectors are secured with the same nuts.

2. To facilitate access, unscrew the mounting bolts and remove the reinforcement rod, where present, between the domes of the front suspension struts. Also jack up the front of the car and support it on axle stands. Where present, remove the lower engine shield.

3. Note the location of the wiring or hose clips on the manifolds and remove them.

4. Loosen the retaining clip and disconnect the air intake duct from the intake manifold.

5. Where applicable, disconnect the hoses from the oil separator mounted on the intake manifold. If required, the oil separator can be unbolted from the bracket.

6. Where applicable, disconnect the breather hoses from the intake manifold.

7. On models equipped with an EGR system, remove the valve and tube as described in Part C of this Chapter.

8. Separate the intake pipe from the exhaust manifold, refer to Section General description and replacement of exhaust system components.

9. Gradually loosen the nuts securing the intake and exhaust manifolds and separate the manifolds from the cylinder head. Remove the manifold gasket.

Installation


1. Perform installation in reverse order, paying attention to the following.
  • a) Make sure the mating surfaces of the cylinder head and manifold are clean and use a new gasket. Tighten all fasteners to the specified Specifications effort.
  • b) Connect the front part of the exhaust system to the manifold, refer to Section General description and replacement of exhaust system components.
  • c) Where applicable, install the EGR valve in the tube as described in Emission control systems current Chapter.
  • d) Position all wiring or hose retaining clips as noted prior to removal.


Models with turbocharger


Removal


1. Although the collectors are separate, they are fastened with the same nuts.

2. To facilitate access, unscrew the reinforcement rod between the front suspension strut domes. Also jack up the front of the car and support it on axle stands. Where available, remove the lower engine shield.

3. Note the location of the wiring or hose clips attached to the manifolds and remove them.

4. Disconnect the breather hoses from the intake manifold, noting their location to simplify installation.

5. Remove the turbocharger as described in Section Removal and installation a turbocharger.

6. On models equipped with an exhaust gas recirculation system, remove the valve and tube as described in Emission control systems.

7. Unscrew the engine ground cable from the mounting eyelet on the right end of the intake manifold, then unscrew the bracket from the manifold.
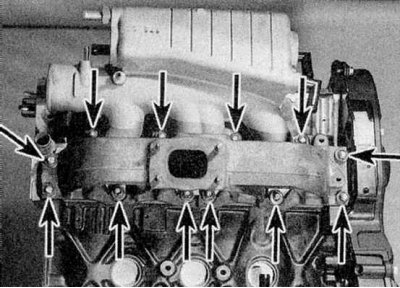
7. Unscrew the engine ground cable from the mounting eyelet on the right end of the intake…


8. Gradually loosen the nuts securing the intake and exhaust manifolds and separate the manifolds from the cylinder head. Remove the manifold gasket (refer to the accompanying illustration).

Installation


1. Perform installation in reverse order, paying attention to the following.


  • a) Make sure the mating surfaces of the cylinder head and manifold are clean and use a new gasket. Tighten all fasteners to the specified Specifications effort.
  • b) Where applicable, install the EGR valve and pipe as described in Emission control systems.
  • c) Install the turbocharger as described in Section Removal and installation a turbocharger.
  • d) Ensure that the breather hoses are properly connected as noted prior to removal.
  • e) Position all electrical wiring or hose mounting brackets as noted prior to removal.


Original article is on the portal renaultbook.ru
This article is available on: russian, bulgarian, belarusian, ukrainian, serbian, croatian, romanian, polish, slovak, hungarian
Article has been reviewed by editor: Fedoseev Denis
Share with friends:
Previous
Megane 1: Fuel system (diesel)
Next

Checking, removing and installing injectors
Checking and adjusting the injection timing
Methods for checking and adjusting injection timing
Removal and installation the fuel pump
Removal and installation the fuel temperature sensor
Checking and adjusting idle speed and deceleration speed
Turbocharger — Description and Precautions
Removal and installation a turbocharger
Turbocharger inspection and maintenance
Removal and installation the intercooler (turbocharged models)
Other articles on other Renault models

➽ Intake manifold Renault Duster 1 (2009-2017)
➽ Intake manifold and throttle body (K4M engine) Renault Fluence 1 (2009-2020, petrol)
➽ Exhaust manifold Renault Kangoo 1 (1997-2007)
➽ Removal and installation the intake manifold (F4P and K4M… Renault Laguna 2 (2001-2007)
➽ Replacing the intake manifold seal Renault Logan 1 (2004-2012, petrol)
Link to this article in different formats
Reviews and comments of visitors
No comments yet


Add two numbers 44 + 31


Megan 2 (2002-2009, petrol) 
  • User manual
  • Introduction to manual
  • Controls and instruments
  • Salon equipment
  • Operation and driving
  • Maintenance and care
  • Power unit
  • Engine repair
  • Fuel system
  • Injection system
  • Intake and exhaust system
  • Starting and charging system
  • Cooling system
  • Decreased toxicity
  • Transmission
  • Clutch
  • Mechanical gearbox
  • Automatic gearbox
  • Wheel drive mechanism
  • Chassis, running gear
  • Suspension and wheels
  • Steering
  • Brake system
  • Body and interior
  • Exterior (external elements)
  • Interior (internal elements)
  • Doors, locks and windows
  • Heating and air conditioning
  • Electrical equipment
  • Equipment and devices
  • Headlights and lighting
  • Electrical circuits
Megane 1 (1995-2002) 
  • General information
  • User manual
  • Maintenance
  • Power unit
  • Petrol engines 1.4/1.6 l
  • Petrol engines 2.0 l
  • Diesel engines 1.9 l
  • Overhaul of engines
  • Cooling system
  • Fuel system (petrol)
  • Fuel system (diesel)
  • Decreased toxicity
  • Charge and launch systems
  • Ignition system (petrol)
  • Preheat system (diesel)
  • Transmission
  • Clutch
  • Mechanical gearbox
  • Automatic gearbox
  • Drive shafts
  • Chassis, running gear
  • Brake system
  • Car suspension
  • Steering
  • Body and interior
  • Exterior (external elements)
  • Interior (internal elements)
  • Doors, locks and windows
  • Electrical equipment
  • Equipment and devices
  • Electrical circuits
RenaultBook.ru © 2018–2026 | Mobile version | News and articles | Sitemap: EN BG BY UA RS HR RO PL SK HU | Administration | Site search | Bookmark
Duster 1 (2009-2017) | Fluence 1 (2009-2020, petrol) | Kangoo 1 (1997-2007) | Laguna 2 (2001-2007) | Logan 1 (2004-2012, petrol) | Logan 2 (2012-2020) | Megane 1 (1995-2002) | Megan 2 (2002-2009, petrol) | Sandero 1 (2007-2012, petrol) | Scenic 1 (1996-2003) | Symbol 1 (1999-2008, petrol) | Symbol 2 (2008-2013, petrol) | Renault 19 (1988-1996) | Espace I and II (1984-1996) | Espace III (1996-2002) | Clio 1 (1990-1998) |
We want your visit to be comfortable 😌 and use cookies 🍪 to do so.