
Warning! If antifreeze comes into contact with your skin or painted surfaces of your vehicle, immediately wash off the spilled drops with plenty of water. Never leave antifreeze in an open container or spilled on the garage floor - the deadly poisonous liquid can attract children and pets with a pleasant smell.
Drain
1. With the engine completely cool, wrap a rag around the expansion tank cap and slowly turn the cap counterclockwise to relieve pressure in the cooling system (a hissing sound is usually heard). Then fully unscrew the cover and remove it.

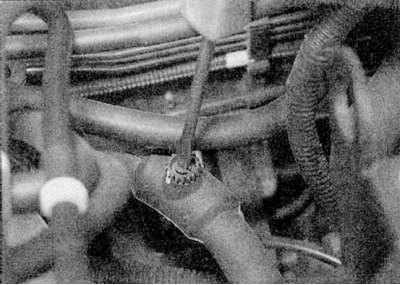
2a. Open the bleed valves in the cooling system. On all engines except the F7R, they are mounted on the heater hose at the left end of the cylinder head (E7J engine) on the heater return hose on the upper right side of the radiator (refer to illustrations).
2b. The F3R engine has an additional bleeder port on the thermostat housing. The F7R engine only has a radiator bleeder.
3. Remove the engine sound shield. Place a suitable container below the lower radiator hose connection. Loosen the hose clamp, remove the hose and wait for the coolant to drain into a container.
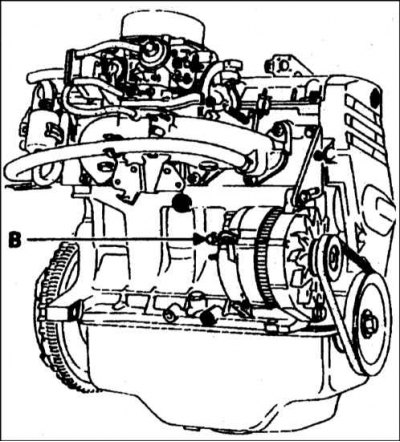
4. To completely drain the liquid from the cooling system on 1.4 and 2.0 l engines, unscrew the drain plug (B) on the engine. It is located on the rear of the cylinder block, behind the alternator on E7J engines and above the intermediate shaft housing on F3R 750, F3R 751 and F7R engines (refer to illustrations).
5. If the coolant is not drained for replacement and is clean and has been used for less than two years, it can be reused, although this is not recommended.
6. Finally, install the lower radiator hose and drain plug on the cylinder block.
Flushing the cooling system
1. If coolant change has been neglected or the antifreeze mixture has become diluted, the cooling system may gradually lose efficiency as the radiator passages become restricted due to rust and other deposits. The efficiency of the cooling system can be restored by flushing the system.
2. The radiator must be flushed independently of the engine to avoid unnecessary contamination.
Flushing the radiator
1. Disconnect the top and bottom hoses from a radiator as it is described in the Head Cooling, heating systems.
2. Insert a garden hose into the top hose inlet of the radiator. Direct a stream of clean water through the radiator and continue flushing until clean water emerges from the bottom radiator hose outlet.
3. If, after a sufficiently long time, the flowing water is still not clear, the radiator can be flushed with a special cleaning agent for the cooling system. It is important to carefully follow the product manufacturer's instructions. If the contamination is especially strong, insert the hose into the outlet of the lower radiator tank and start the flushing jet in the opposite direction.
Engine flush
1. Remove the thermostat as described in Chapter Cooling, heating systems, then temporarily install the top hose to the engine connection.
2. Disconnect the top and bottom hoses from the radiator, insert a garden hose into the top radiator hose and direct a stream of clean water through the engine. Keep flushing it until clean water emerges from the lower radiator hose.
3. At the end of flushing, install the thermostat and connect the hoses to the radiator, as described in Chapter Cooling, heating systems.
Filling the cooling system
1. Before starting work, check the condition of all hoses and brackets. Note that the antifreeze mixture must be used all year round to prevent corrosion of engine components.
2. Remove the expansion tank drain cap
3. Open the cooling system bleed valves.
4. Place a rag around the expansion tank.
5. Slowly fill the system until the coolant level reaches the top of the expansion tank filler neck.
6. Close the bleeder plugs when the coolant appears free of air bubbles.
7. Start the engine and let it run at fast idle (do not exceed 2500 rpm) approximately 4 minutes.
8. Install and tighten the expansion tank filler cap.
9. Let the engine run for approximately 20 minutes.
10. Stop the engine and check the coolant level, which should be up to the mark "MAX" side of the tank. Make sure that the filler cap of the expansion tank is well clamped.
11. Wait until the engine has cooled down, then recheck the coolant level. If necessary, bring the fluid level to normal. Install the engine crankcase guard.
Antifreeze
1. Be sure to replace the antifreeze at the intervals given in Chapter Maintenance. This is necessary not only to preserve the properties of antifreeze, but also to prevent corrosion.
2. Use ethylene glycol based antifreeze. The amount of antifreeze and temperature limits are specified in the Specifications.
3. Before adding antifreeze, the liquid from the cooling system must be completely drained, the system preferably flushed, and the condition and security of all hoses checked.
4. After filling with antifreeze, stick a label on the expansion tank indicating the type and concentration of antifreeze used, as well as its filling. All subsequent fill-ups must use the same type of antifreeze at the strength indicated on the label.
5. Do not use antifreeze in the system as it will damage the car's paintwork.