
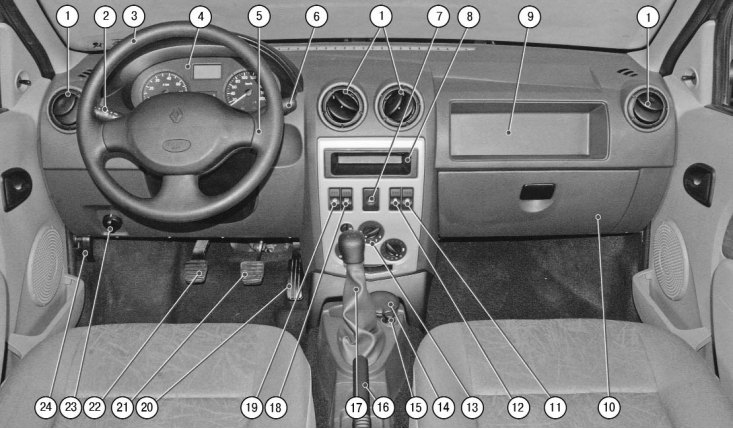
1.7. Instrument panel and controls
The instrument panel contains the following controls and gauges (see fig. 1.7).
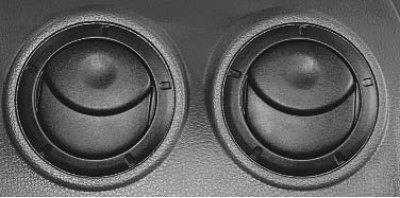
1 - nozzles of the ventilation and interior heating system. Designed to direct the flow of air from the heater, air conditioner or ventilation system.
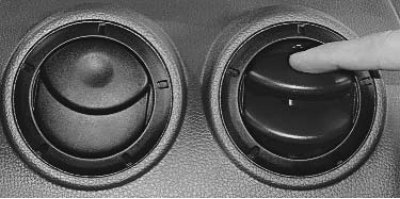
The air flow is regulated by changing the position of the deflectors of the nozzles of the ventilation and heating system...
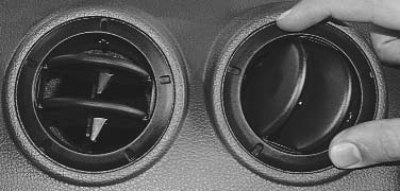
...and the direction of air flow - by turning the deflectors in the appropriate direction.
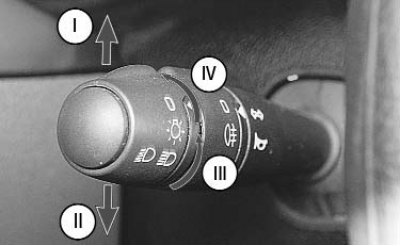
2 - lever switch for outdoor lighting and direction indicators with a button to turn on the sound signal. The switch lever can take the following positions:
- I - right turn indicators are on (fixed position);
- II - left turn indicators are on (fixed position);
- III - overall lighting is on;
- IV - low / high beam is on;
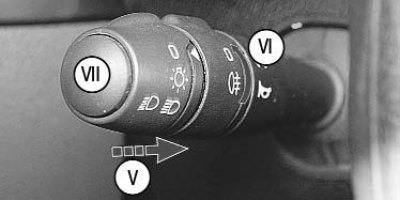
- V - low / high beam switching (non-fixed position). When holding the lever, the high beam is on;
- VI - rear fog lights on (side lighting must be on);
- VII - button for turning on the sound signal. To turn on the sound signal, press the button.
Note. On vehicles equipped with fog lamps, turning the ring to position VI turns on the fog lamps. To turn on the rear fog light, turn the ring to the appropriate position (side lighting must be on).
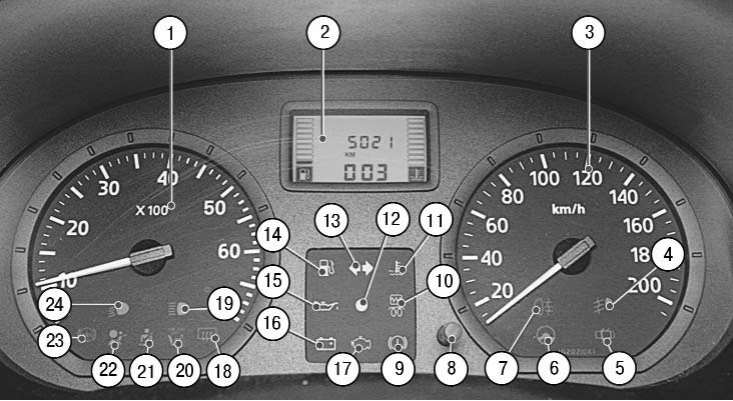
1.8. instrument cluster
When the lever is moved to position I or II, the control lamp 13 lights up in the instrument cluster with a flashing light (pic. 1.8). When the steering wheel is returned to the straight-ahead position, the lever automatically returns to its original position. When changing lanes, to turn on the direction indicator, it is enough to press the lever in the direction of position I or II only until a noticeable resistance occurs, without fixing the lever. When released, the lever will return to its original position.
When switching on the dipped or main beam, the control lamp 24 or 19 lights up in the instrument cluster (see fig. 1.8) respectively.
When the rear fog lights are turned on, the control lamp 7 lights up in the instrument cluster, when the fog lights are turned on, the control lamp 4 lights up.
Note. If the switch (lock) ignition is in position «S» or «A», when the exterior lights are on, when the driver's door is opened, a buzzer will sound to remind you to turn off the lights.
3 - steering wheel.
4 - a combination of devices (see «instrument cluster»).
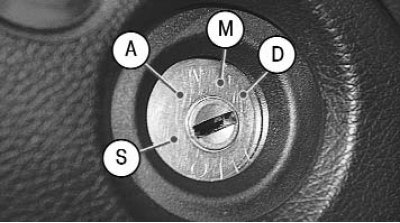
5 - switch (lock) ignition, combined with an anti-theft device, is located on the right side of the steering column. The key in the lock can occupy one of four positions:
- S (blocking) - the ignition is off, with the key removed, the anti-theft device is turned on. To ensure that the steering shaft is locked, turn the steering wheel to the right or left until it clicks. To turn off the anti-theft device, insert the key into the ignition switch and, while slightly turning the steering wheel to the right and left, turn the key to position «A»;
- A (optional equipment) - the ignition is off, the key cannot be removed, the steering is unlocked. The power supply circuits of the sound signal, outdoor lighting, high-beam headlights, radio equipment are turned on;
- M (included) - the ignition is on, the key cannot be removed, the steering is unlocked. Ignition, instruments and all electrical circuits are on;
- D (starter) - the ignition and starter are on, the key cannot be removed, the steering is unlocked. This position of the key is not fixed; when released, the key returns to the position under the action of the spring force «M».
Attention! Do not turn off the ignition or remove the key from the lock while driving: the steering will be locked and the car will become uncontrollable.
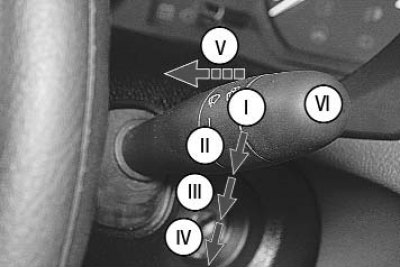
6 - switch lever for the windshield wiper and washer with a button for switching the display modes of the on-board computer. The switch turns on the electrical circuits when the ignition is on. The lever can take the following positions:
- I - wiper off (fixed position);
- II - intermittent wiper operation is on (fixed position);
- III - the first wiper speed is on (fixed position);
- IV - the second wiper speed is on (fixed position);
- V - moving the lever towards you turns on the windshield washer (non-fixed position), at the same time the windshield wiper is turned on (depending on the equipment, the headlight washers are switched on at the same time). When the lever is held in this position, washer fluid is supplied, when released, the wiper blades perform a few more cycles;
- VI - button for switching display modes of the on-board computer. On some models, the on-board computer display modes can be switched using button 8 (see fig. 1.8) resetting the trip odometer.
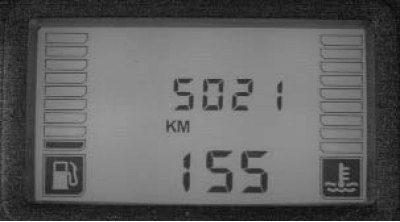
When you press the VI button, the information displayed on the display 2 of the on-board computer changes:
- total mileage counter;
- daily mileage counter.
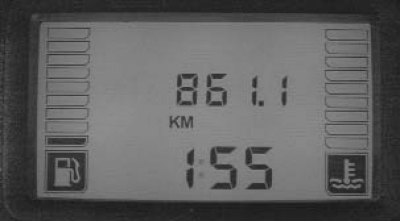
Depending on the vehicle equipment, the following information can be displayed on the on-board computer display:
- amount of fuel used (in liters) since the last reset of the on-board computer;
- average fuel consumption (l/100 km) since the last reset of the on-board computer (the value is displayed after the vehicle has traveled 400 m);
- current fuel consumption (l/100 km), the consumption is displayed when the car is moving at a speed of more than 30 km / h;
- estimated power reserve (km) on the gasoline remaining in the fuel tank, the calculation takes into account the average fuel consumption;
- distance traveled (km) since the last reset of the on-board computer;
- average speed (km/h) vehicle since the last reset of the on-board computer.
7 - alarm switch. When the switch is pressed, all direction indicators and their control lamps installed in the instrument cluster light up with a flashing light. Pressing the key again turns off the alarm.
Note. The alarm system works at any position of a key in the switch (castle) ignition.
8 - a place for installing a car radio.
9 - a niche for small items.
10 - glove box. Serves for storing small things and opens when the lock handle is pressed up. On some vehicles, the glove box lock is opened or locked with the ignition key.
11 - power window control button for the right front door.
12 - the switch of system of the central blocking of locks. When you press the bottom of the button, the door locks are blocked. To unlock the locks, press the top of the button.
13 - heating system control unit (conditioning) and interior ventilation, see «Heating (conditioning) and interior ventilation».
14 - ashtray.
Open the lid to use the ashtray.
To clean, remove the ashtray from the floor tunnel lining.
15 - cigarette lighter. To use the cigarette lighter, press the button on its moving part. After heating the coil for 10–20 s, the movable part will automatically return to its original position with a click, and the cigarette lighter can be removed for use.
Attention! The cigarette lighter can be turned on again no earlier than after 20 s. Do not hold the cigarette lighter forcibly in the pressed position. Do not use the cigarette lighter socket to connect powerful electrical appliances (electric coffee maker etc.) – this may cause damage to the electrical equipment of the vehicle. If the cigarette lighter button does not return to its original position 30 seconds after switching on, remove the cigarette lighter from the cartridge to prevent the coil from burning out.
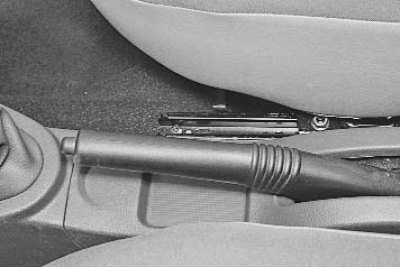
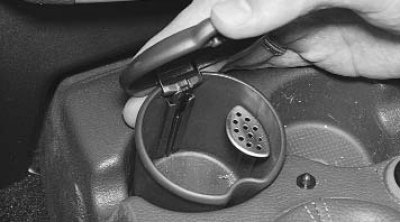
16 - parking brake lever.
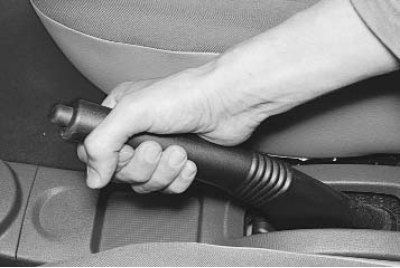
To brake the vehicle with the parking brake, lift the lever all the way up. The signal lamp 9 in the instrument cluster lights up red (see fig. 1.8).
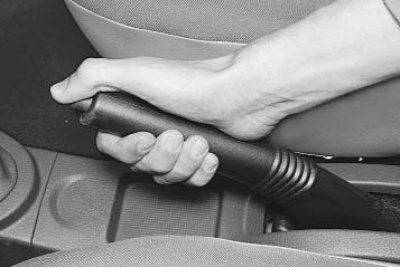
To brake the car, pull the lever up a little, press the button at the end of the lever handle and lower the lever all the way down. The signal lamp should go out.
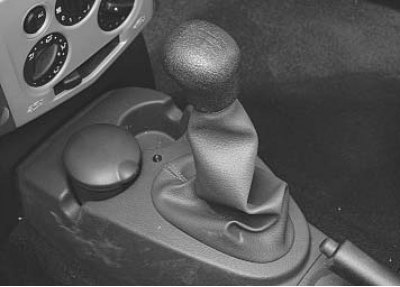
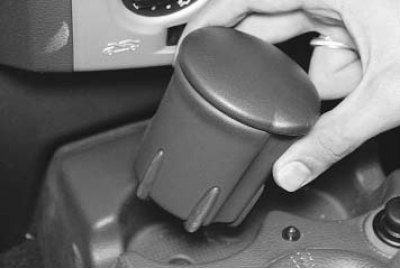
17 - gear lever. The gearshift pattern is printed on the handle.
18 - rear window electric heating switch. Pressing the switch button (ignition key in position «M») the electric heating of the rear window is switched on, at the same time the control lamp in the button lights up. Pressing the button again turns off the heating.
Attention! The heating element consumes a very large current. Therefore, to avoid excessive discharge of the battery, turn on the electric heater with the engine running only for the time necessary to clear the rear window from misting. To avoid damage to the heater filaments, do not use scrapers or other sharp objects, or detergents with abrasive substances to clean the inside of the rear window.
19 - power window control button for the left front door.
20 - accelerator pedal.
21 - brake pedal.
22 - clutch pedal.
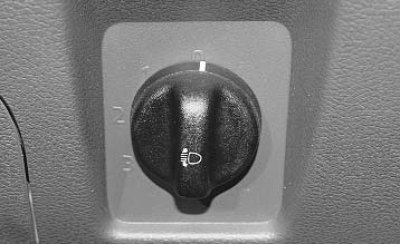
23 - headlight corrector regulator. By turning the knob, depending on the load of the car, the angle of inclination of the headlight beam is changed in such a way as to prevent dazzling of oncoming drivers. Alignment of the mark on the regulator knob and the number on the scale ensures the appropriate adjustment of the position of the headlights for the following vehicle loading options:
- 0 - one driver or driver and passenger in the front seat;
- 1 - all places are occupied;
- 2 - one driver and cargo in the trunk;
- 3 - all seats are occupied and cargo is in the trunk.
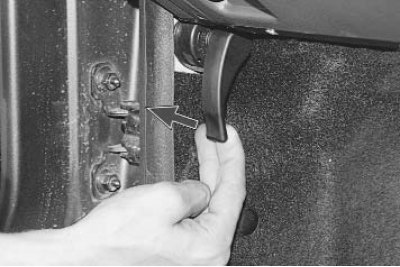
24 - hood lock drive lever. By moving the lever towards you, the hood lock is unlocked. At the same time, the front edge of the hood is lifted, forming a slot for access to the handle of the safety hook of the hood latch. By pressing it towards the lock, you can open the hood.