
English Русский
Български
Беларускі
Український
Српски
Hrvatski
Română
Polski
Slovenský
Magyar
Bookmark Contacts Articles Sitemap
Company vehicles Peugeot Company vehicles Opel Company vehicles Skoda Company vehicles Land Rover Company vehicles Mitsubishi Company vehicles Volkswagen Company vehicles Honda
RenaultBook.ru


Duster   Fluence   Kangoo   Laguna   Logan   Megane   Sandero   Scenic   Symbol   Clio   Other
Logan 1 (2004-2012, petrol) Logan 2 (2012-2020)

Removal and installation the parking brake lever (Renault Logan 1)

  • Main
  • Logan
  • Logan 1 (2004-2012, petrol)
  • Chassis, running gear
  • Brake system
  • Removal and installation the parking brake lever
0
The parking brake drive lever, installed in the passenger compartment on the body base, has a non-separable design; if the toothed sector or pawl is damaged, it should be replaced as an assembly.

You will need: all the tools needed to remove the body floor tunnel trim (see "Removal and installation of floor tunnel lining"), as well as a 13 mm socket head and a knife.

1. Disconnect the wire from the negative terminal of the battery.

2. Remove the floor tunnel lining (see "Removal and installation of floor tunnel lining").

3. Cut the floor mat at the rear of the arm and move the mat sections to the sides (see "Replacing the parking brake cables").
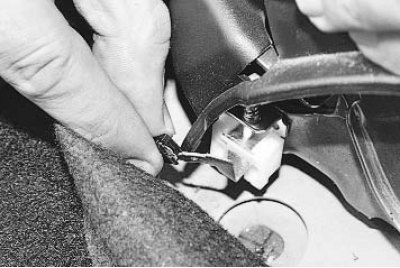
3. Cut the floor mat at the rear of the arm and move the mat sections to the sides (see «Replacing…


[Text provided by an online resource: renaultbook.ru]

4. Move both front seats forward as far as they will go and disconnect the wire from the parking brake indicator switch.

5. Loosen the drive cables and disconnect the rear cable ends from the equalizer (see "Replacing the parking brake cables").
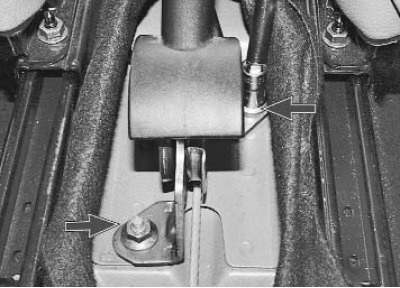
5. Loosen the drive cables and disconnect the rear cable ends from the equalizer (see «Replacing…


6. Unscrew the two nuts securing the parking brake drive lever to the body base and remove the lever together with the front drive cable.
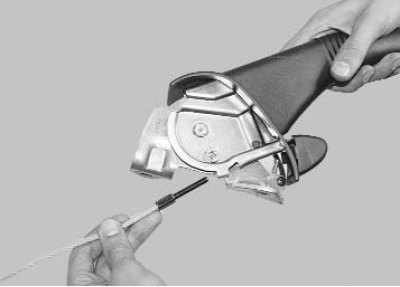


6. Unscrew the two nuts securing the parking brake drive lever to the body base and remove the…


7. Loosen the adjusting nut from the front cable end and disconnect the cable from the lever.
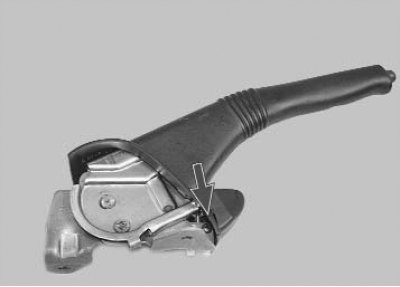
7. Loosen the adjusting nut from the front cable end and disconnect the cable from the lever.


8. Remove the parking brake indicator light switch by unscrewing the screw that secures it.

9. Before installing on the vehicle, lubricate the toothed sector of the lever and the thread of the front cable end with consistent grease.

10. Install the parking brake lever and all removed parts in the reverse order of removal.

11. Adjust the parking brake drive (see "Adjusting the Parking Brake Drive").
This article is available on: russian, bulgarian, belarusian, ukrainian, serbian, croatian, romanian, polish, slovak, hungarian
Article has been reviewed by editor: Podkrepilov Maxim
Share with friends:
Previous
Logan 1: Brake system
 

Replacing the parking brake cables
Adjusting the parking brake drive
Replacing the rear wheel brake slave cylinder
Replacing the brake pads of the rear wheel brake mechanism
Removal and installation the brake drum
 
Other articles on other Renault models

➽ Parking brake lever Renault Duster 1 (2009-2017)
➽ Adjusting the parking brake lever Renault Fluence 1 (2009-2020, petrol)
➽ Removal, installation and adjusting the parking brake lever Renault Laguna 2 (2001-2007)
➽ Removal and installation the parking brake lever Renault Sandero 1 (2007-2012, petrol)
➽ Parking brake lever — removal and installation Renault Scenic 1 (1996-2003)
Link to this article in different formats
Reviews and comments of visitors
No comments yet


Add two numbers 48 + 29


Logan 2 (2012-2020) 
  • General information
  • Faults en route
  • Daily checks
  • Governing bodies
  • Maintenance
  • Power unit
  • Petrol engines 1.2 l
  • Petrol engines 1.6 l
  • Diesel engines 1.5 l
  • Cooling system
  • Lubrication system
  • Power and control system
  • Intake and exhaust system
  • Engine electrical equipment
  • Transmission
  • Clutch
  • Car gearbox
  • Drive shafts
  • Chassis, running gear
  • Suspension and wheels
  • Brake system
  • Steering
  • Body and interior
  • Exterior (external elements)
  • Interior (internal elements)
  • Safety system
  • Heating and air conditioning
  • Electrical equipment
  • Equipment and devices
  • Wiring diagrams (sedan)
  • Wiring diagrams (wagon)
Logan 1 (2004-2012, petrol) 
  • General information
  • Vehicle device
  • User manual
  • Faults en route
  • Daily maintenance
  • First maintenance
  • Second maintenance
  • Driver tips
  • Power unit
  • Engine repair
  • Lubrication system
  • Cooling system
  • Power and exhaust system
  • Transmission
  • Clutch
  • Car gearbox
  • Drive shafts
  • Chassis, running gear
  • Front suspension
  • Rear suspension
  • Steering
  • Brake system
  • Wheels and tires
  • Body and interior
  • Exterior (external elements)
  • Interior (internal elements)
  • Doors, locks and windows
  • Body Care
  • Electrical equipment
  • Equipment and devices
  • Headlights and lighting
  • Power devices
  • Electrical circuits
RenaultBook.ru © 2018–2026 | Mobile version | News and articles | Sitemap: EN BG BY UA RS HR RO PL SK HU | Administration | Site search | Bookmark
Duster 1 (2009-2017) | Fluence 1 (2009-2020, petrol) | Kangoo 1 (1997-2007) | Laguna 2 (2001-2007) | Logan 1 (2004-2012, petrol) | Logan 2 (2012-2020) | Megane 1 (1995-2002) | Megan 2 (2002-2009, petrol) | Sandero 1 (2007-2012, petrol) | Scenic 1 (1996-2003) | Symbol 1 (1999-2008, petrol) | Symbol 2 (2008-2013, petrol) | Renault 19 (1988-1996) | Espace I and II (1984-1996) | Espace III (1996-2002) | Clio 1 (1990-1998) |
We want your visit to be comfortable 😌 and use cookies 🍪 to do so.