English Русский
Български
Беларускі
Український
Српски
Hrvatski
Română
Polski
Slovenský
Magyar
Bookmark Contacts Articles Sitemap
Company vehicles Peugeot Company vehicles Opel Company vehicles Skoda Company vehicles Land Rover Company vehicles Mitsubishi Company vehicles Volkswagen Company vehicles Honda
RenaultBook.ru


Duster   Fluence   Kangoo   Laguna   Logan   Megane   Sandero   Scenic   Symbol   Clio   Other
Renault 19 (1988-1996) Espace I and II (1984-1996) Espace III (1996-2002)

Injector body (Renault Espace III)

  • Main
  • Renault
  • Espace III (1996-2002)
  • Power unit
  • Diesel engines G8T
  • Injector body
0
Contents: Removal 🠛 Installation 🠛

Removal


  • The nozzle assembly with the sprayer is screwed into the cylinder head.
  • Removal the injectors does not require removing the intake manifold.
  • Disconnect the cable from the negative battery terminal.
  • Using the special Mot 1383 key, disconnect the high pressure pipes.

Note: To avoid damage to high-pressure lines, remove them as an assembly.

  • Disconnect the fuel return line
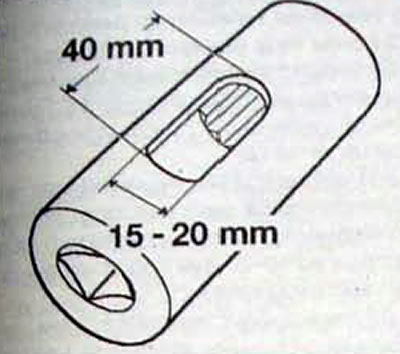
  • Remove the injector body using a 27 mm socket head 27 mm long or the Renault Mot. 997 tool (Fig. 3.12).
  • Remove the flame arrestor washers.

Fig. 3.12. Dimensions of the Renault Mot. 997 tool for removing the injector housing from the G8T…

Fig. 3.12. Dimensions of the Renault Mot. 997 tool for removing the injector housing from the G8T 714 engine


Installation


  • Install a new thermal protection insert and sealing ring for each injector. Each time the injectors are removed, the leather sealing rings and flame protection washers should be replaced with new ones. The installation position of the flame protection washer is with the flange toward the cylinder head (Fig. 3.13).
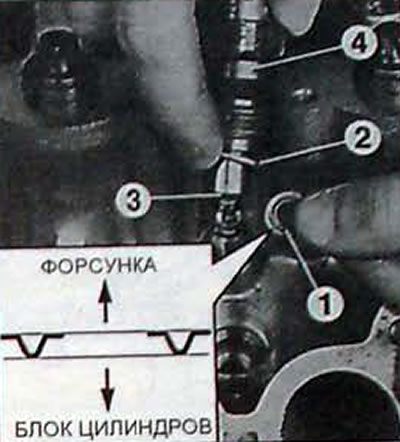
Fig. 3.13. Installing injectors: 1 - flameproof washer; 2 - sealing ring; 3 - nozzle; 4 - nozzle…

Fig. 3.13. Installing injectors: 1 - flameproof washer; 2 - sealing ring; 3 - nozzle; 4 - nozzle body


  • Install the injector housings using a 27 mm socket head with a length of 27 mm or the Renault Mot. 997 tool.
  • Connect the fuel return line.
  • Using the special Renault Mot. 1383 key, tighten the high-pressure pipes to the fuel injectors.

Note: On vehicles with G8T 714 engines, to remove and install the injector housing with the needle lift sensor, it is necessary to use the Renault Mot. 997 tool to pass the wire and the sensor connector through the hole in the tool.
This article is available on: russian, bulgarian, belarusian, ukrainian, serbian, croatian, romanian, polish, slovak, hungarian
Article has been reviewed by editor: Trofimova Anastasia
Share with friends:
Previous
Espace III: Diesel engines G8T
Next

Adjusting the injection timing of the high-pressure fuel pump
High pressure fuel pump
Replacing the fine fuel filter
Cleaning the fuel system
Valve clearances
Checking the injector
Glow plugs
Adjusting the high pressure fuel pump
Replacing the load potentiometer
Engine management system
Other articles on other Renault models

➽ Throttle body Renault Duster 1 (2009-2017)
➽ Anti-corrosion protection of the body Renault Fluence 1 (2009-2020, petrol)
➽ Throttle body Renault Kangoo 1 (1997-2007)
➽ Removal and installation the injector housing gasket (K4M engine) Renault Laguna 2 (2001-2007)
➽ Lubrication of body fittings Renault Logan 1 (2004-2012, petrol)
Link to this article in different formats
Reviews and comments of visitors
No comments yet


Add two numbers 11 + 11


Renault 19 (1988-1996) 
  • General information
  • Maintenance
  • Power unit
  • Engine repair
  • Exhaust system
  • Cooling system
  • Supply system
  • Single-point injection
  • Multi-point injection
  • Diesel injection system
  • Transmission
  • Clutch
  • Car gearbox
  • Chassis, running gear
  • Car suspension
  • Steering
  • Brake system
  • Wheels and tires
  • Body and interior
  • Exterior (external elements)
  • Interior (internal elements)
  • Heating and ventilation
  • Electrical equipment
  • Equipment and devices
  • Headlights and lighting
  • Ignition system
  • Power devices
  • Electrical circuits
Espace I and II (1984-1996) 
  • General information
  • Introduction to the guide
  • Troubleshooting
  • Power unit
  • Engine repair
  • Cooling system
  • Carburetor fuel system
  • Injection fuel system
  • Diesel fuel system
  • Ignition system
  • Transmission
  • Clutch
  • Car gearbox
  • Drive shafts
  • Chassis, running gear
  • Brake system
  • Steering
  • Front suspension
  • Rear suspension
  • Body and interior
  • Exterior (external elements)
  • Interior (internal elements)
  • Doors, locks and windows
  • Electrical equipment
  • Equipment and devices
  • Electrical circuits
Espace III (1996-2002) 
  • General information
  • Introduction to the manual
  • User manual
  • Power unit
  • Petrol engines F3R
  • Petrol engines Z7X
  • Diesel engines G8T
  • Diesel engines G9T
  • Transmission
  • Clutch
  • Mechanical gearbox
  • Automatic gearbox
  • Drive shafts
  • Chassis, running gear
  • Steering
  • Front suspension
  • Rear suspension
  • Brake system
  • Body and interior
  • Exterior (external elements)
  • Interior (internal elements)
  • Doors, locks and windows
  • Heating and ventilation
  • Electrical equipment
  • Equipment and instruments
  • Power devices
  • Electrical circuits
RenaultBook.ru © 2018–2026 | Mobile version | News and articles | Sitemap: EN BG BY UA RS HR RO PL SK HU | Administration | Site search | Bookmark
Duster 1 (2009-2017) | Fluence 1 (2009-2020, petrol) | Kangoo 1 (1997-2007) | Laguna 2 (2001-2007) | Logan 1 (2004-2012, petrol) | Logan 2 (2012-2020) | Megane 1 (1995-2002) | Megan 2 (2002-2009, petrol) | Sandero 1 (2007-2012, petrol) | Scenic 1 (1996-2003) | Symbol 1 (1999-2008, petrol) | Symbol 2 (2008-2013, petrol) | Renault 19 (1988-1996) | Espace I and II (1984-1996) | Espace III (1996-2002) | Clio 1 (1990-1998) |
We want your visit to be comfortable 😌 and use cookies 🍪 to do so.