
- Hairpins (1, fig. 1.98) The exhaust pipes of vehicles with F3R engines have stops that determine the tension of the springs, so they should be tightened until they stop.
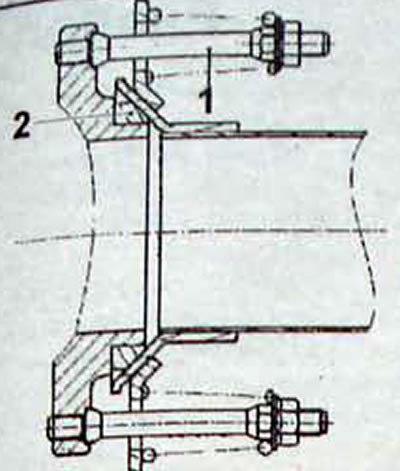
Pic. 1.98. Connection of the exhaust pipe of vehicles with F3R engines: 1 - hairpin; 2 - ring
Attention. All removed clamps must be replaced with new ones.
Resonator and catalytic converter
- Despite the fact that the resonator is connected to the muffler by a solid pipe, it is possible to replace these elements separately.
- In this case, it is necessary to cut the pipe as follows.
- Remove the resonator-muffler assembly.
- Mark the cutting location.
- The cutting area is marked by two knocked-out dots on the exhaust pipe (on the left or right side of a straight pipe section).
- The distance between two marks is 90 mm.
- To cut the pipe, you need to draw a line in the middle between the marks.
- The marks may not be visible due to corrosion and dirt; in this case, clean this section of the pipe with sandpaper.
- With the Mot. 1199 cut the pipe. Install tool Mot. 1199 in the right place in the exhaust pipe. Loosen the chain as much as possible and wrap it around the pipe and attach the tool to the chain. Rotate the jig around the pipe, tightening the chain as you cut (do not tighten too much so as not to deform the pipe when cutting).
- Remove the element to be replaced.
- Install and secure the repair pipe. To ensure the tightness of the exhaust system, it is important to correctly install the pipe on the pipes, that is, in such a way that the pipe rests on the protrusions inside the pipe. First, the pipe is installed on the old pipe and slightly pressed with a clamp.
- Check that the pipe rests against the projections.
- Install a new exhaust system element.
- Before installing the pipe, apply a special mastic to the inner ring of the pipe to seal the connection.
Attention. To avoid touching the body, the coupling bolt and nut of the pipe must be oriented vertically on the left side of the pipe.
- Before final tightening of the nut, you must ensure that the catalytic converter and resonator are properly» but attached to the bottom of the car
- Once removed, the clamp cannot be reused.
- The clamp nut has a groove (A. rice 1.99), to indicate the correct tightening torque. When the groove disappears during tightening, it makes a characteristic click, which means that the nut is tightened to a torque of 25 Nm.

Pic. 1.99. Exhaust system repair pipe: A - groove that determines the tightening torque of the nut
Note. For vehicles with F3R engines, pipes with a diameter of 50 mm must be used.
- Before assembling the unit, make sure there is no dirt or metal particles in the exhaust pipe up to the resonator
- Replace the catalytic converter outlet gasket.
- When installing the resonator-muffler assembly, release the catalytic converter-resonator connection to align the pipe.
- After installation, make sure that the pipe does not touch the bottom anywhere.
Note. When working under the vehicle, check that all exhaust system thermal insulation shields are present and securely fastened.
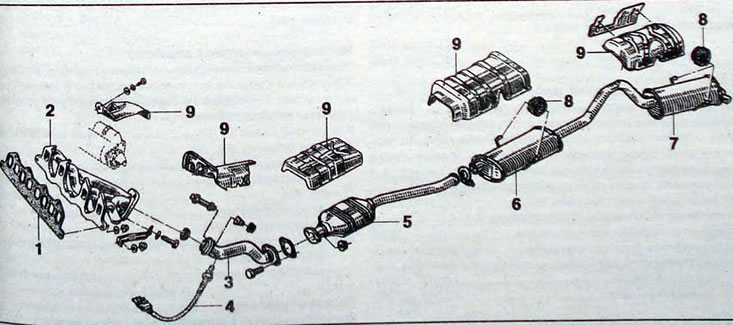
Pic. 1.100.Elements of the exhaust gas system: 1 - exhaust manifold gasket; 2 - exhaust manifold; 3- intake exhaust pipe; 4 - oxygen concentration sensor; 5 - catalytic converter; 6 - front muffler; 7 - rear muffler; 8 - suspension; 9 - thermal protection screen