



Contents: Removal 🠛 Installation 🠛
Note: To adjust the tension of the water pump drive belt, use the Tronic 105.6 tool.
Removal
- Place the car on a lift and raise the front wheels.
- Disconnect the cable from the negative terminal of the battery.
- Disconnect the injection system control unit, unscrew the 2 bolts and remove it.
- Raise the car
- Remove the right front wheel and protective fender liner.
Cars without air conditioning
- Loosen the generator mounting bolts.
- Loosen the belt tension by loosening the adjusting nut.
- Remove the water pump drive belt.
Cars with air conditioning
- Loosen the belt tension by loosening the tension roller with a 7 mm Allen key (fixing bolt in the center of the roller) and holding the roller with a 22 mm open-end wrench (Fig. 1.90).
- Remove the water pump drive belt.
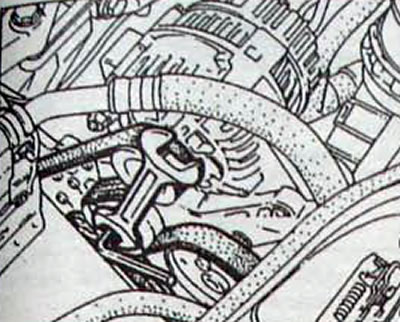
Fig. 1.90. Loosening the bolt securing the tension roller of the water pump drive belt on vehicles with an air conditioning system
Installation
- Please follow the belt tensioning procedure below strictly. Remember that once the belt is loose, it must be replaced with a new one.
Source link is located on [renaultbook.ru]
Cars with air conditioning
- On a cold engine (ambient temperature), install the new belt on the pulleys in accordance with the diagram shown in Figure 1.91.
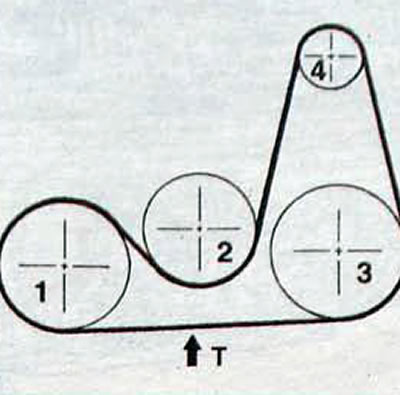
Fig. 1.91. Installation diagram of the auxiliary drive belt F of the engine on vehicles without an air conditioning system: 1 - crankshaft pulley; 2 - water pump pulley; 3 - Power steering pump pulley; 4 - generator pulley; T - installation point of the tension test device sensor
- Install the Tronic 105.6 device sensor in the location indicated by the arrow in Figure 1.91.
- Turn the sensor wheel until it clicks.
- Turn the tension roller to tighten the belt until the value 109±3 units appears on the display of the Tronic 105.6 device.
- In this position, tighten the tension roller mounting bolt.
- Turn the crankshaft 3 revolutions.
- Make sure that the belt tension value has not changed, otherwise, repeat the belt tension adjustment.
- Remove the belt tension tester sensor
- Connect the cable to the negative terminal of the battery.
Cars without air conditioning
- On a cold engine (ambient temperature), install the new belt on the pulleys in accordance with the diagram shown in Figure 1.92.
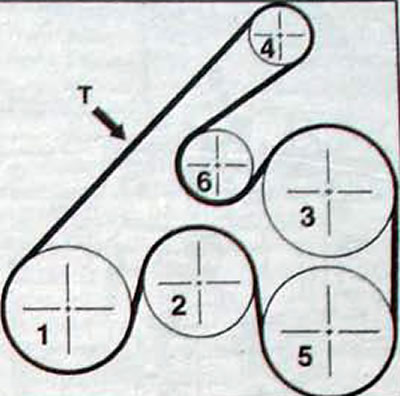
Fig. 1.92. Installation diagram of the auxiliary equipment drive belt F of the engine on vehicles with an air conditioning system: 1 - crankshaft pulley; 2 - water pump pulley; 3 - Power steering pump pulley; 4 - generator pulley; 5 - air conditioning compressor pulley; 6 - tension roller; T - installation point of the tension test device sensor
- Install the Tronic 105.6 device sensor in the location indicated by the arrow in Figure 1.92.
- Turn the sensor wheel until it clicks.
- Turn the belt tension adjustment nut until the value 107±3 units appears on the display of the Tronic 105.6 device.
- In this position, tighten the generator mounting bolt.
- Turn the crankshaft 3 revolutions.
- Make sure that the belt tension value has not changed, otherwise, repeat the belt tension adjustment.
- Remove the belt tension tester sensor.
- Connect the cable to the negative terminal of the battery.