
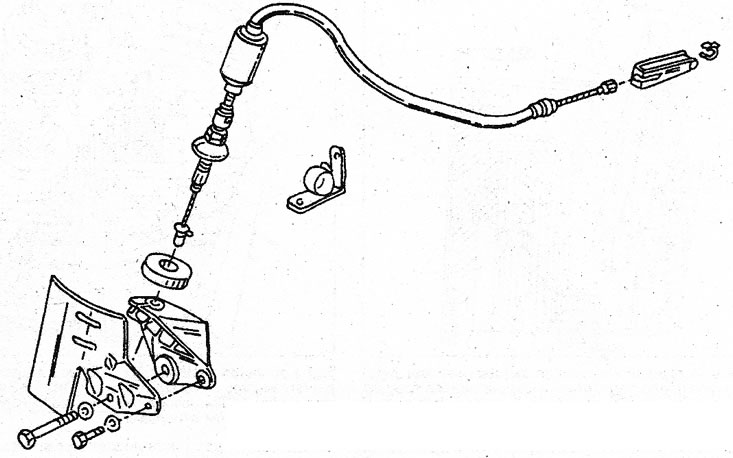
5.1 Location of the clutch pedal cable on later models (with adjustable clutch cable)
2. The clutch pedal on these models is installed after installing a new cable or if the pedal clearance has increased due to clutch wear. Clutch Pedal Gap Adjustment on Earlier Models (whose designation begins with «J11») happens automatically.
3. The mechanism works as follows: spring 3 (see illustration) acts on the traction on toothed segment 2. The clutch pedal cable is always in tension, i.e. The release bearing is constantly in contact with the clutch diaphragm spring.
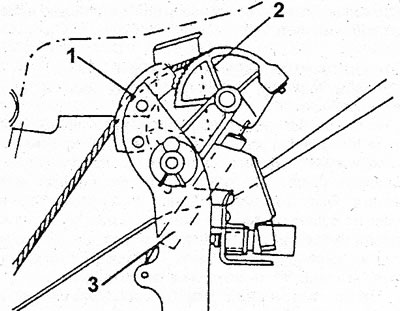
5.3 Self-adjusting clutch, numeric designations are in the text
4. When the clutch pedal is depressed, lug 1 hits the toothed segment and prevents rotation so that the cable is taut again.
5. If the clutch or clutch pedal cable was removed after installation, press the pedal several times to make adjustments.
6. Installation of this cable design is not easy, so use the help. Perform the following work only if there is no other way out. Otherwise, take it to a workshop.
7. Disconnect the clutch pedal cable from the clutch release fork in the engine compartment (see illustration 2.3 in Section 7).
8. Remove luggage rack 1 in the passenger compartment (see illustration). Two screws (2 and 3) attach trim panel. Also remove the screws 4 and the hood drive cable (5). Remove the steering column cover.

5.8 Remove the parts to gain access to the cable attachment to the pedal; numeric designations are indicated in the text
9. Depress the clutch pedal and pull the cable.
10. Hold the cable on the ledge with 1 hand (see illustration 5.3) and release the clutch pedal. The end of the cable will then be released from the toothed segment (2) and it can be pulled out.
11. Pass the cable through the hole in the body (use screwdriver) and remove completely from the engine compartment.
12. Pass a new cable from the side of the engine compartment into the car interior, pull it through the ledge 1 and the toothed segment 2, as shown in illustration 5.3.
13. Connect the other end of the cable to the clutch release fork (see illustration 2.3 in Section 7).
14. Depress the clutch pedal to pass the cable through the hole in the vehicle floor. Make sure that the cable fits exactly into the hole.
15. Step on the pedal several times for automatic adjustment to take place. Proper functioning is controlled by sliding the clutch release lever. The free play should be 17-18 mm on the segment «X» (see illustration). If this is the case, the self-adjustment system will work flawlessly, however, check the operation of the system again. To do this, start the engine, press the clutch pedal and engage reverse. Noise in the gearbox indicates poor shutdown.
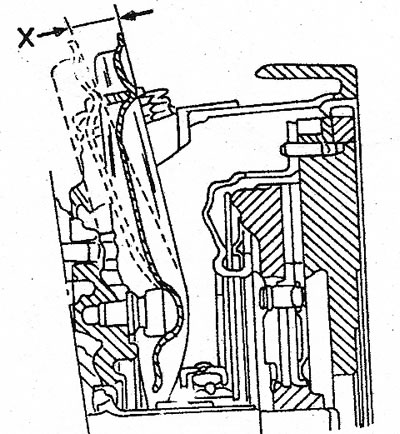
5.15 Check the operation of the automatic gap adjustment after the clutch pedal cable is connected - the lever should move within the distance «X» (17-18 mm).
16. Removing and installing the clutch pedal cable without an automatic adjuster is much easier. Perform work in accordance with illustration 5.1.
17. Open the hood and locate the end of the clutch pedal cable on the clutch release lever. Loosen both nuts (see illustration), to disconnect the cable from the lever.
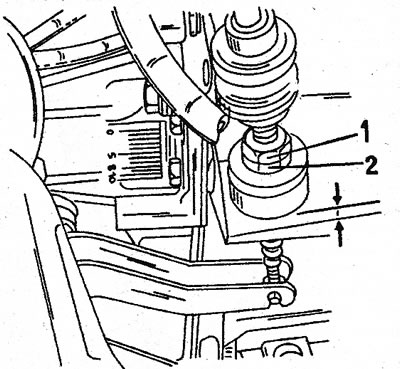
5.17 Fastening the clutch pedal cable to the clutch release lever; nuts 1 and 2 are designed to adjust the pedal clearance; the gap is measured on the segment indicated by the arrows
18. In the cabin, remove the switch trim on the steering column (5 screws) under the steering wheel. Depending on the model, you may also need to loosen the screw on the radio. Disconnect the instrument panel backlight switch from the terminal.
19. Remove the switch trim on the steering column above the steering wheel. Disconnect the end of the cable from the clutch pedal and pull out the cable. At the same time, pay attention to how the rubber cable guides are located, so that you can install them correctly later.
20. Install in reverse order. After installing the cable, adjust its gap. The free play is 3 -.4 mm in the segment indicated by the arrows (see illustration 5.17).
21. To control the adjustment of the clutch pedal, ask an assistant to hold it down and pull the pedal cable until a noticeable resistance is established. Use both nuts to adjust the free play and finally lock the nuts against each other.