



Contents: Adjusting the longitudinal…🠛 Transverse inclination of kingpin 🠛 Wheel alignment 🠛 Wheel alignment 🠛 Causes of incorrect wheel alignment…🠛
1. Optical instruments are used to check the front wheel alignment angles. If necessary, check the camber or kingpin caster with a measuring device. The geometry of the front wheels is measured in the following order: kingpin caster, kingpin transverse caster, camber and toe-in. Before performing any checks, set the steering gear to an intermediate position so that the wheels are straight:
- a) Turn the steering wheel all the way and make a mark on the top of the rim with chalk.
- b) Now turn the steering wheel all the way in the other direction and count the number of full turns.
- c) Turn the steering wheel back by half the counted turns. The front wheel alignment angles are very important, first of all, when checking the wheel alignment and when installing the steering wheel, if it was removed.
Adjusting the longitudinal inclination of the kingpin
2. The kingpin caster can be adjusted. There is a tension rod between the upper wishbone and the body, which is adjusted by loosening the lock nut on the outer end. One turn of the tension rod changes the kingpin caster by 15'. For the kingpin caster value, see the specifications. If possible, have the front wheel geometry checked at a workshop. If the kingpin caster angle does not correspond to the standard value, the reason is in the wishbone or the tension rod. The difference between the left and right cannot be more than 1°.
3. Measurements on first generation vehicles must be taken in an unloaded condition, i.e. in the same condition as they are used for normal driving. If the front of the vehicle is higher than the rear, the geometry of the wheels on the second generation vehicle is disrupted. Two measurements must be taken on these models. The measurements are taken between the lower surface of the corresponding longitudinal beam and the flat surface on which the vehicle is installed, in order to obtain the height "H1" and the height "H2" (see illustration). The height value can be set based on the values shown in the illustration, however, it should be taken into account that some cars have a device for equalizing the load, so load the car so that both height values are minimal. Before taking measurements, familiarize yourself with the technical characteristics of the car.
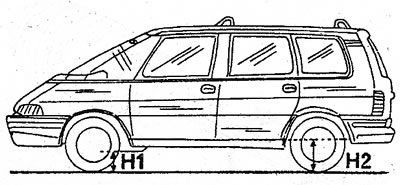
5.3 The height of the front and rear axles is measured at the specified points "H1" and "H2". Operating weight - vehicle with 5 seats:
Height "H1":
Without load balancing:
- 4 cylinder engine = 175 mm
- 6 cylinder engine = 185 mm
With load balancing:
- 4 cylinder engine = 170 mm
- 6 cylinder engine = 175 mm
Height "H2":
Without load balancing:
- 4 cylinder engine = 420 mm
- 6 cylinder engine = 435 mm
With load balancing:
- 4 cylinder engine = 400 mm
- 6 cylinder engine = 410 mm
Note: When loading a vehicle with a load equalizer, disconnect the battery in advance.
Transverse inclination of kingpin
4. The kingpin lateral inclination cannot be adjusted. There are no suitable devices and methods for measuring the kingpin lateral inclination, so please entrust this work to professionals.
Wheel alignment
5. Wheel camber is measured using a special device. On second-generation cars, measure the height "H1" and "H2" as shown in Figure 5.3. It should be mentioned that early models (name J11...) have positive camber, while subsequent models (name J63...) have negative camber. Camber cannot be adjusted. If it does not correspond to the standard value or the difference between the two sides exceeds the permissible limit, the reason may be in the front suspension. A sharp start from a place over a curb can lead to deformation of certain parts of the front suspension.
Wheel alignment
6. Increased negative camber of the front wheels is recognized by wear of the tires on the inside; wear of the tires on the outside allows you to determine increased wheel alignment. Adjustment of the front wheel alignment can only be done with special tools, since it is very important that the wheels are parallel to the vehicle axis. If checking the wheel alignment is unavoidable, use a special ruler. It is necessary to pay attention to the height "H1" and "H2" (see illustration 5.3) for second generation cars, i.e. first compare with the data in the specifications and correct by weight (only in front):
7. Set the front wheels straight. Look from the front of the car to see if one of the wheels forms an angle with another wheel. If not, measure the toe-in.
8. Place the measuring device on the inner surfaces of the front wheel discs from the rear edge at the height of the hubs and zero its readings.
9. Mark the places where the measuring device is applied with chalk.
10. Roll the car forward half a turn of the front wheels so that the chalk marks are on the front edge at the height of the wheel hub.
11. Place the measuring device back on the rear edge of the disc and measure the distance. It may be greater or at the front (wheel alignment) or in the back (wheel alignment).
12. If the obtained value does not correspond to 4.0±2.0 mm of wheel camber on early models, or 4.5 mm ±0.7 mm on models starting with "J63...", loosen the tie rod end nut (see illustration). Make sure that the rubber boot on the inside turns easily, and turn the tie rod in the required direction. If the tie rod turns in the direction indicated by the arrow, the wheel alignment is set. Both tie rods must be turned the same number of turns. A full turn of the rod changes the wheel alignment by 3.0 mm. After installation, tighten the lock nut again.
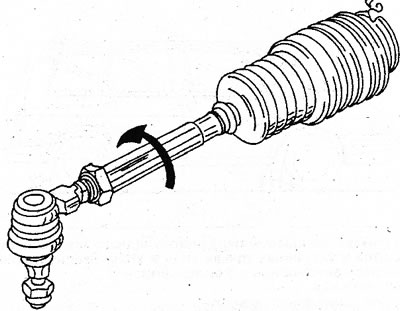
5.12 Adjusting the front wheel alignment
Causes of incorrect wheel alignment angles
- The longitudinal inclination of the kingpin does not correspond to the norm: difficult displacement of the suspension arm or longitudinal beam.
- Wheel alignment is not normal: the steering linkage arm or longitudinal beam is deformed.
- Wheel alignment is normal, kingpin lateral tilt is not normal: difficult to move steering knuckle.
- The transverse inclination of the kingpin corresponds to the norm, the camber of the wheels does not correspond: difficult displacement of the steering knuckle.
- The alignment is not correct: the suspension arm is difficult to move, the longitudinal inclination of the kingpin is not correct, or the longitudinal beam is difficult to move.
- Wheel alignment more than 6 mm above the specified value: the left or right steering knuckles are deformed or difficult to move.