
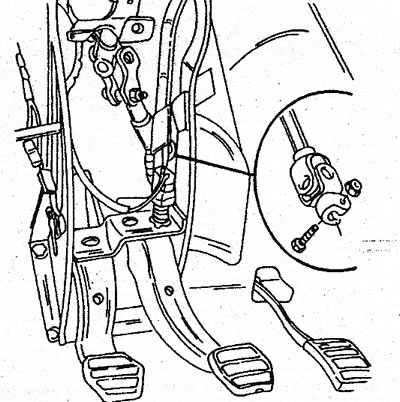
2. Install the bracket and rotate the steering wheel until the bracket is snug between the steering housing and the tie rod joint boot. On early models whose code starts with «J11...», the steering mechanism is set to a certain height (see below).
3. The procedure for removing and installing the steering mechanism is different for the first and second generation models. After a long run, noises in the steering area will be clearly audible. Their cause is in most cases the damper (as well as the friction mechanism for adjusting the ease of rotation of the steering fork). The damper can be adjusted with the steering installed, however consult your workshop.
Early models (GTS/TSE/2000-1)
Removing
4. We are talking about models with markings starting with «J11...».
5. Jack up the front of the vehicle and place it on axle stands, then remove both wheels.
6. Turn off nuts of hinges of steering drafts and remove hinges from levers of rotary fists by means of a special puller.
7. Remove the luggage rack in the cabin (see illustration 5.8 in Section 6). Remove both screws (2 and 3) and screws 4, the last with a star-blade screwdriver.
8. Remove a drive cable of the lock of a cowl.
9. Remove a casing of a steering and remove a casing of the universal joint.
10. Remove the lower bolt and universal joint nut at the junction with the pivot steering axle. Mark the universal joint before removing the pivot axle (see illustration).
1.10 The steering joint is disassembled as shown
11. In the engine compartment, either drain the fluid from the power steering hydraulic system, or pinch the hoses coming out of the reservoir so that the fluid cannot flow out.
12. Remove the hose mounts from the steering and disconnect the hoses from the reservoir and from the power steering pump (see illustration). Collect the leaking liquid.

1.12 Steering gear assembled
13. Locate the four mounting bolts and separate the steering gear from the frame cross member.
14. Remove the mechanism along with the steering rods through the right wheel arch. Do not remove steering linkage unless replacement is to be made.
Installation
15. Install the steering mechanism in the reverse order, if no other work has been done.
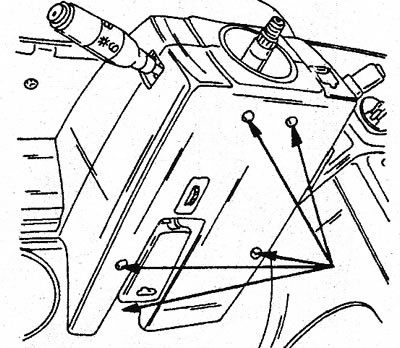
16. Before tightening the nuts, adjust the position of the steering mechanism in height (see illustration). Install the mechanism so that the lower edge of the assembly on both sides coincides with the lower edge of the frame cross member. Tighten the steering gear nuts in this position to 40 Nm.
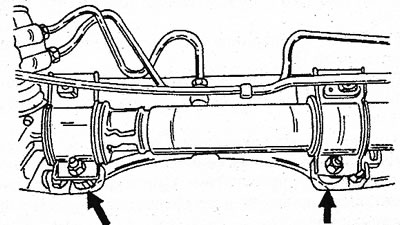
1.16 To set the steering gear to the correct height, fit the end of the gear and the frame cross member at the locations shown
17. The final position of the steering must match the original in order to maintain the relative position of the steering wheel, universal joints and steering gear housing.
18. Tighten the universal joint bolts to 30 Nm. If the steering gear needs to be replaced, also replace both tie rod ends and ball joints as follows.
19. Clamp the steering rod in a vice with soft jaws.
20. Install an open end wrench on the nut closest to the rack to prevent the ball joint from turning and loosen the ball joint and locknut.
21. Remove the ball joint, counting the number of revolutions required for this.
22. To remove the inside of the hinge, remove the protective cap and roll up the lock washer that secures the hinge boot to the rack. Lock the rack with an open end wrench and remove the hinge cover.
23. Remove in turn from the end of the gear rack locking, adjusting and thrust washers. Parts mounted on the rack are shown in the illustration.
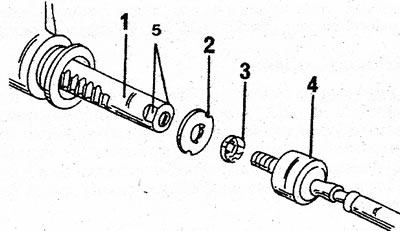
1.23 Parts installed at each end of the steering rods 1. Gear rack; 2. Thrust washer; 3. Lock washer; 4. Hinge cover; 5. Rack surface
24. New parts shown in order of installation. The threads of the ball joint housing must be lubricated with sealant.
25. Nuts of the hinge cover must be tightened with a tightening torque of 50 Nm.
26. After the hinge covers are tight, install a lock washer in the gap of each hinge cover.
27. Establish both tips of steering drafts, twisting them at the same time on the same quantity of turns which was counted at removal. Tighten the locknuts only after checking and correcting the wheel alignment as necessary.
28. After the steering cover is removed, the tie rods can be changed on the installed steering gear. To do this, loosen the locknut near the tie rod joint, while locking the joint cover with a wrench (see illustration). Then replace the tie rod joint as described above.
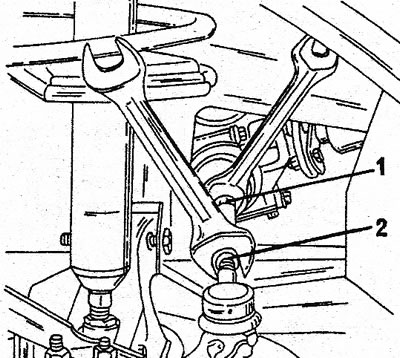
1.28 To remove the hinge, lock the steering rod with two keys (1) And (2)
Later models
Note: Models whose designation begins with «J63...», belong to the second generation. The process of removing and installing the steering on these vehicles is quite laborious, since many parts must be removed to get to the steering.
29. Disconnect the battery.
30. In the cabin, remove the steering column shaft trim under the steering wheel (see illustration) and then remove the top bolt from the universal joint. Pull the bolt out carefully. Then, pull out the steering wheel so that the steering shaft comes out of the joint.
1.30 Five screws securing the lower casing of the steering column shaft
31. In the engine compartment, remove the main brake cylinder and brake booster. See Section «Brake system».
32. Remove the hinge bolt at the junction with the steering axle, press the hinge and slide towards the passenger compartment.
33. Disconnect steering drafts from levers.
34. Either drain the system or pinch the hoses between the supply reservoir and steering and disconnect the hoses from the reservoir and power steering pump. Keep a container handy to collect liquid.
35. If the car is not equipped with an anti-lock braking system (ABS), unscrew the 4 nuts securing the steering gear to the frame crossmember and pull the steering together with the rods through the left wheel arch. Otherwise, remove through the right wheel arch.
36. Install the steering gear in reverse order. Place the steering in the correct position and tighten the nut to 40 Nm. Before installing both universal joints, carry out the following work to set the steering gear rack to an intermediate position:
37. Disconnect the right steering cover and slide it to the outside.
38. Install the previously mentioned metal corner on the free surface of the rack and turn the steering gear until the corner is sandwiched between the steering housing and the hinge cover. Move the universal joint in this position. If the steering is exactly centered, the bolt will lie parallel to the rack. Tighten the nut/bolt to 25 Nm.
39. Take out a metal corner and fix a cover of the steering mechanism. In case the rack looks rather dry, apply a small amount of graphite grease to it.
40. Carry out the remaining work in reverse order. Finally, bleed the brake system and steering.