
Removal and installation of the pump
2. Disconnect the battery.
3. Remove fluid from the steering system either by disconnecting the hoses from the pump and collecting the fluid in a reservoir, or by pinching the hoses between the feed reservoir and the pump and then disconnecting the hoses from the pump. Collect the leaking liquid.
4. Loosen the fixing bolt (1) (see illustration) and pinch bolt (2). Press the pump against the engine and remove the pump drive belt.
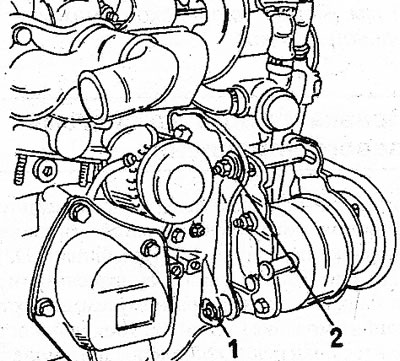
4.4 Two bolts (1) And (2) attach the power steering pump to the engine (until January 1988)
5. Completely turn out bolts (1) And (2) and remove the pump bracket. The pump pulley can be removed to provide access to the console mount. To do this, use a puller. To block the pulley when removing the shaft nut, use an old V-belt or similar in the groove of the pulley.
6. For February 1988 release models, refer to illustrations 4.6a and 4.6b. Carry out the work described above for earlier models of pumps, until the hoses are disconnected from the pump. Then remove the bolt (1) (see illustration 4.6a) from the engine compartment.
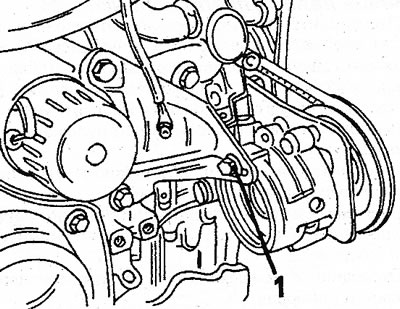
4.6a Bolt (1) mounts the pump on the back of the engine (next to the oil filter) (release models since February 1988)
4.6b Engine front with mounting bolts (1) pump (release models since February 1988)
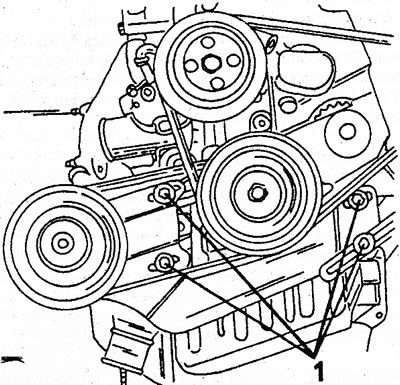
7. Install the front of the car on a lift and remove the bolts (1) (see illustration 4.6b) from the bottom surface. The drive belt will then be released and can be removed. Remove the pump together with the bracket. If the pump needs to be replaced, replace the pulley as well. Use a puller to detach the pulley.
8. The process of removing the pump from a 4-cylinder engine of a second generation car is the same as removing the pump from an early model until the hoses are disconnected, and then remove all connections from the pump.
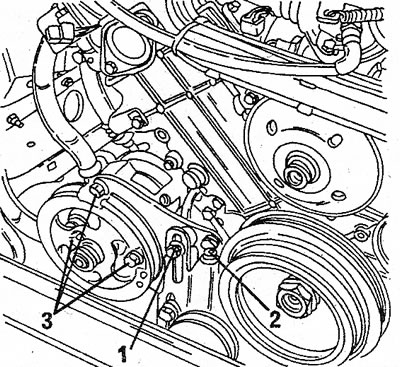
9. See illustration 9.7 in Section 3 for an installed pump with generator. To remove, first loosen the alternator belt tensioner at the point (1) and remove the lower generator mount. Loosen the power steering pump belt tensioners at the point (2). Then remove the bolt (3) and both bolts to the left of the pulley, as well as the rear bolt and remove the belt. After removing the mounting bolts, the pump can be removed. When replacing a pump, replace its pulley as well.
10. Illustration 4.10 shows the pump on a V6 engine. After disconnecting the hoses in the manner described, unscrew both screws (1) And (2) and remove the drive belt. Then unscrew the three screws (3) and rear mounting bolt and remove the pump. If air conditioning is installed, remove the compressor belt in advance.
4.10 The power steering pump on the V6 engine is bolted (1), (2) And (3)
11. Install in the reverse order.
Pump drive belt tension
12. In case the pump is mounted as shown in illustration 4.4 (until January 1988), loosen the bolts (1) And (2) and press the pump outward until the belt at the bottom on a cold engine deflects 3.5 mm. If the engine is warm, the deviation may be 4.5 - 5.0 mm. Tighten both bolts in this pump position.
13. On vehicles starting from February 1988, adjust in accordance with illustrations 4.6a and 4.6b. Place the front of the vehicle on a lift to gain access to the lower mounting surface. First make sure the bolt (1) (see illustration 4.6a) weakened. Then loosen the five bolts (1) (see illustration 4.6b) and use the lever to move the pump to the side on the slots. In this position of the pump, tighten the bolts. The belt is considered to be properly tensioned if it flexes 4.5 - 5.0 mm after the engine has been running for at least 10 minutes. Don't forget to tighten the bolts (1) (see illustration 4.6a). After all bolts are tightened, check belt tension.
14. When tensioning the belt on a car of the second generation with a 4-cylinder engine, refer to illustrations 9.2 and 9.7 from section 3. Loosen both bolts (3) And (4) (see illustration 9.7), as well as the next bolt directly under the generator, and adjust the tension by installing the bolt (2). When cold, the belt should flex 3.5 - 4.0 mm. Tighten all mounting bolts. After the engine has been running for at least 10 minutes, check the belt tension. The deflection can now be 4.0 - 4.5 mm.
15. To tighten the belt on V6 models, loosen the bolt (1) and adjust belt tension (see illustration 4.10). Bolt installation (2) can change tension. The amount of belt deflection corresponds to the values for a 4-cylinder engine.