
English Русский
Български
Беларускі
Український
Српски
Hrvatski
Română
Polski
Slovenský
Magyar
Bookmark Contacts Articles Sitemap
Company vehicles Peugeot Company vehicles Opel Company vehicles Skoda Company vehicles Land Rover Company vehicles Mitsubishi Company vehicles Volkswagen Company vehicles Honda
RenaultBook.ru


Duster   Fluence   Kangoo   Laguna   Logan   Megane   Sandero   Scenic   Symbol   Clio   Other
Renault 19 (1988-1996) Espace I and II (1984-1996) Espace III (1996-2002)

Checking the V-belt tension (Renault 19)

  • Main
  • Renault
  • Renault 19 (1988-1996)
  • Electrical equipment
  • Power devices
  • Checking the V-belt tension
0
The V-belt rotates the coolant pump in addition to the generator on engines of the "C" and "F" type. Therefore, special attention should be paid to the control of the V-belt tension. If the belt slips, this can be determined by the belt whistle, and if you add gas at idle, this negatively affects the engine cooling.

In a car repair shop, the tension of the V-belt is checked on a cold engine using a special tool (El. 346-04). In this case, the pressure of the tool pusher on the V-belt between the V-belt drive pulleys is 30 Nm and the belt deflection is measured. Without a tool, you can measure the belt deflection with a ruler by pressing on it with your finger.

EngineMeasurement locationMeasuring instrumentBy pressing a finger
1.4 liter (C3J)On top between the generator and coolant pump pulleys4 mm4-6 mm
1.7/1.8 liter and diesel (F3N/F3P/F8Q) without servo driveOn top between the generator and coolant pump pulleys4-5 mm4-6 mm
1.7/1.8 liter and diesel (F3N/F3P/F8Q) with servo driveOn top between the generator and coolant pump pulleys4-5 mm4-6 mm
16-valve engine (F7P)On top between the generator and coolant pump pulleys3-5 mm3-6 mm

1. On this type of engine, at the longest section, between the two V-belt pulleys, press on the V-belt with your finger.

2. If your Renault 19 is equipped with a power steering gear and/or air conditioning, then instead of a regular belt, it is equipped with a ribbed V-belt, which is held by a tension roller at the required tension.

3. When tensioned correctly, the belt should deflect a maximum of 6 mm, see table above.


4. Also, if the V-belt is correctly tensioned, you should check whether the generator tension bolt and the nut on the pivot support and, accordingly, the tension roller are tightened well.

V-belt tension


It is much easier to check the tension (arrow) and condition of the ribbed V-belt on some engine types (in the picture, an "F" engine with a power steering gear) after removing the right wheel arch cover.

To do this, of course, you need to remove the wheel.
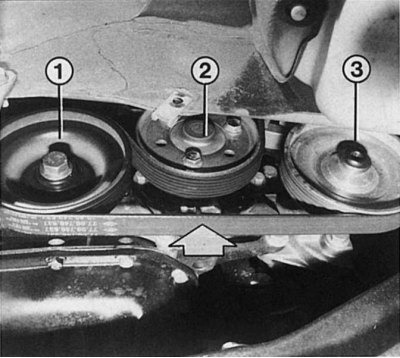
1 - crankshaft pulley;

1 - crankshaft pulley;
2 - coolant pump pulley;
3 - servo pump pulley.
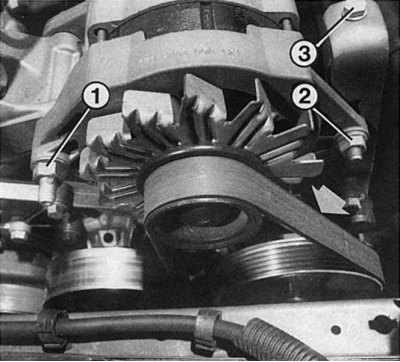

Damage to the V-belt or ribbed V-belt (here in a 1.7-liter engine with power steering) sharply…


Damage to the V-belt or ribbed V-belt (here in a 1.7-liter engine with power steering) sharply reduce its service life. Therefore, when disassembling, work without using tools if possible. After loosening the nut of the pivot support "1" and the adjusting bolt "2", swing the tensioner "3" and pull the belt onto the pulleys by hand. You can temporarily check the tension of the V-belt with your finger (shown by arrow), see table above.


1. Engine type "C": loosen the mounting bolt in the groove of the adjustment bracket.

2. Loosen the generator pivot support mounting bolts.

3. Insert a powerful screwdriver or crowbar between the generator and the engine.

4. Press the generator away from the engine while tightening the mounting bolt in the groove of the adjusting bracket.

5. Engine type "F" (standard design): loosen the tensioner and swivel support mounting bolt.

6. Loosen or tighten the V-belt tensioner bolt until the correct belt tension is achieved.

7. Tighten the pivot support bolt and tensioner mounting bolt.

8. Engine type "F" (power steering or air conditioning): loosen the tension roller center nut so that the tension roller can be moved in the adjustment groove.

9. Press the tension roller inward with a small pry bar until the required V-belt tension is achieved.

Note: Suggestion: After tensioning the V-belt, run the engine briefly and check the belt tension again; adjust tension if necessary. For accurate measurement, place a ruler from pulley to pulley.
This article is available on: russian, bulgarian, belarusian, ukrainian, serbian, croatian, romanian, polish, slovak, hungarian
Article has been reviewed by editor: Trofimova Anastasia
Share with friends:
Previous
19: Power devices
Next

Checking the voltage regulator
Voltage Regulator — Design Description
Generator — design description
Starting an engine with a discharged battery
Charging the battery
Checking the condition of the V-belt
Removal the generator
Broken V-belt
Driving with a faulty alternator
Charging indicator light
Other articles on other Renault models

➽ Checking the tension of the auxiliary drive belt Renault Logan 1 (2004-2012, petrol)
➽ Checking the tension of the auxiliary drive belt Renault Sandero 1 (2007-2012, petrol)
➽ Auxiliary Drive Belt Tension Renault Kangoo 1 (1997-2007)
➽ Auxiliary Drive Belt Tension Renault Laguna 2 (2001-2007)
➽ Checking and replacing the auxiliary drive belt Renault Megane 1 (1995-2002)
Link to this article in different formats
Reviews and comments of visitors
No comments yet


Add two numbers 41 + 20


Renault 19 (1988-1996) 
  • General information
  • Maintenance
  • Power unit
  • Engine repair
  • Exhaust system
  • Cooling system
  • Supply system
  • Single-point injection
  • Multi-point injection
  • Diesel injection system
  • Transmission
  • Clutch
  • Car gearbox
  • Chassis, running gear
  • Car suspension
  • Steering
  • Brake system
  • Wheels and tires
  • Body and interior
  • Exterior (external elements)
  • Interior (internal elements)
  • Heating and ventilation
  • Electrical equipment
  • Equipment and devices
  • Headlights and lighting
  • Ignition system
  • Power devices
  • Electrical circuits
Espace I and II (1984-1996) 
  • General information
  • Introduction to the guide
  • Troubleshooting
  • Power unit
  • Engine repair
  • Cooling system
  • Carburetor fuel system
  • Injection fuel system
  • Diesel fuel system
  • Ignition system
  • Transmission
  • Clutch
  • Car gearbox
  • Drive shafts
  • Chassis, running gear
  • Brake system
  • Steering
  • Front suspension
  • Rear suspension
  • Body and interior
  • Exterior (external elements)
  • Interior (internal elements)
  • Doors, locks and windows
  • Electrical equipment
  • Equipment and devices
  • Electrical circuits
Espace III (1996-2002) 
  • General information
  • Introduction to the manual
  • User manual
  • Power unit
  • Petrol engines F3R
  • Petrol engines Z7X
  • Diesel engines G8T
  • Diesel engines G9T
  • Transmission
  • Clutch
  • Mechanical gearbox
  • Automatic gearbox
  • Drive shafts
  • Chassis, running gear
  • Steering
  • Front suspension
  • Rear suspension
  • Brake system
  • Body and interior
  • Exterior (external elements)
  • Interior (internal elements)
  • Doors, locks and windows
  • Heating and ventilation
  • Electrical equipment
  • Equipment and instruments
  • Power devices
  • Electrical circuits
RenaultBook.ru © 2018–2026 | Mobile version | News and articles | Sitemap: EN BG BY UA RS HR RO PL SK HU | Administration | Site search | Bookmark
Duster 1 (2009-2017) | Fluence 1 (2009-2020, petrol) | Kangoo 1 (1997-2007) | Laguna 2 (2001-2007) | Logan 1 (2004-2012, petrol) | Logan 2 (2012-2020) | Megane 1 (1995-2002) | Megan 2 (2002-2009, petrol) | Sandero 1 (2007-2012, petrol) | Scenic 1 (1996-2003) | Symbol 1 (1999-2008, petrol) | Symbol 2 (2008-2013, petrol) | Renault 19 (1988-1996) | Espace I and II (1984-1996) | Espace III (1996-2002) | Clio 1 (1990-1998) |
We want your visit to be comfortable 😌 and use cookies 🍪 to do so.