English Русский
Български
Беларускі
Український
Српски
Hrvatski
Română
Polski
Slovenský
Magyar
Bookmark Contacts Articles Sitemap
Company vehicles Peugeot Company vehicles Opel Company vehicles Skoda Company vehicles Land Rover Company vehicles Mitsubishi Company vehicles Volkswagen Company vehicles Honda
RenaultBook.ru


Duster   Fluence   Kangoo   Laguna   Logan   Megane   Sandero   Scenic   Symbol   Clio   Other
Megane 1 (1995-2002) Megan 2 (2002-2009, petrol)

Removal and installation the master brake cylinder (Renault Megane 2)

  • Main
  • Megane
  • Megan 2 (2002-2009, petrol)
  • Chassis, running gear
  • Brake system
  • Removal and installation the master brake cylinder
0
Contents: Removal 🠛 Installation 🠛

Removal


Place the vehicle on a two-post lift.

Disconnect the battery.

Remove:
  • windshield wiper arms;
  • air intake niche grille;

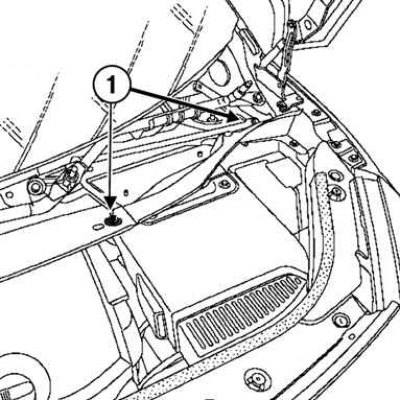
Fig. 6.9. Removing the air filter access panel fasteners: 1 – mounting bolts

Fig. 6.9. Removing the air filter access panel fasteners: 1 – mounting bolts


Unscrew the bolts securing the air filter access panel (Fig. 6.9).

Original publication on the portal: RENAULTBOOK.ru

Remove the air filter access panel.

Remove the battery and battery tray.
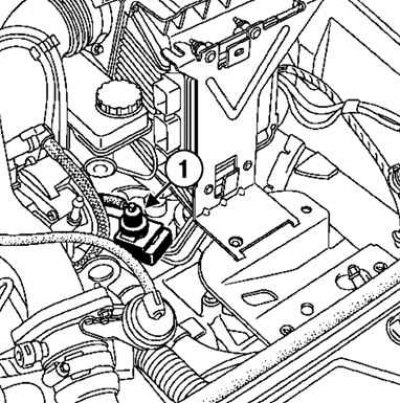
Fig. 6.10. Removing the boost pressure control solenoid valve: 1 – valve

Fig. 6.10. Removing the boost pressure control solenoid valve: 1 – valve


Remove the boost pressure control solenoid valve (Fig. 6.10).
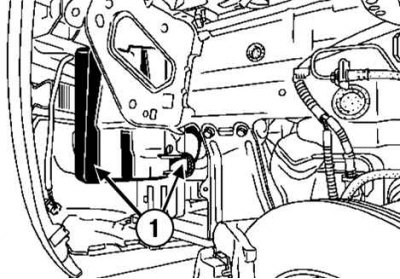
Fig. 6.11. Removing the intake noise mufflers: 1 – mufflers

Fig. 6.11. Removing the intake noise mufflers: 1 – mufflers


Remove the left front wheel, mudguard and both intake silencers (Fig. 6.11).

Remove:
  • air intake pipe;
  • air duct;
  • air duct coming from the air filter housing;
  • air filter housing;

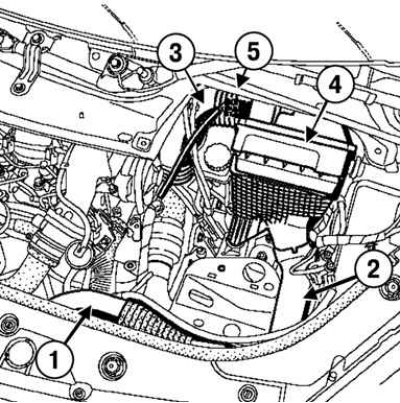
Fig. 6.12. Removing the air filter components and disconnecting the mass air flow sensor: 1 – air…

Fig. 6.12. Removing the air filter components and disconnecting the mass air flow sensor: 1 – air intake pipe; 2 – air pipe; 3 – air duct; 4 – air filter housing; 5 – Mass air flow sensor connector


Disconnect the mass air flow sensor connector (Fig. 6.12).

Disconnect the wiring harness from the brake master cylinder reservoir.

Remove the brake fluid from the master cylinder reservoir using a syringe.

Remove:
  • clutch master cylinder pipe;
  • brake lines from the master cylinder;
  • nuts securing the master cylinder to the brake booster;
  • master brake cylinder with reservoir;
  • bolt securing the reservoir to the brake master cylinder;
  • master brake cylinder reservoir (Fig. 6.13).
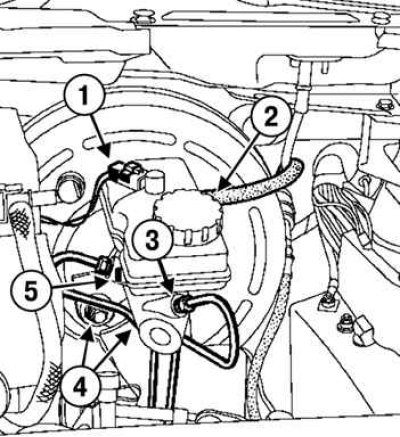
Fig. 6.13. Removing the master brake cylinder and its components: 1 – wiring block; 2 – pipeline; 3…

Fig. 6.13. Removing the master brake cylinder and its components: 1 – wiring block; 2 – pipeline; 3 – brake pipes; 4 – master cylinder mounting nuts; 5 – bolt for fastening the brake master cylinder reservoir
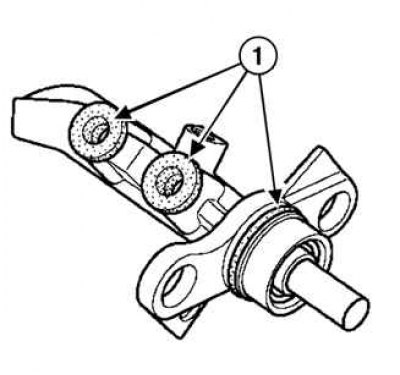


Fig. 6.14. Master cylinder seals: 1 – cuffs

Fig. 6.14. Master cylinder seals: 1 – cuffs


Installation


Replace the master cylinder seals (Fig. 6.14).

Snap the reservoir onto the master cylinder correctly.

Install the reservoir mounting bolt to the master cylinder.

Tighten the reservoir mounting bolt to the master cylinder to the specified torque of 8.5 N·m.
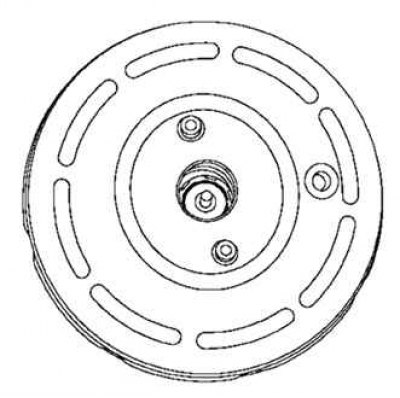
Fig. 6.15. Connection point of the master brake cylinder to the brake booster

Fig. 6.15. Connection point of the master brake cylinder to the brake booster


Align the master cylinder with the brake booster so that the booster pushrod fits into the slot in the master cylinder body (Fig. 6.15).

Caution: When installing the master cylinder, center the seal in the brake booster.


Tighten the nuts securing the master cylinder to the brake booster.

Tighten the master cylinder mounting nuts to the brake booster to the specified torque of 50 N·m.


Installation is carried out in the reverse order of removal.

Tighten the nuts securing the pipes to the brake master cylinder to the specified torque of 17 N·m.

Bleed the brake system.

Connect the battery.
This article is available on: russian, bulgarian, belarusian, ukrainian, serbian, croatian, romanian, polish, slovak, hungarian
Article has been reviewed by editor: Kupriyanov Sergey
Share with friends:
Previous
Megan 2: Brake system
Next

Bleeding the pressure control circuit
Bleeding air from the hydraulic drive of the service brake system
Frequency of brake fluid replacement
General information about the braking system
Checking, removing and installing the brake booster
Checking the brake booster check valve
Removal and installation the brake booster check valve
Removal and installation the brake pedal (with automatic transmission)
Removal and installation the brake light switch
Other articles on other Renault models

➽ Brake line between the hydraulic unit and the master cylinder Renault Duster 1 (2009-2017)
➽ Master brake cylinder Renault Fluence 1 (2009-2020, petrol)
➽ Master brake cylinder Renault Kangoo 1 (1997-2007)
➽ Removal and installation the master brake cylinder Renault Laguna 2 (2001-2007)
➽ Checking the level and adding brake fluid to the master cylinder… Renault Logan 1 (2004-2012, petrol)
Link to this article in different formats
Reviews and comments of visitors
No comments yet


Add two numbers 27 + 47


Megan 2 (2002-2009, petrol) 
  • User manual
  • Introduction to manual
  • Controls and instruments
  • Salon equipment
  • Operation and driving
  • Maintenance and care
  • Power unit
  • Engine repair
  • Fuel system
  • Injection system
  • Intake and exhaust system
  • Starting and charging system
  • Cooling system
  • Decreased toxicity
  • Transmission
  • Clutch
  • Mechanical gearbox
  • Automatic gearbox
  • Wheel drive mechanism
  • Chassis, running gear
  • Suspension and wheels
  • Steering
  • Brake system
  • Body and interior
  • Exterior (external elements)
  • Interior (internal elements)
  • Doors, locks and windows
  • Heating and air conditioning
  • Electrical equipment
  • Equipment and devices
  • Headlights and lighting
  • Electrical circuits
Megane 1 (1995-2002) 
  • General information
  • User manual
  • Maintenance
  • Power unit
  • Petrol engines 1.4/1.6 l
  • Petrol engines 2.0 l
  • Diesel engines 1.9 l
  • Overhaul of engines
  • Cooling system
  • Fuel system (petrol)
  • Fuel system (diesel)
  • Decreased toxicity
  • Charge and launch systems
  • Ignition system (petrol)
  • Preheat system (diesel)
  • Transmission
  • Clutch
  • Mechanical gearbox
  • Automatic gearbox
  • Drive shafts
  • Chassis, running gear
  • Brake system
  • Car suspension
  • Steering
  • Body and interior
  • Exterior (external elements)
  • Interior (internal elements)
  • Doors, locks and windows
  • Electrical equipment
  • Equipment and devices
  • Electrical circuits
RenaultBook.ru © 2018–2026 | Mobile version | News and articles | Sitemap: EN BG BY UA RS HR RO PL SK HU | Administration | Site search | Bookmark
Duster 1 (2009-2017) | Fluence 1 (2009-2020, petrol) | Kangoo 1 (1997-2007) | Laguna 2 (2001-2007) | Logan 1 (2004-2012, petrol) | Logan 2 (2012-2020) | Megane 1 (1995-2002) | Megan 2 (2002-2009, petrol) | Sandero 1 (2007-2012, petrol) | Scenic 1 (1996-2003) | Symbol 1 (1999-2008, petrol) | Symbol 2 (2008-2013, petrol) | Renault 19 (1988-1996) | Espace I and II (1984-1996) | Espace III (1996-2002) | Clio 1 (1990-1998) |
We want your visit to be comfortable 😌 and use cookies 🍪 to do so.