



Removal the clutch hydraulic line
1. Place the vehicle on a two-post lift.
2. Loosen the mounting bolts and remove the engine protective pan.
3. Remove the engine air filter unit.
4. Disconnect the level sensor connector from the brake fluid reservoir.
5. Remove the brake fluid reservoir cap.
6. Using a syringe, remove the brake fluid from the reservoir until its level is below the outlet to the clutch master cylinder.
7. Remove the cap from the air bleed nipple (2).
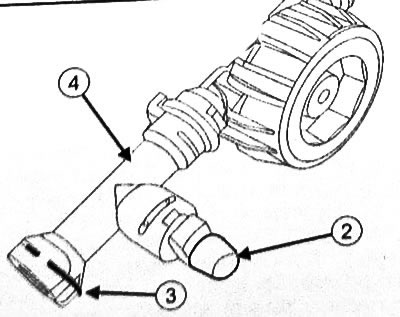
8. Place a rag under the clutch release cylinder.
9. Press the lock (3).
Caution: Do not remove the retainer. In case of any improper handling of the retainer, the pipe must be replaced.
10. Pull the clutch hydraulic line (4) out one notch to release the air bleed nipple.
Note: This will cause some brake fluid to leak out.
11. Connect a transparent hose to the air bleed nipple and place an empty container under the nipple.
12. While pressing the clutch pedal by hand, drain the brake fluid from the master cylinder and clutch line.
13. Press the locking device (3) of the clutch release cylinder.
14. Disconnect the pipe (4) from the release cylinder and plug all openings.
15. Remove the retainer (4) from the connection of the pipeline to the clutch master cylinder.
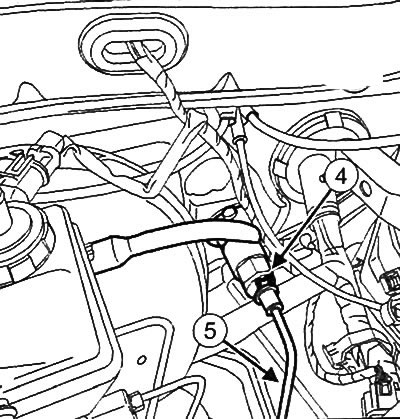
16. Place a rag under the clutch master cylinder.
17. Disconnect the pipe (5) from the clutch master cylinder in the engine compartment.
You can find the original at this link (renaultbook.ru)
18. Seal all openings.
19. Disconnect the clutch hydraulic drive line.
20. Remove the clutch hydraulic line between the master and release cylinders.
Installation of the clutch hydraulic line
1. Check the condition of the seals and replace them with new ones if necessary.
2. Remove the plugs from the holes.
3. Installation of the clutch hydraulic drive pipeline is carried out in the reverse order of removal.
Note:
- Fix the clutch hydraulic line until it clicks.
- Fill the brake fluid reservoir to the required level and bleed the clutch hydraulic circuit.