
English Русский
Български
Беларускі
Український
Српски
Hrvatski
Română
Polski
Slovenský
Magyar
Bookmark Contacts Articles Sitemap
Company vehicles Peugeot Company vehicles Opel Company vehicles Skoda Company vehicles Land Rover Company vehicles Mitsubishi Company vehicles Volkswagen Company vehicles Honda
RenaultBook.ru


Duster   Fluence   Kangoo   Laguna   Logan   Megane   Sandero   Scenic   Symbol   Clio   Other
Logan 1 (2004-2012, petrol) Logan 2 (2012-2020)

Clutch pedal (Renault Logan 2)

  • Main
  • Logan
  • Logan 2 (2012-2020)
  • Transmission
  • Clutch
  • Clutch pedal
0
Contents: Versions with cable release drive 🠛 Versions with hydraulic clutch…🠛
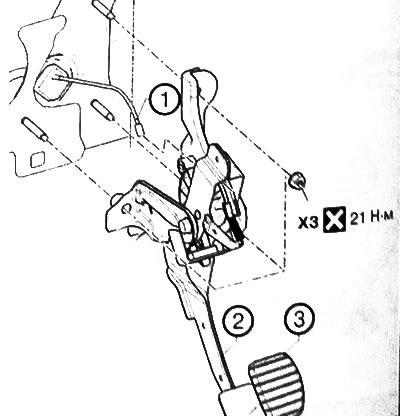
Versions with cable release drive


1. Clutch cable 2. Clutch pedal 3. Clutch pedal pad

1. Clutch cable 2. Clutch pedal 3. Clutch pedal pad


Removal the clutch pedal


Remove the clutch cable from the thrust sleeve (1) to relieve the tension on the cable.
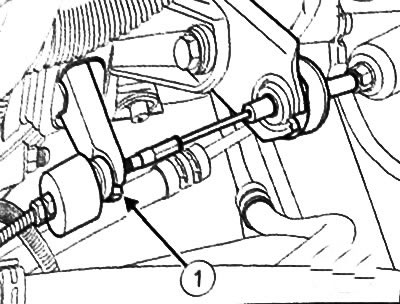
Remove the clutch cable from the thrust sleeve (1) to relieve the tension on the cable.


2. Remove the lower element of the instrument panel to absorb the impact (if equipped).

3. Remove the clutch cable from the pedal housing by lifting the pedal and placing the cable perpendicular to the pedal.

4. Remove the clutch pedal

Installing the clutch pedal


Installation is performed in the reverse order of removal.

Note:
  • Insert the drive cable into place in the groove of the pedal.
  • Make sure the cable is securely seated in the pedal groove.
  • Check the clearance of the clutch cable on the gearbox side


Versions with hydraulic clutch release


Text provided by an online resource [www.Renaultbook.ru]

Removal the clutch pedal


1. Remove the lower element of the instrument panel to absorb the shock (if equipped).

2. Disconnect the clutch master cylinder ball joint from the pedal

3. Disconnect the clutch pedal position sensor connector.

4. Remove the clutch pedal sensor by turning it a quarter turn counterclockwise.

5. Tighten the mounting nuts and remove the clutch pedal.

Installing the clutch pedal


Installation is carried out in the reverse order of removal.

After installation, adjust the clutch pedal sensor.

Adjusting the clutch pedal sensor


Note: Do not remove or install the clutch pedal switch unless the pedal is connected to the clutch master cylinder.


Press the sensor against the bracket, keeping it perpendicular to the hole

Secure the clutch pedal sensor by turning it a quarter turn clockwise.

Note: No additional adjustments are required for the clutch pedal sensor.
This article is available on: russian, bulgarian, belarusian, ukrainian, serbian, croatian, romanian, polish, slovak, hungarian
Article has been reviewed by editor: Petrovsky Roman
Share with friends:
Previous
Logan 2: Clutch
Next

Precautions during repair
Car Clutch — General Information
Cable clutch drive
Hydraulic clutch drive
Clutch master cylinder
Clutch hydraulic line
Clutch discs
Other articles on other Renault models

➽ Clutch pedal — removal and installation Renault Duster 1 (2009-2017)
➽ Clutch pedal and clutch pedal travel sensors Renault Fluence 1 (2009-2020, petrol)
➽ Adjusting the free travel of the clutch pedal Renault Laguna 2 (2001-2007)
➽ Checking the stroke, removing and installing the clutch pedal Renault Megane 1 (1995-2002)
➽ Removal and installation the clutch pedal and adjusting the… Renault Symbol 1 (1999-2008, petrol)
Link to this article in different formats
Reviews and comments of visitors
No comments yet


Add two numbers 45 + 18


Logan 2 (2012-2020) 
  • General information
  • Faults en route
  • Daily checks
  • Governing bodies
  • Maintenance
  • Power unit
  • Petrol engines 1.2 l
  • Petrol engines 1.6 l
  • Diesel engines 1.5 l
  • Cooling system
  • Lubrication system
  • Power and control system
  • Intake and exhaust system
  • Engine electrical equipment
  • Transmission
  • Clutch
  • Car gearbox
  • Drive shafts
  • Chassis, running gear
  • Suspension and wheels
  • Brake system
  • Steering
  • Body and interior
  • Exterior (external elements)
  • Interior (internal elements)
  • Safety system
  • Heating and air conditioning
  • Electrical equipment
  • Equipment and devices
  • Wiring diagrams (sedan)
  • Wiring diagrams (wagon)
Logan 1 (2004-2012, petrol) 
  • General information
  • Vehicle device
  • User manual
  • Faults en route
  • Daily maintenance
  • First maintenance
  • Second maintenance
  • Driver tips
  • Power unit
  • Engine repair
  • Lubrication system
  • Cooling system
  • Power and exhaust system
  • Transmission
  • Clutch
  • Car gearbox
  • Drive shafts
  • Chassis, running gear
  • Front suspension
  • Rear suspension
  • Steering
  • Brake system
  • Wheels and tires
  • Body and interior
  • Exterior (external elements)
  • Interior (internal elements)
  • Doors, locks and windows
  • Body Care
  • Electrical equipment
  • Equipment and devices
  • Headlights and lighting
  • Power devices
  • Electrical circuits
RenaultBook.ru © 2018–2026 | Mobile version | News and articles | Sitemap: EN BG BY UA RS HR RO PL SK HU | Administration | Site search | Bookmark
Duster 1 (2009-2017) | Fluence 1 (2009-2020, petrol) | Kangoo 1 (1997-2007) | Laguna 2 (2001-2007) | Logan 1 (2004-2012, petrol) | Logan 2 (2012-2020) | Megane 1 (1995-2002) | Megan 2 (2002-2009, petrol) | Sandero 1 (2007-2012, petrol) | Scenic 1 (1996-2003) | Symbol 1 (1999-2008, petrol) | Symbol 2 (2008-2013, petrol) | Renault 19 (1988-1996) | Espace I and II (1984-1996) | Espace III (1996-2002) | Clio 1 (1990-1998) |
We want your visit to be comfortable 😌 and use cookies 🍪 to do so.