
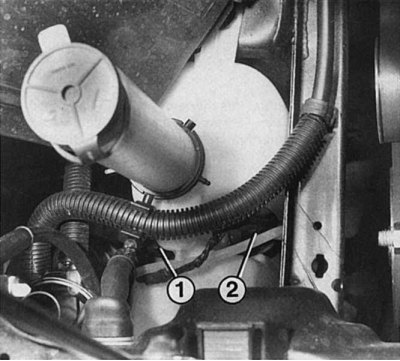
1 - pump with a hose to the rear window; 2 - pump with a hose to the windshield.
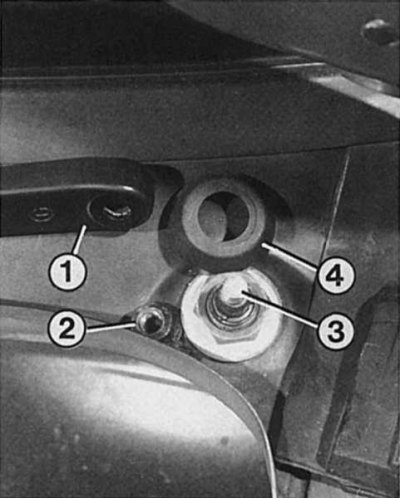
Left: To remove the wiper arm (1) unscrew the fastening nut (2) from the axis of the wiper arm (3). To get to the axle mount, remove the cap (4). After winter salt, lubricate the wiper arm pivot with corrosion-resistant oil.
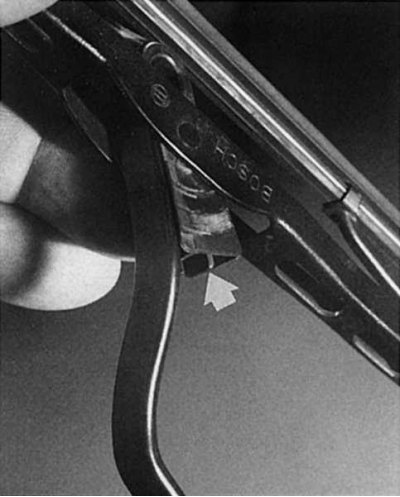
Right: To change the wiper blade, press the tab (arrow) wiper blade pivot.
 |  |
Constant control
- Turn on the ignition.
- Do the wipers operate at both speeds and do they reset when switched off?
- Does intermittent wiper operation work?
- Does the single-click windshield wiper work?
- Is water splashing from the washer nozzles?
- Does the windshield wiper and washer on the rear window work?
Removing the wiper arm
1. Pry with a flathead screwdriver and remove the wiper arm cap.
2. Loosen the nut.
3. Remove the wiper arm from the shaft.
4. If this is not possible, place a large rag on either side of the wiper shaft to protect the hood and air grille.
5. With a screwdriver inserted on the right and left, lift and remove the wiper blade arm.
6. Set the wiper arms so that they are parallel to the lower windshield seal.
7. Check up, whether they work, whether at the operating screen wiper the left brush on consolidation of a windshield does not come across.
Note. Recommendation: if it is necessary to install the wiper blade in a different position, then loosen the wiper arm on the drive shaft, remove it, and then install it in a new position. If you move the wiper arm loosened in the mount on the shaft, you can damage the splined connection of the arm axis. If both wiper arms need to be removed, then mark where which one was installed, as the arms have different lengths and different cap shapes.
Removing the wiper blade
1. Fold out the wiper arm.
2. Compress the wiper blade retaining spring until its lug comes out of the lever hole.
3. Press the wiper blade down and remove it from the lever.
4. When installing the wiper blade, make sure that it is well fixed on the lever.
Replacing the rubber in the wiper blades
Rubber wiper blades last at most six months. It is cheaper than buying new brushes to replace the rubber on old brushes, for which:
1. Remove the wiper blade.
2. The wiper rubber has recesses on one side in order to hang the clip of the brush arm. Use a fingernail or a small screwdriver to press the corresponding bumps in the rubber so that the clips can be released.
3. Remove the wiper rubber with side metal spring strips.
4. Install a new wiper rubber in the lower clips of the brush arm.
5. Slide the spring bands on the right and left and insert the retaining tabs of the bands into the grooves on the rubber.
6. Push in the bulges of the rubber again to secure with clips.
Note. Recommendation: Good glass cleaning is especially important on the driver's side. Advice for economical: install the wiper blade from the driver's side to the front passenger side, install the wiper blade with new rubber on the driver's side.
Trouble-shooting
Malfunction | Cause | Debugg |
| A. Water and dirt are evenly distributed over the glass. | 1. The glass is contaminated with lacquer cleaner, oily residue or insect residue. 2. The rubber bands of the brushes are worn out. 3. The brush holder does not press it firmly against the glass. | Apply glass cleaner «Sidol», let it dry and then wipe it with a clean cloth. Replace. Bend the end of the brush holder. |
| B. On the glass there are untouched smudges of water. | See A2. | |
| C. Traces of small drops remain on the surface to be cleaned. | The angle of the rubber bands of the brushes is too sharp. | Replace brushes. |
| D. A water film remains on the cleaned glass surface. | Uneven pressure distribution due to a bent or defective wiper blade pressure spring. | Replace brush. |
| E. On the cleaned glass surface, some areas remain intact. | 1. The contact pressure of the brush holder is too low. 2. Worn wiper drive. 3. The brush holder is loose on its axis. 4. The brush holder is bent. 5. The brush itself is bent. | Check down pressure. Lightly lubricate the spring, replace the holder if necessary. Check and replace defective parts. Tighten. Fold back. Replace. |
| F. Water remains on the glass surface to be cleaned at the top edge. | 1. See E 1. 2. See D. | |
| G. The brushes make noise while working. | 1. Too much clearance between brush or plastic fitting and brush holder. 2. The brush holder is twisted. | Replace brush, plastic connector or holder. Carefully rotate the holder to the correct position. |