



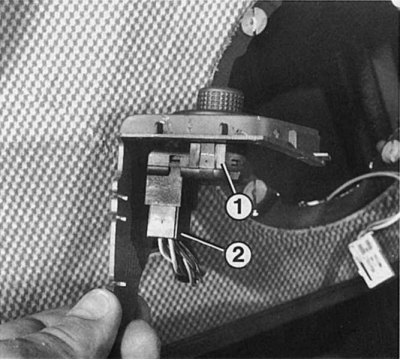
The switch (1) for electrically adjusting the mirrors can only be checked for proper operation after removing the door receiving pocket. After disconnecting the connector (2), perform the check.
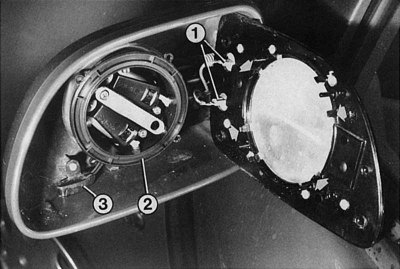
When installing the mirror glass, make sure that the guide bolts for fastening the mirror glass are correctly inserted into the corresponding grooves of the adjusting ring (2); the glass is also secured with spring clips located in a circle (shown by arrows). If it is necessary to replace the mirror glass, connect the contact connections (1) correctly. The number "3" indicates the outside air temperature indicator sensor.
Renault 19 drivers appreciate this device, especially on the right side. In addition, the mirror surface is heated when the rear window heating is on. If the mirrors are not adjustable:
1. Check the appropriate fuse, see. Electrical wires and fuses.
2. Then use a screwdriver to remove the switch from the door.
3. If the switch is OK, check the mirror adjustment motors.
4. Disconnect the connectors from the mirror and connect the auxiliary brown wire (horizontal adjustment) or purple wire (vertical adjustment) to the battery.
5. Does the mirror move now? If so, the wire leading to the switch is faulty (maybe in the door frame) or, accordingly, the connector has oxidized.
6. If the mirror does not move, the corresponding motor is faulty. In this case, you can adjust the mirror position manually.
7. If the mirror heating is faulty, check if voltage is coming from the rear window heating switch.
Disassembling electrically powered mirrors
(The original can be found on the website renaultbook.ru)
1. Depending on the type of mirrors, their removal occurs differently.
2. Or, by inserting a thin screwdriver into the mirror housing, carefully press the stopper from the side.
3. Or simply push the glass away from the retainer from the outer lower corner of the mirror housing.
4. Carefully remove the mirror glass and disconnect the heating wire.
5. In the mirror housing, unscrew the screws of the glass adjustment motor.
6. Disconnect the wire and remove the motor.