
 |  |
After each disconnecting the wires from the battery terminals or removing the radio, during subsequent assembly and, accordingly, connecting the wires to the battery terminals on modern radios, you will need to enter the so-called «Keycode» (key code), to turn on the radio. After the radio is pulled out, you will see the following connectors, which differ depending on the type of radio installed:
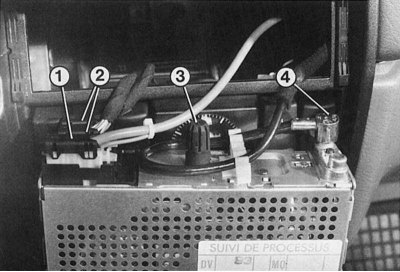
1 - antenna input; 2 - power and speaker connectors; 3 - mounting guide (on the inserted radio, it must be located exactly in the mounting hole); 4 - remote control connector on the steering wheel.
Further, we will focus exclusively on serial radio (in the future - tape recorder) for Renault.
If you want to install another radio yourself, then you should choose it with such a mount that it fits your car and, if possible, with a steering wheel remote control, otherwise you may have problems installing it. Also, this radio should be accompanied by simple and understandable instructions for its installation.
Products from other manufacturers also include detailed installation instructions for the electrical part, so descriptions can be omitted.
If you have an encoded radio (Keycode), then take care of the code number.
1. Disconnect the wires from the battery.
2. New generation radios can be removed without damage if the locking tongues are pressed out with the U-shaped wire corner, while the inserted corners are pressed outward.
3. Carefully, without tilting, pull the radio out of the socket, being careful not to damage it.
4. Disconnect the antenna cable, electrical connectors, speaker wires, and ground.
Removing the speakers
Depending on the equipment, the speakers can be installed on the inner lining of the front doors, on both sides in the instrument panel, in systems with four speakers, additionally on the edges of the hand luggage shelf behind the rear seat.
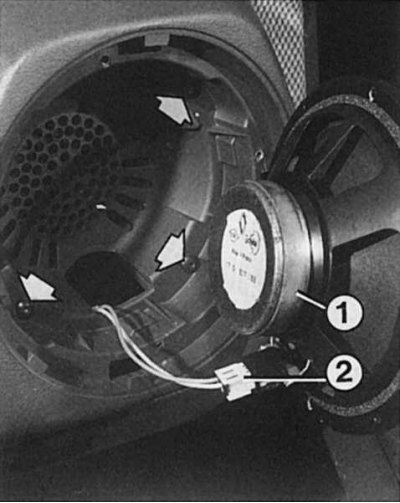
1. Door speaker: press the round speaker housing with the palm of your hand and at the same time turn the speaker housing counterclockwise until it stops.
2. Remove the cover.
3. Remove 4 screws and carefully remove the speaker.
4. Disconnect the speaker.
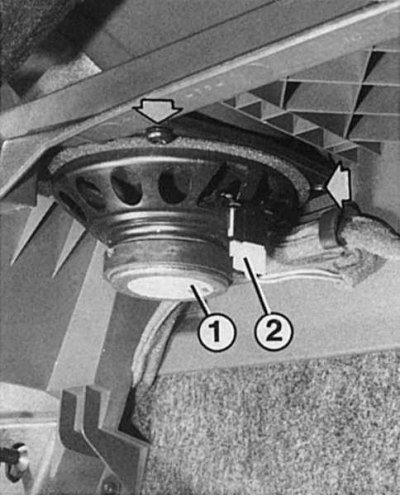
5. Speaker in carry-on bin behind rear seat: Disconnect speaker connector.
6. Remove 4 screws and remove the speaker.
7. Speaker on the instrument panel: carefully pry the instrument panel from the front edge with a thin screwdriver, placing a rag (not to scratch!).
8. Remove the cover.
9. Remove the screws securing the speaker.
10. Remove the speaker from the instrument panel.
11. Disconnect the connector pin.
12. Before installing the shroud and panel, test the speaker for proper operation.
Removing the antenna
1. Use a thin screwdriver to remove the interior light from the socket in the ceiling.
2. Release the antenna mount that is visible in the socket.
3. Carefully remove the antenna leg, along with the seal, from the roof.
4. If the antenna cable is broken, release it from the clips and pull it out through the hole in the roof.
5. When installing the antenna, clean the area around the roof opening. Pay attention to the correct position of the antenna leg seal. Before tightening the nut, make sure that the insulating sleeve is correctly positioned in the roof.
6. Before installing the interior light, check the operation of the antenna.