



Contents: Constant control 🠛 Removal the windshield washer…🠛 Adjusting the windshield washer spray 🠛 Troubleshooting 🠛
Constant control
Exhaust gas residues, oil vapors and silicone from car paint care products are constantly deposited on the glass. During the warm season, it is recommended to add a cleaning additive to the windshield washer water; in winter, fill up with antifreeze for washing windows.
1. First add the additive and only then the water, so that the liquids are well mixed in the windshield washer reservoir.
2. In severe frost, the windshield washer nozzles may, however, freeze.
3. To avoid freezing, it is necessary to increase the concentration of the antifreeze additive. The addition of denatured alcohol leads to the formation of a sediment in the form of flakes and subsequent blockage in the windshield washer sprayers.
Note. Recommendation: since on the Renault 19 the windshield washer reservoir is also responsible for supplying water to the rear window, you should turn on the rear window washer several times before severe frost after adding antifreeze additive. This will prevent the long supply line to the rear window from freezing.
Removal the windshield washer sprayers
Sometimes a blockage in the spray nozzle cannot be cleared, despite using a thin wire or needle. In this case, the nozzle must be replaced or removed and blown out with compressed air. To prevent blockage of the nozzles, it is recommended to buy a standard fuel filter and install it on the windshield washer hose.
1. Front: open the engine hood. At the rear edge of the hood, carefully lift the plug near the spray nozzle from the hood socket with a screwdriver.
2. Use your finger to push the nozzle out of its socket in the hood.
3. Disconnect the hose and remove the sprayer.
4. To replace the hose system, it is necessary to remove other plugs from the engine hood.
5. Remove the distributor with the jet hoses. To facilitate reassembly, if necessary, tie a cord to the hose to be removed in advance, with which you can pull in a new hose.
6. Behind: carefully pry up the trim in the upper opening of the trunk door.
7. Carefully pull back the tailgate trim and press the windshield washer nozzle out of its socket with your fingers.
8. Turn the sprayer from the outside and remove it together with the hose from the socket.
9. Remove the hose from the sprayer.
10. If the spray hose has fallen into the socket before installation, then thread the cord through this hole, tie it to the hose and pull it out of the spray socket.
Source is located on the website RenaultBook
11. When installing the sprayer, pay attention to the correct position of the sealing gasket.
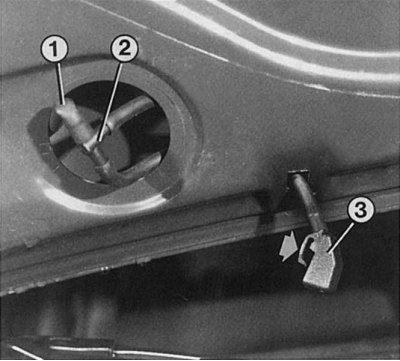
With the plugs removed from the inside of the engine hood, you can check the condition of the spray hoses (3). If the windshield washer sprayers are constantly clogged with dirt, you can install a small fuel filter in front of the fluid distributor (2) (from a lawn mower or motorcycle) in the intake hose (1). When squeezing the sprayer out of its seat, make sure that the small plastic clamp is not broken off, otherwise the sprayer can no longer be installed on the hood. If a new sprayer is not available, you can stick the damaged old one onto the closed mount in the bottom of the hood and fix it in the optimal position after fine-tuning.
Adjusting the windshield washer spray
1. Insert a thin needle into the spray nozzle and turn the spherical spray in the desired direction.
2. How the windshield and rear window washer fluid jet should be adjusted is shown in the figure below.
Troubleshooting
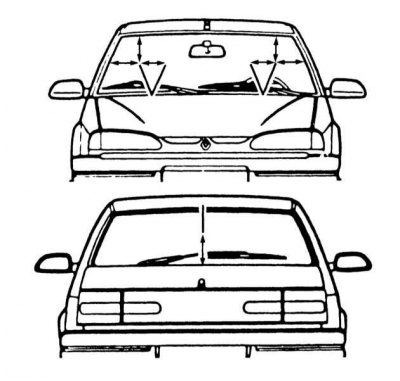
Windshield: individual jets of water from twin nozzles - the distance is measured from the top edge of the windshield and should be about 30 cm. From the side, the outer jets should hit the glass at a distance of 25 cm from the side edge of the glass, and the inner ones at 50 cm.
Rear window: The spray jet should hit the window at a distance of approximately 25 cm from the top edge of the window.
malfunction | Cause | Troubleshooting |
| A. Water does not splash when the switch is turned on. | 1. The windshield washer reservoir is empty. 2. In winter: the windshield washer water has frozen. 3. The spray nozzle is clogged. 4. The windshield washer pump is faulty. 5. The windshield wiper switch is faulty. | Fill it up. Increase the concentration of antifreeze additive. Remove the sprayer and blow it out with air or clean it with a thin wire. It may also be necessary to clean the hose. With the ignition on and the switch pressed, check if there is electrical current, replace if necessary. Check the switch. |
| B. The stream of water hits only from one side. | See A 3. | |
| C. The water jet sprays too high or too low. | The sprayers are not adjusted correctly. | Adjust with a fine needle. |