



Contents: Removal the engine and windshield…🠛 Removal the wiper linkage and lever…🠛 Removal the windshield wiper motor 🠛 Windscreen wiper operation at…🠛 Troubleshooting 🠛
On the removed windshield wiper motor (1) you can see on the back side of the crank drive (2) the colors of the wire of the contacts (3). In the diagram on the bottom right are marked:
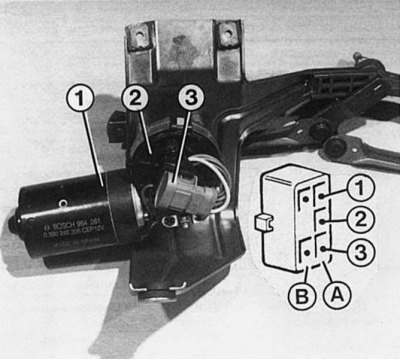
1A - "+" - electric current for the final position of the windshield wiper; 1B - mass; 2A - high speed windshield wiper; 3A - Low windshield wiper speed; 3B - final position of the windshield wiper.
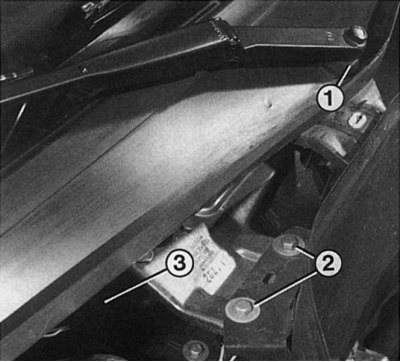
After removing the fairing grille, you can get to the bolts that secure all the rods and levers of the windshield wiper drive with the motor in the holder. The motor is secured with three screws "2" and a more hidden "3". Before this, you should remove both axles of the windshield wiper arm (1). Before removing the motor drive crank, you should mark its original position. In the original position, the crank is located at an angle of 90° relative to the edge of the holder.
The wire terminals in the windshield wiper motor have the following meaning:
- Terminal 1 (white wire) supplies voltage for the second speed of the windshield wiper.
- Terminal 2 (black wire) associated with mass.
- Terminal 3 (red wire) stops the windshield wiper motor after switching off during the return movement in the end position, then the motor receives voltage through the sliding contact of terminal 3 (positive electric current), until the windshield wipers are in their final position.
- Terminal 4 (white cable) supplies voltage for the first speed of the windshield wiper.
- Terminal 5 (orange-green cable) supplies positive electrical current to finally switch off the windshield wiper.
Note: Recommendation: When the ignition is on, the wiper blades should not be blocked in the intermediate position, for example by snow or because they are frozen. In this case, terminal 3 will continuously supply voltage. Since the wiper motor cannot rotate with the blades jammed, it will burn out after a while. In this case, release the wiper blades so that they can reach the final position.
Removal the engine and windshield wiper linkage system
1. Set the windshield wipers to the end position.
2. Remove both wiper arms.
3. Remove the front wall seal in the engine compartment.
4. Unscrew the connecting bolt (SW 7) of both halves of the fairing casing.
5. Lift the fairing cover from the front and remove it.
6. Disconnect the battery.
7. Release the wiper blade lever axles (SW 22).
8. Unscrew the 3 mounting bolts (SW 10) of the entire windshield wiper mechanism.
9. Disconnect the connector and remove the wiper mechanism together with the motor.
Removal the wiper linkage and lever system
1. Remove the water drainage cover from the body.
2. Remove the wiper drive rods and levers from the engine crank and the wiper arm cranks. To do this, turn the locking cap a little and use a screwdriver, or better yet, a suitable key, to move it off the spherical head.
3. Before installation, check the spherical heads for wear.
4. Lubricate the joints and press them with a suitable wrench head onto the ball head of the corresponding cranks.
Removal the windshield wiper motor
[You can find the original at this link: renaultbook.ru]
1. Remove the windshield wiper mechanism together with the motor as described above.
2. Disassemble the windshield wiper drive rods and levers.
3. Unscrew the nut from the wiper motor drive shaft and remove the drive crank from the shaft cone. Mark the position of the crank in advance.
4. Unscrew the wiper motor from the mount (3 bolts).
5. When installing, pay attention to the correct position of the engine crank relative to the engine shaft.
6. Turn on the ignition and check the position of the windshield wiper blades when they are finally switched off. The windshield wiper motor crank should be set almost horizontally to the left (in the direction of movement).
7. If necessary, remove the crank from the engine and, after installing it as required, tighten it again.
Windscreen wiper operation at intervals
Renault 19 is equipped with a device that allows the windscreen wiper to operate at intervals, which interrupts the movement of the windscreen wiper for approximately 5 seconds.
The intermittent switching works as follows: the three-stage lever switch has an additional terminal A6, which gives electric current to the corresponding terminal of the intermittent switching relay in the fuse box (beige wire). When the "interval" signal is received, the windshield wiper motor receives a current pulse from the intermittent switching relay via terminal 4 and from the corresponding terminal of the windshield wiper current switch, it sets it in motion.
Troubleshooting
malfunction | Cause | Troubleshooting |
| A. The windshield wiper does not work. | 1. The fuse is defective. 2. The interval relay is faulty. 3. The windshield wiper drive crank has become loose. 4. The wiring to the windshield wiper switch is faulty. 5. The wiring to the windshield wiper motor is faulty. 6. The windshield wiper motor has burned out. | Replace. Replace the relay to test. Tighten. Check the wiring. Check the wiring. Replace. |
| B. The windshield wiper does not work at first speed. | 1. Terminal 4 of the windshield wiper motor is faulty. 2. Terminals A3/A5 in the switch are faulty. | Replace the engine. |
| C. The windshield wiper does not work at second speed. | 1. The wire of terminals A2 from the windshield wiper to the motor is faulty. 2. Terminals A2/A5 in the windshield wiper switch are faulty. 3. Terminal 1 of the windshield wiper motor is faulty. | Check the wire. |
| D. The windshield wipers only work at second speed. | The wire of terminals A3 from the windshield wiper switch to the windshield wiper motor is broken. | Check the wire. |
| E. The windshield wiper does not return to its original position. | 1. The wire of terminals A5 between the windshield wiper and the windshield wiper motor is broken. 2. The windshield wiper motor is faulty. | Check the wire. Check with a test lamp: between terminal A1 and ground, the lamp should be constantly lit. Between terminal A5 and ground, the lamp should go out shortly before reaching the end position of the windshield wiper. When checking between terminal 5 (windshield wiper motor) and the battery positive terminal, the lamp should light shortly before reaching the final wiper position. If this is not the case, replace the wiper motor. |
| F. The windshield wiper does not work at intervals. | 1. The interval relay is faulty. 2. The wire of terminal A6 between the windshield wiper switch and the windshield wiper motor is broken. 3. Contact A6 in the windshield wiper switch is faulty. | Replace. |
| G. It is not possible to turn off the interval wiper operation. | 1. See E 1. 2. See F 1. 3. Contact A5 or A6 in the windshield wiper switch is not interrupted. 4. Relay is faulty. | Replace the switch. |
| N. After switching off, the windshield wiper does not remain in the final position or remains in the final position for a short time. | Poor contact in the sliding contact in the wiper motor. | Unscrew the windshield wiper motor housing, clean the contacts. Replace the windshield wiper motor if necessary. |